Color: the visible range of reflected light. Color had three properties: hue, value, and intensity.
- Analogous Colors: related colors: colors that appear next to each other on the color wheel and have one color in common, such as blue-green, blue, blue-violet.
- Warm Colors: a group of colors on the color wheel associated with warmth, such as red, yellow, and orange.
- Cool Colors: a group of colors on the color wheel associated with coolness, such as blues, greens, and violets.
Space: the area above, below, around, and within an artwork; the illusion of depth or space on a flat surface, created by means of the following technique: rendering shapes and forms so that they overlap and using size, detail, value, color, and linear perspective.
Texture: the portrayal of the quality of a surface by using drawing techniques to create textures and patters, such as stippling, hatching, cross hatching, scribbling, broken lines, and repeating lines and shapes.
Balance: the arrangement of elements that makes individual parts of a composition appear equally important.
Contrast: a technique that shows differences in the elements of visual arts in an artwork, such as smooth/rough textures, light/dark colors, or thick/thin lines.
Movement: the use of the elements of visual arts to draw a viewer’s eye from one point to another in an artwork.
Variety: the use of the elements of visual arts to create differences in an artwork for visual interest.
Overlap: to position things in such a way that the edge of one thing appears to be or is on top of and extending past the edge of another; used as a spatial device or perspective technique in perspective drawing.
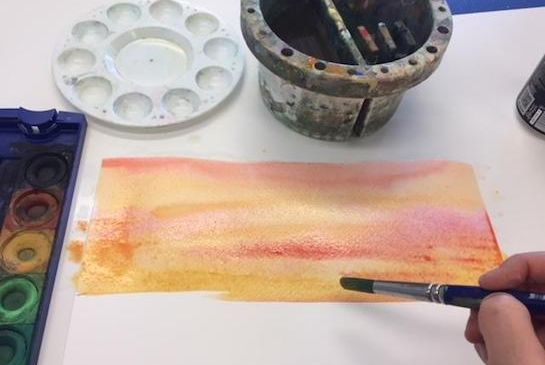
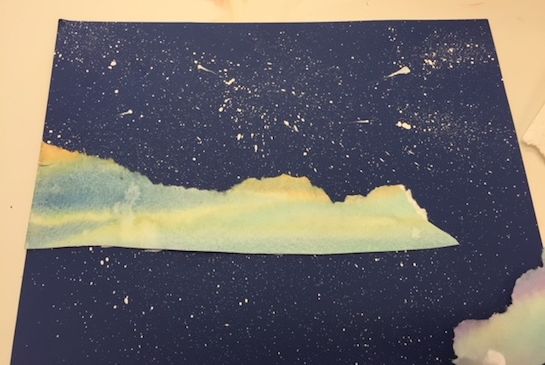
Watercolor Wash: a technique of controlling color gradations by saturating the paper surface with water first and quickly adding desired colors, letting them blend gently where they touch.
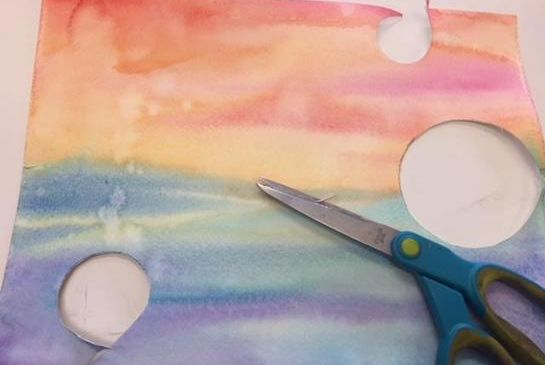
Pre-cut 3 different size circle templates for students to pass around to trace. About 10 of each size should be enough to pass around for all students.
Water down 5 small cups of white Tempera paint and place a toothbrush next to each cup at a designated area in the classroom setting down sheets of newspaper to keep areas safe from paint splatters for the students to create stars.
Place a few hair dryers in designated areas as blow-drying stations.
Begin by showing students the Color Wheel and talk about Primary and Secondary Colors. Explain what Analogous are. You can also discuss Warm and Cool Colors while pointing out examples on the Color Wheel. Note the proximity of the warm colors and cool colors, which makes them an analogous color scheme.
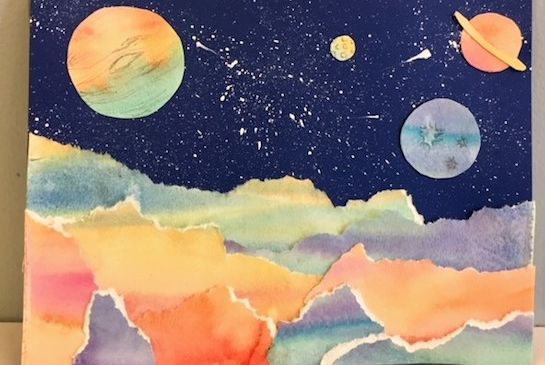
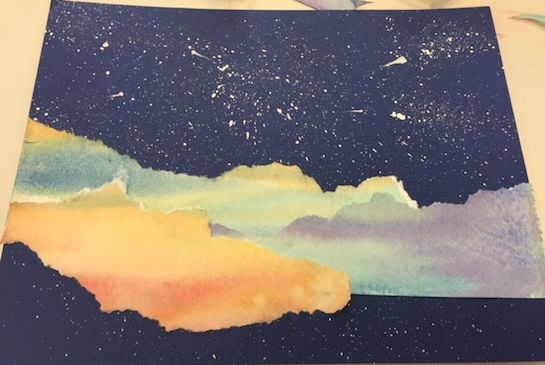
As students are arranging the overlapping layers of their planet’s ground, ask them to notice how the layering creates a sense of distance with the first layers glued down looking further away than the ones closest to them.
Explain to students how warm colors often pop out and seem closer and the cooler colors often create a sense of being further.
As students glue their planets in the sky, you can also direct them to notice that the varying sizes of the planets help them to look either closer or further away.
Students became familiar with warm and cool colors.
Observe how depth is created on a flat surface by using size, color and overlapping techniques.
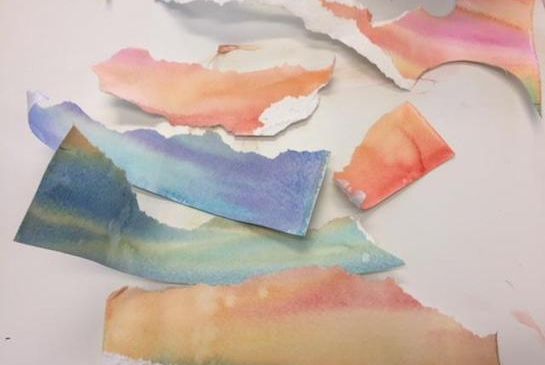
Students used watercolor paint to layer warm color's in a wash.
Students used watercolor paint to layer cool colors in a wash.
Students used the above information to make a landscape painting/collage that suggests depth.
Prior to lesson, set a sheet of newspaper or newsprint on each student’s desk and place a sheet of watercolor paper, a watercolor palette, cup of water, and a watercolor brush.
Lesson written by Cameron C. Kim. Examples of artwork courtesty of Newcastle Elementary Docent Program.
21st Century Thinking Skills
Persisting, creating, observing, visualizing, sequencing, comparing/contrasting, inferring, determining point of view, decision making, evaluating.
WA State Learning Standards
(VA:Cr1.2.3) Apply knowledge of available resources, tools, and technologies to investigate personal ideas through the artmaking process. This happens when students make their own watercolor washes and arrange their compositions.
(VA:Cr2.1.3) Organize and develop artistic ideas and work. Create personally satisfying artwork, using a variety of artistic processes and materials. Same as above.
(VA:Cr.2.2.3) Demonstrate an understanding of the safe and proficient use of materials, tools and equipment for a variety of artistic processes. This happens when students use the materials and tools according to instructions.
(VA:Cr3.1.3) Refine and complete artistic work. Elaborate visual information by adding details in an artwork to enhance emerging meaning. This happens if they make comets.
(VA:Re7.1.3) Speculate about processes an artist uses to create a work of art. This happens when using a wash for a specific purpose.
(VA:Re9.1.3) Evaluate an artwork based on given criteria. This happens when students critique work looking for evidence of learning objectives.
(VA:Cn10.1.3) Develop a work of art based on observations of surroundings. This happens when students simulate overlapping mountains as seen in nature.
Arts Integration Opportunities
Discuss with students that our Solar System is made up of the sun, planets, moons, asteroids, stars, and comets. Some planets such as Jupiter, Saturn, Uranus, Neptune, and Pluto are made up of colorful gases. Some Planets such as Mars, Earth, Venus and Mercury are rocky inner planets. Each is individual and has a unique color and terrain.
Please note: These lesson plans are intended for non-profit use only. Use of these plans for commercial purposes should give attribution to the Issaquah Schools Foundation and be accompanied by a nominal donation at www.isfdn.org/donate. Thank you.
Fueling Success for Every Student, Every School