Line: the flat path of a dot through space. Moves in either a straight or curved way.
Space: the area between and around objects.
- Negative space: the empty space surrounding a shape, figure, or form in a two- or three-dimensional artwork.
- Positive space: the actual space taken up by the line, shape, or form.
Texture: surface quality that can be either seen and/or felt.
Pattern: the repetition of the elements of visual arts in an organized way.
Emboss: a process of carving, molding, or stamping a design on a surface to allow it to standout or in relief.
Raised Relief: a surface with some areas raised.
Since 6000 BC, people have been making and using utensils, adornments, art and weapons out of metal. Very quickly, people started making them beautiful as well as useful. The 'ancient' metals were gold, silver, tin, copper, lead, iron and mercury. The most commonly used were gold and copper because of their prevalence. Please refer to Metal as an art medium reference page for more about the history of the various ways metal is used in art.
Collect samples of embossing.
Collect a sample of print making or a rubber stamp, stamped on a piece of paper.
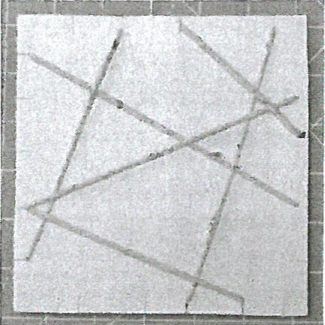
Cut cereal box cardboard into 6 x 6-inch squares - one for each student.
Cut 2 yards of yarn for each student.
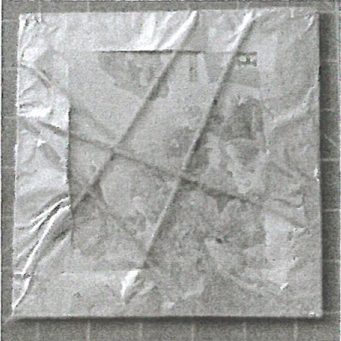
Cut foil large enough to fold double and cover the area of the board plus 2 inches on each side.
Fold foil in half and press smooth.
Sharp jerky motions or too much pressure can rip the foil. A drop of Elmer’s glue can repair it.
Many students have shoes with thick tread patterns in the soles. This is a perfect example of a surface in relief that students can easily identify with.
Explain the process of embossing as an altering of a surface by carving, molding or stamping a design so that the design (positive space) stands out against the negative space. There are many different kinds of embossing.
Embossing can be for aesthetics or functional. Most familiar examples are jewelry, paper embossment for formal invitations or business cards, embossed names on credit cards, braille, and notary seals. Embossing has been associated with quality, permanence and authenticity. It can imply importance.
Texture is the surface quality of an object: how it feels (tactile) or appears to feel (visual). Every surface has a texture. There are certain textures you enjoy touching and textures you avoid because of the way they feel. Textures may influence the clothes you choose to wear and the food you eat. Pick out textures in the room and describe them.
On scrap paper, practice repeating small lines and shapes to create visual texture, using the attached lines & patterns worksheet.
If you have time you can show the students the print Village Feast by Miguel Garcia Vivancoe and discuss all of the places you see texture in this painting.
Students will:
Observe and describe examples of embossing.
Observe and describe examples of visual & tactile textures
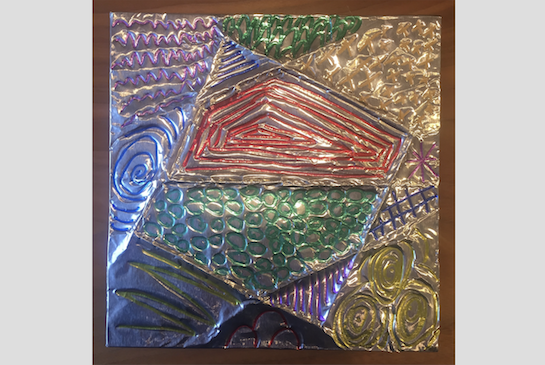
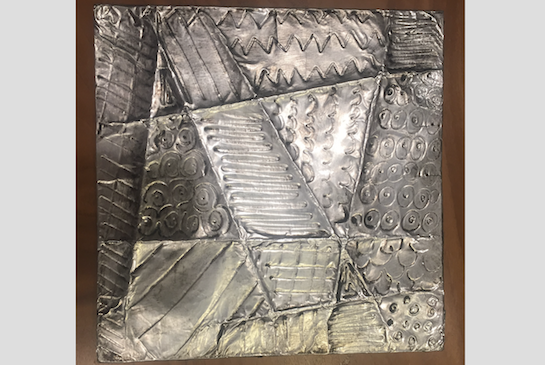
Create a work of art that employs raised relief to create tactile texture and simulate embossing.
Add details of color, pattern or texture
Lesson written by Beth Koontz.
What Is Embossing? online article.
TOSBlog. “Article Spotlight ~ Back to Basics – The Seven Art Elements – By Pat Knepley.” The Old Schoolhouse, 16 May 2014.
Village Feast Art Print by Miguel Vivancos at Art.Com.
21st Century Thinking Skills
Thinking flexibly, persisting, creating, innovating, taking responsible risks, observing, making connections, visualizing, sequencing, comparing and contrasting, problem solving, decision making, evaluating.
WA State Learning Standards
(VA:Cr1.1.3) a. Elaborate on an imaginative idea.This happens as the multi-step process unfolds in this lesson.
(VA:Cr.1.2.3) a. Apply knowledge of available resources, tools, and technologies to investigate personal ideas through the artmaking process.This happens when the student makes design choices.
(VA:Cr2.1.3) Organize and develop artistic ideas and work. Create personally satisfying artwork, using a variety of artistic processes and materials
(VA:Cr.2.2.3) a. Demonstrate an understanding of the safe and proficient use of materials, tools and equipment for a variety of artistic processes.This happens when students are introduced to working with foil, yarn, shoe polish etc., in this lesson.
(VA:Cr3.1.3) Refine and complete artistic work. Elaborate visual information by adding details in an artwork to enhance emerging meaning. This happens when multiple steps add details of texture, line and color in this lesson.
(VA:Re7.1.3) Responding – Perceive and analyze artistic work.Speculate about processes an artist uses to create a work of art . This happens when embossing is explained in this lesson.
(VA:Re.9.1.3) a.Evaluate an artwork based on given criteria.This happens when students critique their own work, looking for evidence of the learning objectives.
(VA:Cn10.1.3) a. Develop a work of art based on observations f surroundings. This happens when students apply the creative process and use a variety of media to create artworks that represent or express observations, personal experiences, feelings or ideas.
Arts Integration Opportunities
Have students write an expository piece on the process of metal embossing.
Please note: These lesson plans are intended for non-profit use only. Use of these plans for commercial purposes should give attribution to the Issaquah Schools Foundation and be accompanied by a nominal donation at www.isfdn.org/donate. Thank you.
Fueling Success for Every Student, Every School