Contrast: a principle of design; a technique that shows differences in the elements of visual arts in an artwork, such as smooth/rough textures, light/dark colors, or thick/thin lines.
Emphasis: the area of a composition which is visually dominant.
Line: an element of visual arts; the flat path of a dot through space used by artists to control the viewer’s eye movement; a long narrow mark or stroke made on or in a surface; a thin mark made by a pencil, pen, or brush. The repetition of lines (and/or shapes) is used to create texture, pattern, and gradations of value.
Space: an element of visual arts; the area above, below, around, and within an artwork; the illusion of depth or space on a flat surface, created by means of the following techniques: rendering shapes and forms so that they overlap and using size, detail, value, color, and linear perspective.
- Negative Space: the empty space surrounding a shape, figure, or form in a two- or three-dimensional artwork
- Positive Space: the actual space taken up by the line, shape, or form.
Shape: an element of visual arts; a two-dimensional (flat) area enclosed by a line.
- Geometric: shapes that are based on mathematical principles, such as a square/cube, circle/sphere, triangle/cone, or pyramid.
- Organic: irregular shapes, often curving or rounded, and more informal than geometric shapes.
Photographers use images to convey meaning. Some show beauty/brutality of nature, some document important moments in history (raising the flag on Iwo Jima), some record cultural events, some bring us images from times past (Lindbergh’s plane) or faraway places (earth seen from the moon) while others document things we can’t see with the naked eye (snowflakes). This is how photography aids society; both to educate and to express what is meaningful to the photographer.
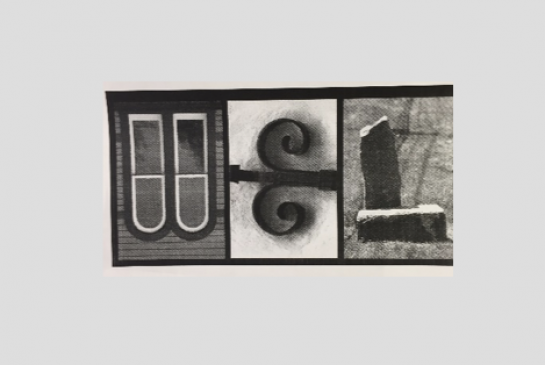
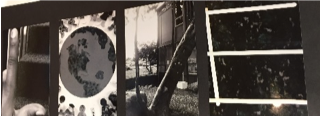
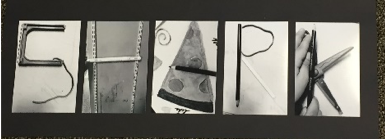
There are many important photographs you could quickly show the students to articulate making meaning with visual imagery. Include images form ‘Alphabet City’ in your presentation to students.
Stephen T. Johnson published a book on letter photography in 1995 called “Alphabet City.” He is an artist interested in the connection between words and images. Besides photography, his art work also includes collage, 3-D, and painting.
Note: Students may notcommunicate directly with the volunteer art docents via social media or email. Work out a way to get the letter images from the students to the docent, through the teacher.
Perhaps the students could manipulate their letters during computer lab time and print their own letters.
Check out the book “Alphabet Photography” by Stephen T. Johnson.
Find examples of letter photography on the internet or library. Print copies out to show the class.
Find an example of the alphabet and print out a copy of the alphabet.
Print out a list of words for the students to choose from (this will cut down on the random silly, friend impressing, inappropriate or first thing they can spell choices)
~ List of ‘inspirational’ words
~Spelling words
~Vocabulary from an upcoming play or drama event
~Poetry they are studying
Discuss the history (quickly) to give students a context where the medium of photography came from. Some points to mention are: black and white photography, film, the development process and digital photography. In the past photographers had to set up, wait for the right light and then take photos, and they couldn’t see the images until everything was developed. Now we can do all that ‘on location’.
Talk about how now we can ‘shoot’, see, crop, zoom in and edit on location, which is how we will be working.
Talk about observation skills. Show how when you look at objects in the environment you can find many different things when you look closely. You can even find letters. At first it can be hard to see, but the more you take time to observe, the more you will see.
Talk about the concept of looking closely “zooming-in” and looking far away. Sometimes you can find letters by “zooming-in” or by looking in the distance.
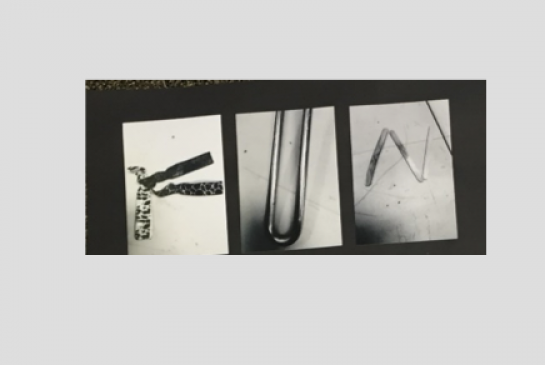
As they look for letters, encourage them to find images with a lot of contrast (very dark & very light) so that the image can be seen well.
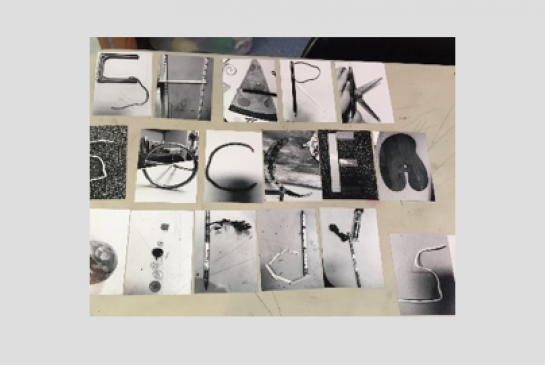
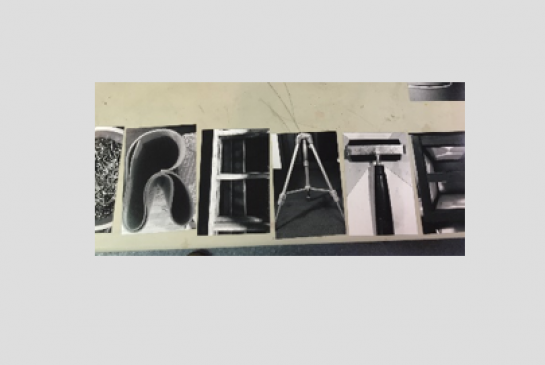
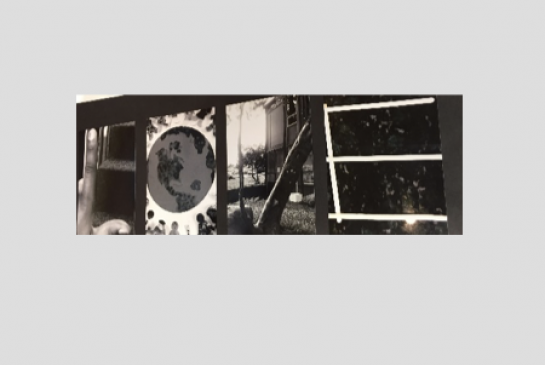
Students took pictures of each letter by finding an example in their environment.
Students used contrast to highlight each letter.
Students did not photograph pre-written letters but found lines, shapes and forms that resembled letters.
Students chose a personally meaningful word.


Alphabet Photography, ABC Photo Art, Personal Wall Art, Inspirational Wall Art, Name Art & Word Art. Alphabet pixs. Creative and unique photographs that resemble the Letters of the Alphabet -- Framed & Ready to Hang. N.p., n.d. Web. 15 May 2017.
"Letter Photography Alphabet." Google Search. Google, n.d. Web. 15 May 2017
Johnson, Stephen. Alphabet City. N.p.: Paw Prints, 2009. Print.
"Stephen Johnson." Welcome | Stephen T. Johnson Studio. N.p., n.d. Web. 23 May 2017. http://www.stephentjohnson.com.
21st Century Thinking Skills
Goal setting, observing, making connections, visualizing, sequencing, predicting, comparing/contrasting, classifying, finding evidence, problem solving, decision making, evaluating.
Habits of Mind
Thinking flexibly, persisting, questioning, creating, innovating, taking responsible risks, reflecting.
WA State 2017 Learning Standards
(VA:Cr2.3.5) a. Identify, describe, and visually document places and/or objects of personal significance.
(VA:Cr3.1.5) a. Create artist statements using art vocabulary to describe personal choices in art-making.
(VA:Pr5.1.5) a. Develop a logical argument for safe and effective use of materials and techniques for preparing and presenting artwork.
Arts Integration Opportunities
Students can look for spelling words or their names' letters to photograph.
Students can watercolor or color with colored pencils the negative space around the letters.
Students can view more historical or scientific photographs relating to other curricula being studied.
Students can use their word as a prompt for a story or poem.
Students can work with the computer lab to edit and print their own letters for mounting.
Please note: These lesson plans are intended for non-profit use only. Use of these plans for commercial purposes should give attribution to the Issaquah Schools Foundation and be accompanied by a nominal donation at www.isfdn.org/donate. Thank you.
Fueling Success for Every Student, Every School