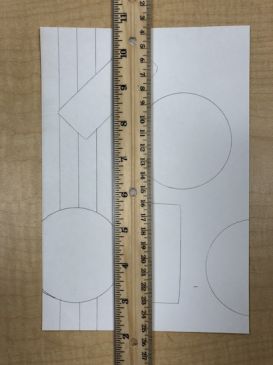
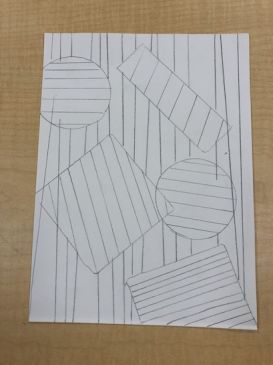
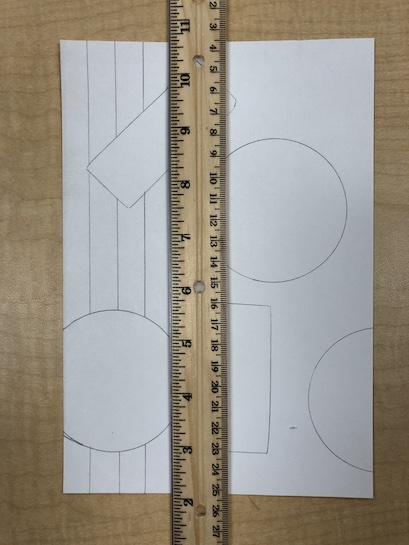
loading Skip to Main Content

Op Art 3-D Illusion Inspired by Vasarely

Inspired by Victor Vasarely, students will use shapes and lines to create an illusion of a 3-dimensional drawing in the Op Art style. Recommended for 1st Graders.

Elements of Art

Linea mark between two points.  Lines can be thin, thick, dotted, dashed or have other qualities. In this lesson straight lines (vertical, horizontal and diagonal) are used.
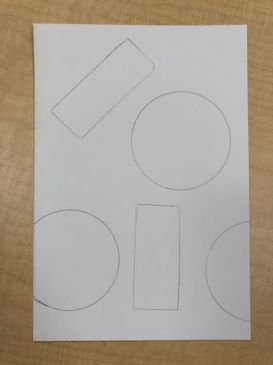
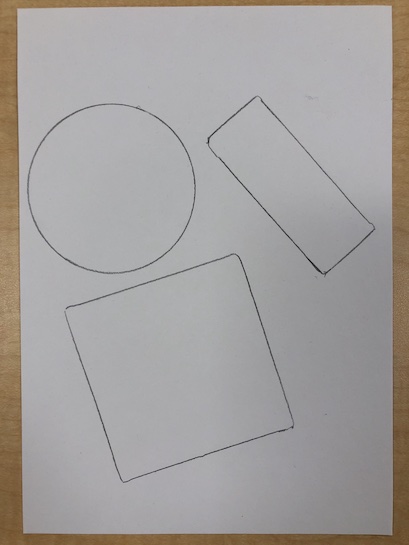
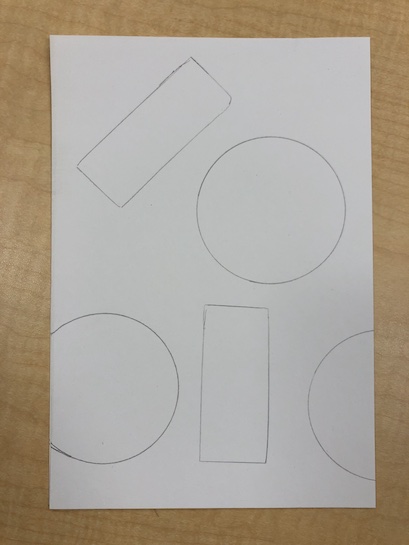
Shape: a 2-dimensional (flat) area enclosed by a line, either geometric or organic. In this lesson geometric shapes are used. a closed line. Shapes can be geometric or organic. They are flat, express length and width.

Principles of Design

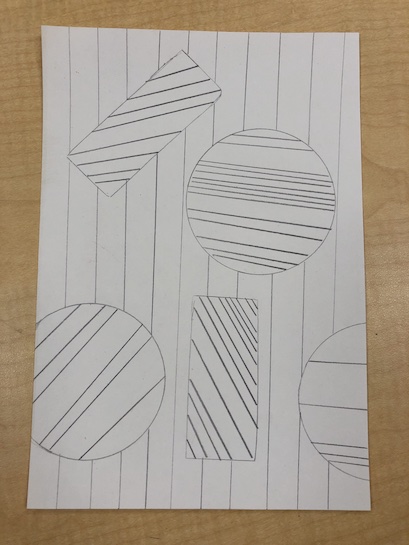
Pattern: element(s) repeated in a regular arrangement.

Additional Vocabulary

2- Dimensional (2D): having width and height but no thickness (depth).
3- Dimensional (3D):  having actual height, width and depth and existing in space or having the illusion of existing in three dimensions.
Background: the part of the picture that is overlapped by the shapes, where the vertical lines will be drawn.
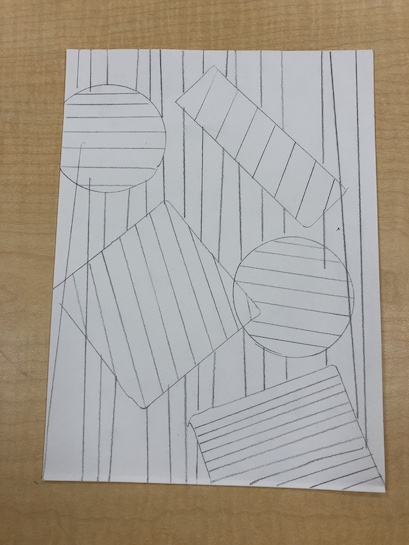
Optical Illusion:  a visual image that appears different from how it appears in reality.
Parallel Lines: two lines which are the same distance apart, like train tracks.
Repetition: when an element is used multiple times.
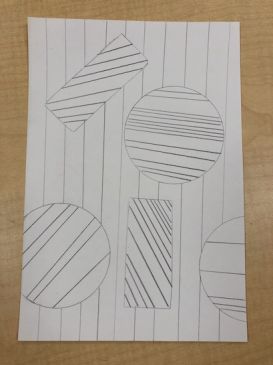
Variation: in which different qualities of an art element are used.  Variation adds interest and break the monotony of simple repetition. Too much variety creates confusion. Various shapes, line lengths and contrasting colors of black and white provide variety.

Materials & Supplies

  • White (1/2 sheets, 5.5” x 8.5”) cardstock, 2 to 3 per student
  • Same size white drawing paper
  • Black markers with multiple tip sizes
  • Pencils
  • Shape stencils: 4 to 6 sets
  • Rulers

Context (History and/or Artists)

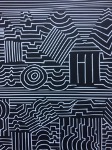
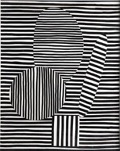
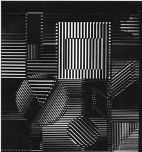
Op Art is short for ‘optical art’.  The word optical describes how our eyes see.  Op Art is a form of abstract art that uses shape, line, color and pattern to create an illusion of movement, hidden imagery, vibrating patterns, or warping shapes.

Victor Vasarely (1906-1997) was a Hungarian-French artist who was one of the leaders of the Op Art Movement which emerged in the 1960’s.  He developed his style of geometric abstract art in both color and black and white in 2-dimensional media, primarily paintings.  This lesson will explore art elements used in Op Art using Vasarely’s 1964 painting Naissance K (center image) as inspiration. When the camera came into use, artists felt freer to experiment, rather than always accurately representing what they saw. In this style, artists enjoyed playing with the viewer’s perception.
      

Advanced Preparation

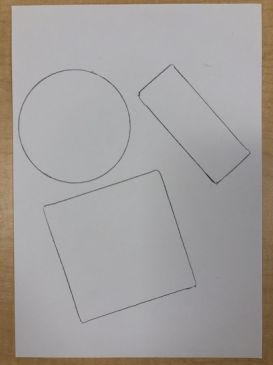
Pre-cut 3-6 different shapes for students in various sizes out of cardstock paper so that students can use them as stencils. Shapes should be small enough to fit multiple on your half page of paper.

Create a poster with the shapes labeled with correct geometric names:

  • Circle
  • Square
  • Rectangle
  • Triangle
  • Trapezoid
  • Hexagon
  • Octagon
  • Diamond
  • Oval

Tips & Tricks

  • Have table groups share sets of shapes.
  • Some students may have difficulty tracing more complex shapes.
  • On a small piece of scratch paper have students follow along with you as you demonstrate how to hold a ruler in the non-drawing hand, pressing down in 2 spots so it won’t move, while dragging the upright pencil against the available edge nearest the drawing hand. To achieve equally-spaced lines in the background, show how to line up the ruler to the line just drawn. If this is difficult for students, skip this last step.
  • Do the same while tracing a stencil, reminding them that the pencil must stand up ‘like a tree’ while the point actually touches the edges of the stencil.
  • When markers are used with a ruler they may smear if the ruler is dragged across the line before it can dry.

Discussion Points

  • Share your poster of labeled geometric shapes and read the names aloud with the students.
  • Show students several examples of Vasarely’s black and white line work:
    • Have them identify the shapes
    • Ask them to point out where the parallel lines create a regular pattern
    • Have them describe visual qualities of the designs (vibrating, moving)
  • Have students identify the shapes of the stencils.
  • Have students draw the straight-line directions (horizontal, vertical and diagonal) in the air with their finger while you point them out in his art
  • Define the word ‘variety’ and ask students where they see evidence of variety in Vasarely’s work (Different colors, shapes and line direction, thickness and size).

Reflection Point (Assessment of Learning Objectives)

  • Students use shape and line as used in Op Art to create a Victor Vasarely-inspired drawing.
  • They will identify the names of some geometric shapes.
  •  They will name and draw the three directions of straight lines.

Instructions for Lesson

Write the vocabulary you will use on the board and refer to it during the lesson.                         
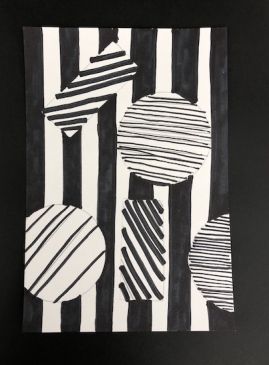
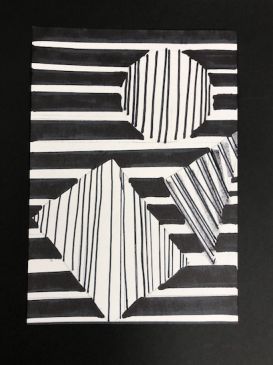
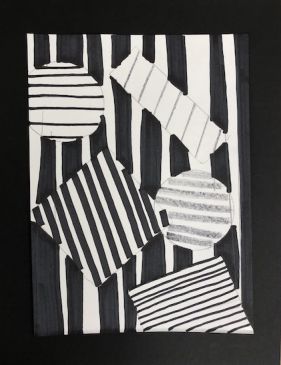
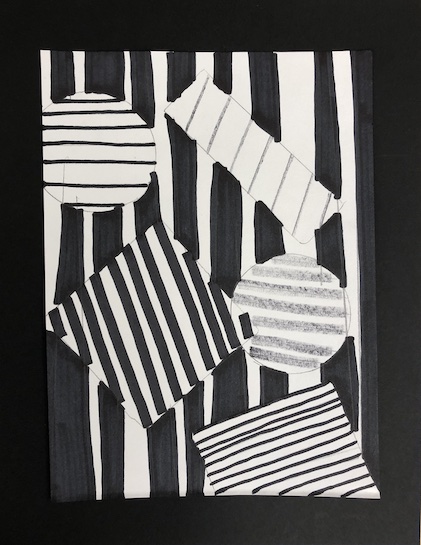
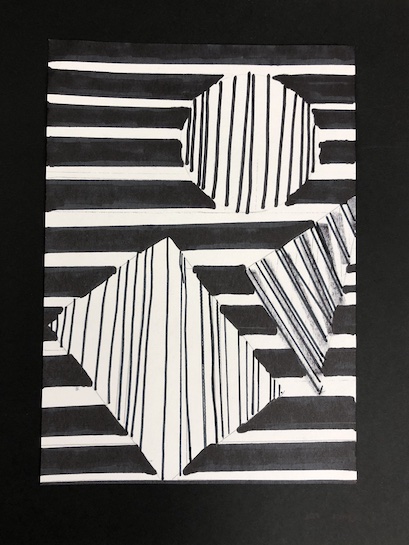
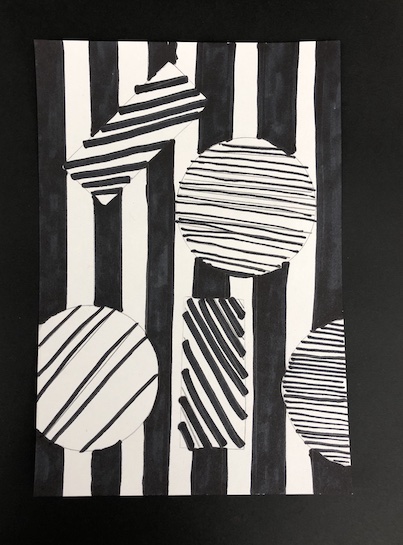
  1. Hand out 2 to 3 sheets of scratch drawing paper and card stock per student.
  2. Have students pick out 3-5 precut shapes.
  3. On the scratch paper demonstrate and practice drawing lines with the ruler and tracing a shape.
  4. On the cardstock, demonstrate arranging your shapes on the paper so none overlap and are spread evenly. A shape can come off the page so only part of it is in the picture.  
  5. Have students do this and walk around to assist if necessary.
  6. Demonstrate tracing each shape slowly and carefully. Have students do this.
       
  7. Demonstrate how to draw vertical (top to bottom) lines down the cardstock paper, while avoiding the shapes that were traced.  Lines don’t have to be equally spaced but encourage students to leave some space between each line and try and keep the lines as straight and parallel as possible.
  8. Give students time to draw their background lines. Walk around making sure the rulers aren’t upside down and students are holding them down in 2 places with the correct hand and keeping the pencils upright and touching the edge of the ruler. 
  9. Demonstrate using the ruler to draw more lines within their shapes.  The line direction should be different from the line direction in the background and be parallel to each other within the shape.  Drawing slowly, line up the ruler edge as parallel as possible to the last line before drawing.
        
  10. Students will draw their lines within their shapes using their ruler. Walk around and assist.
  11. Allow students to practice line variations on their extra paper for a few minutes.  
  12. Students will now choose a different line width for each shape from their practice sheet.
  13. Once students are mostly done, stop them to watch you demonstrate re-tracing the lines within their shapes, using a marker with a ruler a second time. Most students don’t like tracing with the ruler twice and may want to just use the marker in this step. It affects the quality of the straight line, so decide based on the student’s frustration level whether to require using the ruler a second time with the markers.
  14. Point out that thick markers make thick lines in the background while thin markers work on the lines within the geometric shapes.
  15. As students are working ask them about which type of lines they are using (vertical, horizontal, diagonal and/or parallel. If they are too absorbed, you can name the students and their line choices for the class as you walk around the room.Bring all outlines to the edge of the page.

Examples:
    

References and Attributions

Lesson written by Cameron C. Kim. Tate Op Art website: www.tate.org.uk/kids/explore/what-is/op-art.
Artsy website artist bio: www.artsy.net/artist/victor-vasarely.

Notes for Educators

21st Century Thinking Skills
Observing, making connections, sequencing, comparing/contrasting, finding evidence, decision making, evaluating.

WA State Learning Standards
(VA:Cr1.2.1) a. Use observation and investigation in preparation for making a work of art.
(VA:Cr2.1.1) a. Explore uses of materials and tools to create works of art or design.
(VA:Cr2.2.1) a. Demonstrate safe and proper procedures for using materials, tools, and equipment while making art.
(VA:Cr3.1.1) a. Use art vocabulary to describe choices while creating art.
(VA:Re8.1.1) a. Interpret art by categorizing subject matter and identifying the characteristics of form.
(VA:Cn11.1.1) a. Understand that people from different places and times have made art for a variety of reasons.

Arts Integration Opportunities
Math: geometric shapes and their counterparts in form.

Please note:  These lesson plans are intended for non-profit use only. Use of these plans for commercial purposes should give attribution to the Issaquah Schools Foundation and be accompanied by a nominal donation at www.isfdn.org/donate. Thank you.

Donate Now

Artistic Support Reference Materials

Loading...
Loading

Fueling Success for Every Student, Every School