loading Skip to Main Content

Pie in the Sky Collage

Students will read Lois Ehlert’s book, Pie in the Sky, looking for patterns and textures then construct a colorful pie collage. Recommended for 1st Graders.

Elements of Art 

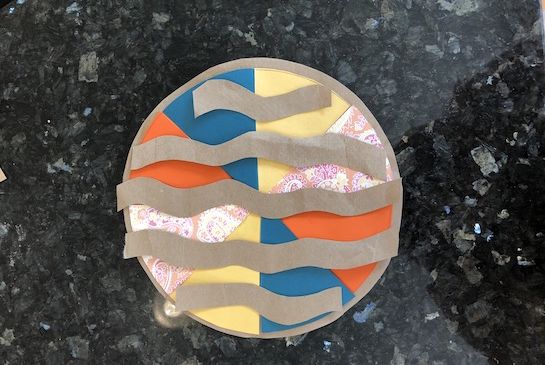
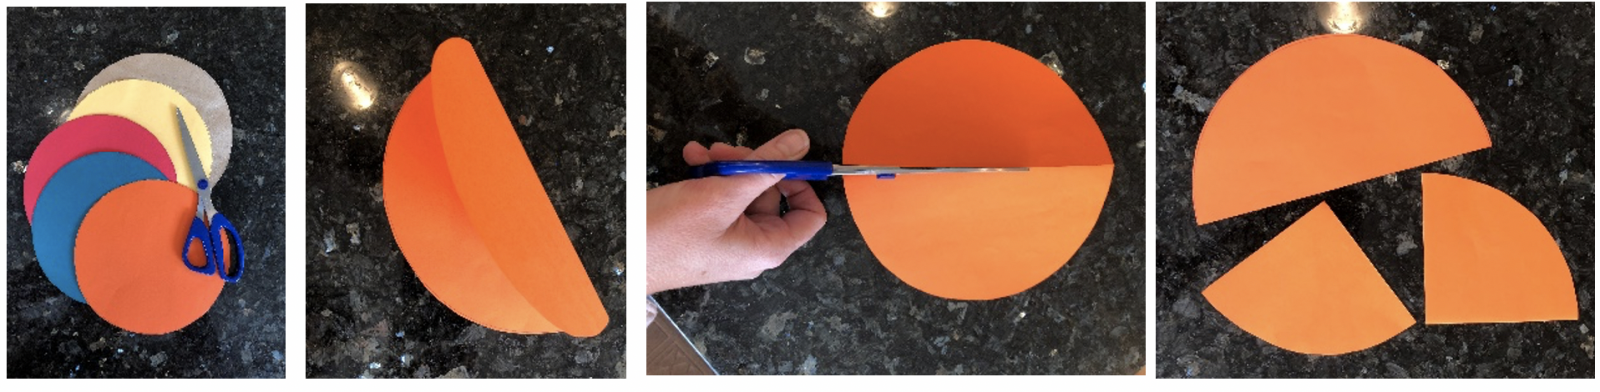
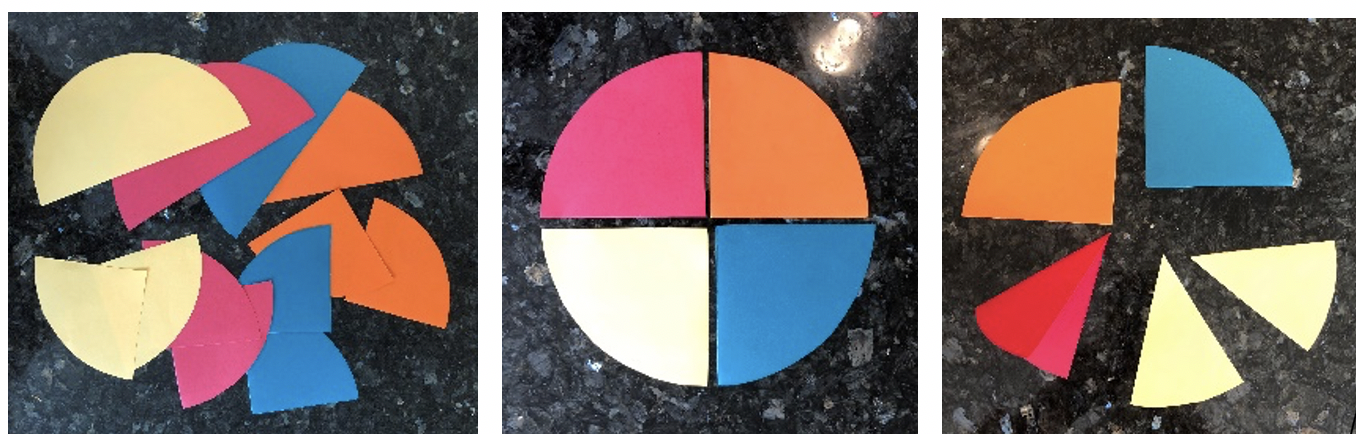
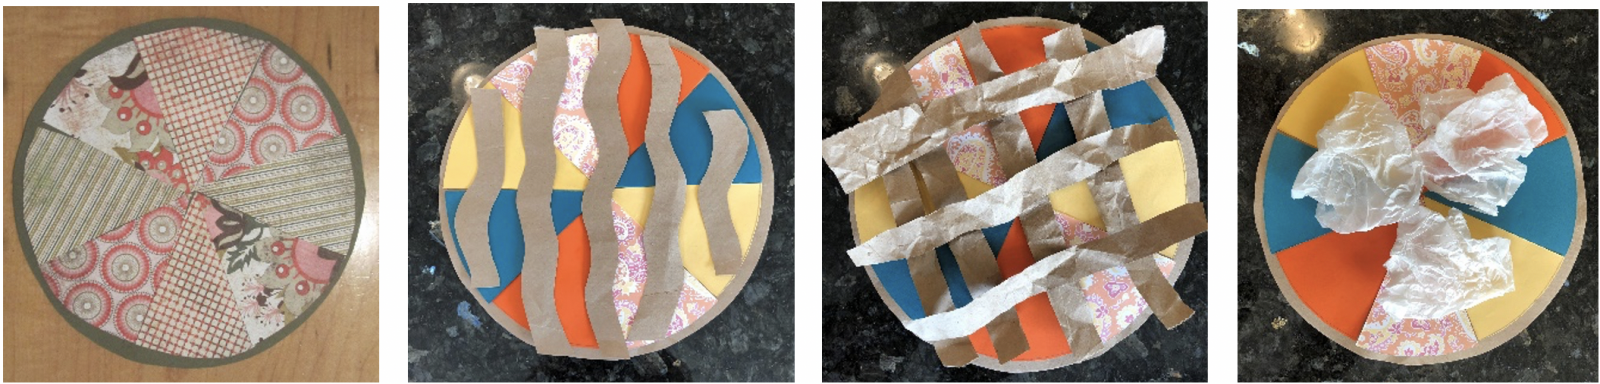
Shape: a flat figure created within joined lines. In this lesson, triangles combine to fill a circle.
Texture: actual texture is how something feels when touched; visual texture (also called simulated texture) is how something appears to feel.

Principles of Design

Unityunity occurs when all the elements of a piece combine to make a balanced, complete whole.
Variety: the use of elements of art to create differences for visual interest.

Additional Vocabulary

Collage: An art form in which paper, fabric or objects are glued onto a backing to create an image.

Materials & Supplies

  • Cut papers into 9”x9” squares
    • textured paper
    • Corrugated cardboard
    • Paper bags (scrunch for texture)
    • Wax paper (scrunch for texture)
    • Scrapbooking paper
    • Wall paper remnants
    • Brown or tan construction or textured paper
    • Specialty papers: mulberry paper, velum or metallic
  • Construction paper scraps for fruit or other details
  • Lace, ricrac
  • Class set of pencils, colored markers and/or oil pastels                            
  • Class set of scissors, glue sticks
  • Circle templates, approx. 6” & 8” in diameter, one for the crust on bottom and one for the pie insides & top crust. (plastic lids or laminated pre-cut tagboard) 
  • Lois Ehlert’s “A Pie in the Sky”, either as a book or video
  • Optional: decorative edge scissors, hole punches, die cut 

Context (History and/or Artists)

Lois Ehlert, born 1934, is an American author/illustrator of children’s books, most having to do with nature. Ehlert won the Caldecott Medal for “Color Zoo”. She grew up painting and sculpting.  Even in her early years she always erased her drawings, never satisfied. Her favorite art technique has always been collage.

Advanced Preparation

Cut paper into 9”x9” squares.

  • Locate the book or video. Set it up under the overhead projector or on the computer.
  • Make explanatory templates.
  • Make your own pie using patterned or textured paper.
  • Find images of pie to put around the room for pie crust inspiration

Tips & Tricks

  • As the instructor reads the book, use vocabulary words often, asking students to describe the textures, patterns and shapes in the pictures, as well as the unusual objects the artist chose. Look for patterns that repeat shape, color and texture. Point out how they create unity and variety in different images.
  • You can adjust the paper sizes and templates smaller if needed. Just keep them all the same size squares.
  • For younger grades tracing the circle, point out that it’s necessary to touch the edge of the template with the pencil at all times. Have the pencil ‘stand up like a tree’.

Discussion Points

The instructor should point out the textures discovered when reading the book, asking why the artist chose these textures for each image. (They looked like the object they were meant to portray, they created visual interest). When the book is finished, the instructor will ask students to think about their favorite kinds of pie and what textures and colors they contain. This list can be written on the whiteboard.

Reflection Point (Assessment of Learning Objectives)

Students will:

  • read Ehlert’s book Pie in the Sky, looking for patterns, shapes and textures.
  • construct a pie with 8 equal ‘slices’ in a symmetrical arrangement.
  • become familiar with vocabulary listed above.
  • use good craftsmanship.

Instructions for Lesson

Introduction (5 minutes): After reading the book and explaining vocabulary:

  • Show the templates for creating the 4 different colors/patterns/textures used in their ‘pie’
  • These pie slices will become their pie insides.  What kind of pie do they like?
  1. Demonstrate
    a) Tracing and cutting out the circle  
    b) Folding and cutting along the crease to create halves.

    c) Folding the half in half and cutting along the crease to create quarters.
    d) Lastly folding the quarter in half and cutting along the crease to create eighths.
    e) Explain that they will have extra quarters that will be traded with other students.
  2.  Students can choose one pie filling color/texture and a brown crust.
  3. Using the larger circle template have students cut out their crust, write their name on the back and set it aside.
  4. Circulating around the room to help them, have them cut out their pie filling.  
  5. Using the smaller circle template, follow the steps above to make two eighths of pie. 
  6. Have students share and swap fillings until they have four different pie fillings
  7. Have students do this, but don’t let them glue anything down.
  8. Have students arrange their ‘pieces’ and check with an adult when they are ready to glue.
  9. Once students have glued their pie filling to the crust allow them to start creating their top crust.
  10. Talk about the pie crust and show examples of real pies with fancy embellishments.
    a) Pie crust has holes so that the steam can get out.
    b What did Lois Ehlert’s pie crust look like?
    c) Remind students about layering and how we want to still see the pie inside through its crust.
    Pie crust examples
  11. Demonstrate cutting strips to weave a top, cutting out forms to add to the top, taking a circle and cutting out forms.
  12. Demonstrate using ricrac or corrugated cardboard to make an edge that holds their pie together.
    Collage pie examples
  13. Students may add details in their pie filling before they glue on their crust and on top like those in Lois Ehlert’s books.
  14. On the back of the crust they can write the flavors in their pie or the type of pie they ‘baked.’

    Student Reflection – refer back to reflection point above (5 minutes):

    Students can share with each other or the instructor can share the different ‘pies’, looking for evidence of patterns, textures, unity and variety.
  15. Students Cleanup (5 minutes):  Remind students to put tops on glue sticks & recycle paper scraps.

References and Attributions

Lesson written by Cynthia Moring. Also refer to Artist Lois Ehlert’s website.

Notes for Educators 

21st Century Thinking Skills
Persisting, taking responsible risks, reflecting, observing, making connections, visualizing, sequencing, comparing/contrasting, analyzing, evaluating.

WA State Learning Standards
(VA:Cr1.2.1) a. Use observation and investigation in preparation for making a work of art. This happens when reading the book.
(VA:Cr3.1.1) a. Use art vocabulary to describe choices while creating art.
(VA:Cr3.1.2) a. Discuss and reflect with peers about choices made in creating artwork.
(VA:Pr4.1.2) a. Categorize artwork based on a theme or concept for an exhibit.
(VA:Re7.2.2) a. Categorize images based on expressive properties. This happens when students ascribe pie flavors to their paper choices.
(VA:Re9.1.2) a. Use learned art vocabulary to express preferences about artwork.
(VA:Cr2.1.3) a. Create personally satisfying artwork, using a variety of artistic processes and materials. This only happens if students can choose patterned/textured paper.
(VA:Re7.1.3) a. Speculate about processes an artist uses to create a work of art. This happens when talking about Ehlert’s choices of collage materials.
(VA:Re7.2.3) a. Determine messages communicated by an image.
(VA:Re8.1.3) a. Interpret art by analyzing use of media to create subject matter, characteristics of form, and mood.
(VA:Re9.1.3) a. Evaluate an artwork based on given criteria. This happens when student work is shared.

Arts Integration Opportunities
Math, natural science.

Please note:  These lesson plans are intended for non-profit use only. Use of these plans for commercial purposes should give attribution to the Issaquah Schools Foundation and be accompanied by a nominal donation at www.isfdn.org/donate. Thank you.

Donate Now

Artistic Support Reference Materials

Loading...
Loading

Fueling Success for Every Student, Every School