loading Skip to Main Content

Clay Leaf Bowls

Students will make make bowls in the shape of a leaf using a slab of clay and a real leaf for texture. Recommended for 2nd Graders.

Elements of Art

Form: a three-dimensional object that has height, width, and depth.
Shape: a two-dimensional (height, width) area enclosed by a line:  geometric: based on mathematical principles, or organic:  irregular, often curving or rounded, and more like nature.
Texture: actual: how something feels when touched; or visual (simulated): how something appears to feel.

Principles of Design

Balance: the way the elements are arranged so that individual parts appear equally distributed visually throughout the composition. i.e. spread out in a visually interesting way. 
Symmetrical Balance or Symmetry: 
arranging the parts equally on both sides.

Additional Vocabulary

Bisqueware: clay that has been fired once.
Clay: A fine-grained, firm material that is soft when wet and hardens under extreme heat; consisting mostly of water, silica (glass) and finely grained rock.  It’s used in making bricks, tiles, and pottery.
Craftsmanship: a way of working that includes following directions, demonstrates neatness and the proper use of tools.
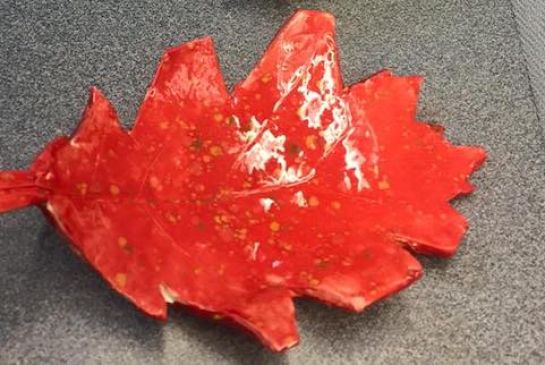
Glaze: a layer of colored glass (silica), clay, and minerals that can also harden during a kiln firing.
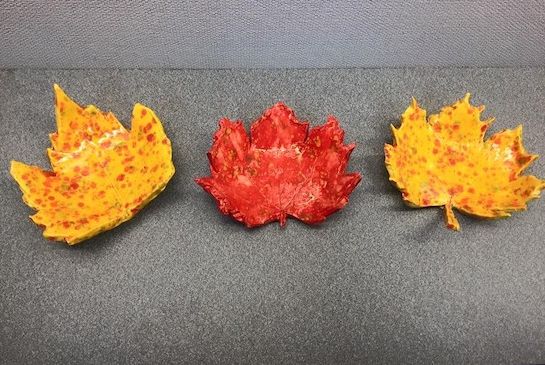
Glaze ware: clay that has also gone through a glaze firing.
Kiln: the hot ‘oven’ for clay which gets much hotter than the kitchen oven. Low fire clay vitrifies at approximately 1828*. Clay is being fired, not cooked!

Materials & Supplies

For Clay Building Session:

  • Low fire clay (Cone Fire 04-06) 
  • Wooden skewers or plastic knives  
  • Wire tool to cut large clay pieces
  • Maple leaf, approx. 6” wide
  • Clay mat
  • Paper bowls
  • Plastic wrap
  • Small clay sponges   
  • Small water containers                                           
  • Slab roller if available 

For Glaze Lesson:

  • Low Fire (Cone 04-06) glazes
  • Plastic water cups
  • Glaze brushes 1-2 each student
  • Paper plates – 1 per bowl

Context (History and/or Artists)

How long have clay projects been around? Clay pots have been found in current day Iran and China that date back to 5000 B.C. – that’s more than 7000 years ago! People used clay to make containers for food and to make bricks to build houses (baked clay mixed with straw called adobe). Back then they used fire to cook and harden the clay. Today, in modern times, a kiln is used. More information about the history of clay and its use in art on the Issaquah Schools Foundation Clay Reference Page.

Advanced Preparation

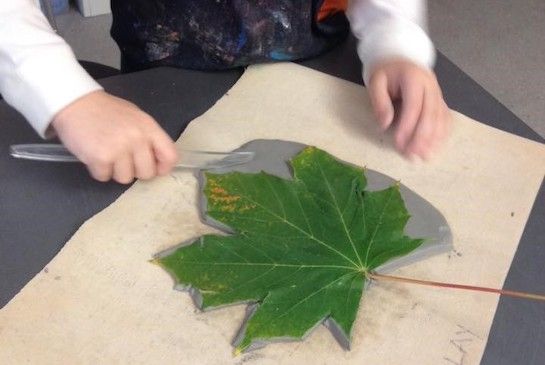
Preparation of clay slabs by Docent:

  1. Cut cubes of clay from the bagged clay. Approx. 3”x3” x 4”. Don’t cut slabs directly from the bagged clay! It will shrink incorrectly and split during firing.
  2. Pound the cubes thin enough to feed into the slab roller or roll by hand. Use slab roller to roll the slabs into elongated pieces. Final thickness is about 1” thick. Remember that clay shrinks by 10% during bisque firing. When sections get too thin, they’ll shrink and crack as they dry.
  3. If the leaves stay on the slab for a day or so, you’ll get a clean texture/print. If students remove the leaves, they may mark them accidentally. If you can get the leaves off the slabs after a couple of days, it’ll help the slabs dry more evenly.
  4. Slabs may be stored layered between plastic wrap in a sealed container to keep moisture from evaporating until class. Clay will keep for months if damp towels or sponges are placed in sealed tubs with the clay.

Tips & Tricks

  • Keep clay moist. Start with clean cutting tools. Make cuts and pull away from main clay body. 
  • Do not let students poke holes through the body of the clay unless it is to hang the piece after firing. Glaze will melt and flow through the holes and can damage kiln shelves. 
  • Limit time for creating texture to about 5 minutes. Longer than that and the clay becomes overworked. 
  • Clay is dry enough to bisque fire when it has an overall chalkiness to the touch and even in color. Any dampness in clay will result in broken pieces in the kiln. 

Reflection Point (Assessment of Learning Objectives)

Students will:

  • Work with tools and clay
  • Use art vocabulary
  • Use good craftsmanship

Instructions for Lesson

  1. Post vocabulary and briefly go over the meanings.
  2. Demonstration: as you demonstrate, talk about what you are doing, using the vocabulary when possible. Use the rolling pin to make sure the slab is even and the right thickness. Determine the most even, smooth area before you place a leaf (veins down for deeper texture) on the slab and roll it in until it is fully impressed into the clay. Using the skewer or plastic knife, stand it up tall ‘like a tree’ to get a clean edge as you cut. Remind students that they can slice hard to get sections like a pizza slice, and turn the mat as they go. Use a dampened finger to smoothen the cut edge.
  3. Distribute the slabs, leaves and cutting tools.
  4. Students will use rolling pin to press the texture of the leaf into the slab.
  5. Students will use a skewer or plastic knife to cut around the leaf, holding the knife upright, like a pencil, cutting perpendicular to the table. 
  6. Once all the extra clay has been cut away, remove the leaf or let it dry on the slab. 
  7. Instruct students to smooth all cut edges with fingers dampened by a sponge. Use wet fingertips. Do not use the sponge on the clay.   Sharp edges in clay makes VERY sharp edges when fired.
  8. REMEMBER TO HAVE STUDENTS IMMEDIATELY ETCH THEIR NAMES INTO THE BOTTOM OF THEIR LEAF. Demonstrate how to flip the slab over a wide-fingered palm to support it while they etch their names very shallow. This can be done by an adult to keep it legible and not too deep.
  9. Demonstration: Gather students around to see the next step. Carefully center leaf over paper bowl and gently form fit it to the inside shape. OR turn the slab upside down in one hand as you fit the paper bowl behind it.
  10. Lift bowl with slab 4-6 inches from the table surface and drop GENTLY to slump the shape into the bowl.
  11. Remove slabs from bowls after 24 hours or so, so as to dry evenly and prevent cracking.
  12. Allow 5-7 days drying time before bisque firing at cone 04-06.

Clean Up: 

  • Brush mats over buckets or garbage cans to remove most of the clay fragments.  Wet mats are harder to clean so scrape them with rulers to get the bulk of clay. 
  • Soak all plastic tools in buckets. Remove all traces of clay from the texture tools, wooden rolling pins, knives, etc.  CLAY CLOGS DRAINS.  Clay water can be dumped outside onto dirt areas.  

NOTE: Clay pieces should dry AT LEAST 5-10 days before bisque firing.  

Bisque Firing takes approximately 13 hours for the kiln to reach the correct temperature and another 12-15 hours to cool. So, allow for at least 24-30 hours for pieces to thoroughly cool before scheduling the glaze lesson. 

Advanced Preparation & tips for Glazing Bisqueware Lesson:

  • Locate all cone 06-04 (low fire glazes) to be sure they have enough water & stir to the consistency of heavy cream.
  • Choose color palette to offer students.
  • Pour small amounts of glaze into containers – you can always offer more. 
  • Remind students not to mix glazes by using the same brush.
  • Pour back unused and uncontaminated glazes after use.
  • Dampen glaze brushes to keep silica dust down.
  • Optional effect for glazing: before firing, sponge off most of the glaze so it remains in the deeper veins. Clear glaze the whole leaf.
     

Instructions for Glazing:

  1. Distribute bisqueware leaf bowls on a clean paper plate to each student.
  2. Distribute cups of glaze to students. 2-3 students can share a glaze cup. Each student needs their own brush.
  3. Instruct students to apply 2 coats of glaze to their bowls—AVOID the underside of the bowl where it comes into contact with the kiln shelf to avoid damaging kiln shelves or the piece being stuck to the shelf. 
  4. Collect all finished pieces. 
  5. Wipe the bottoms of all pieces with a damp sponge.  
  6. Checking for legible names.
  7. Fire to cone 04-06. 

References and Attributions

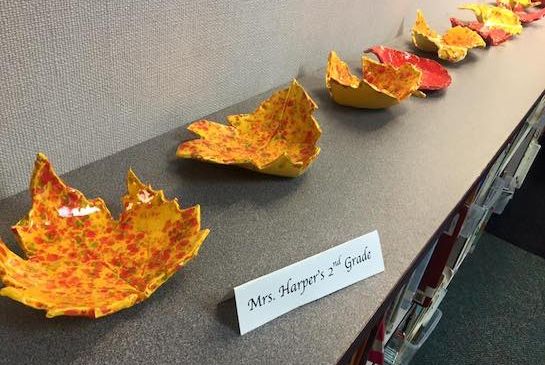
Issaquah Valley Elementary. PTA Art Docent Program.  Art Docent Lesson. 2006 by Leslie MacInnes, Jana White, Tiffany Aske, Angie Warren, et.al.

Notes for Educators

21st Century Thinking Skills
Thinking flexibly, persisting, questioning, creating, taking responsible risks, reflecting, goal setting observing, making connections, visualizing, sequencing, predicting, comparing/contrasting, problem solving, cause and effect, decision making, evaluating.

WA State Learning Standards
(VA:Cr1.2.2) a. Make art or design with various materials and tools to explore personal interests, questions, and curiosity.
(VA:Cr2.1.2) a. Experiment with various materials and tools to explore personal interests in a work of art or design. 
(VA:Cr2.2.2) a. Demonstrate safe procedures for using and cleaning art tools, equipment, and studio spaces. 
(VA:Cr2.3.2) a. Repurpose objects to make something new.
(VA:Re7.1.2) a. Perceive and describe aesthetic characteristics of one’s natural world and constructed environments.
(VA:Re9.1.2) a. Use learned art vocabulary to express preferences about artwork.

Arts Integration Opportunities
Science: study the vascular system of leaves and trees.
Spelling: vocabulary words and names of tools.

Please note:  These lesson plans are intended for non-profit use only. Use of these plans for commercial purposes should give attribution to the Issaquah Schools Foundation and be accompanied by a nominal donation at www.isfdn.org/donate. Thank you.

Donate Now

Artistic Support Reference Materials

Loading...
Loading

Fueling Success for Every Student, Every School