Color: the visible range of reflected light.
Line: the flat path of a dot through space used by artists to control the viewer’s eye movement; a long narrow mark or stroke made on or in a surface; a thin mark made by a pencil, pen, or brush.
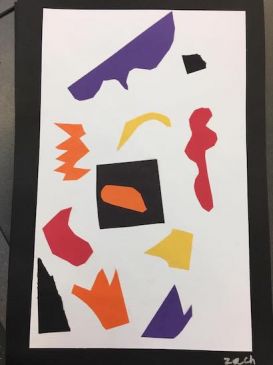
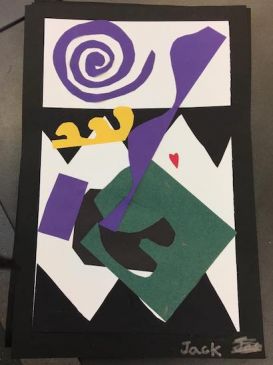
Shape: a two-dimensional (flat) area enclosed by a line. Geometric shapes are based on mathematical principles, such as a square/cube, circle/sphere, triangle/cone, or pyramid. Organic shapes are irregular, often curving or rounded, and more informal than geometric shapes.
Balance: the arrangement of elements that makes individual parts of a composition appear equally important; an arrangement of the elements to create an equal distribution of visual weight throughout the format or composition.
Contrast: a technique that shows differences in the elements of visual arts in an artwork, such as smooth/rough textures, light/dark colors, or thick/thin lines.
Movement: the use of the elements of visual arts to draw a viewer’s eye from one point to another in an artwork.
Variety: the use of the elements of visual arts to create differences in an artwork for visual interest.
Complementary colors: colors that are opposite one another on the color wheel, such as yellow/violet, blue/orange, and red/green. When placed side by side, these colors complement each other or make each color stand out.
Positive and negative space: Positive space is the actual space taken up by the line, shape, or form. Negative space is the empty space surrounding a shape, figure, or form in a two- or three-dimensional artwork. In this lesson the positive space is the shape you will cut out and the negative space is the “left over” after you cut the shape out.
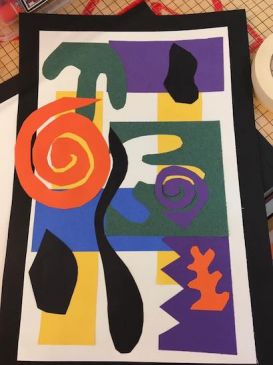
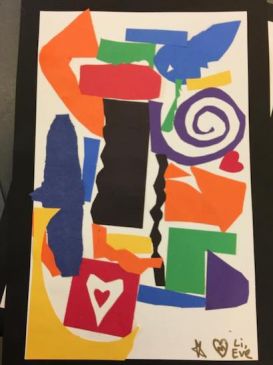
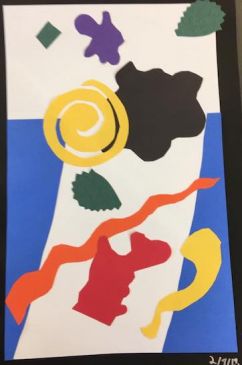
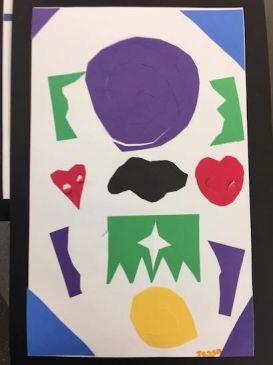
Henri Matisse was a painter for most of his artistic life but developed a technique in his later years that he called, “drawing with scissors” to create beautiful paper cut-outs. Instead of using a pencil to begin these works of art, he started with scissors, cutting brightly colored paper to see where his creativity led him. He then arranged the positive and negative paper cutout shapes to his liking.
Select the background paper; cut colorful squares and rectangles in a variety of sizes and colors.
Display a few examples of Matisse’s work to inspire students.
If there is time to read Henri’s Scissors by Jeanette Winter or Matisse’s Garden by Samantha Friedman, either of these books adds literary, visual context, and storytelling.
If time allows, read Henri’s Scissors by Jeanette Winter or Matisse’s Garden by Samantha Friedman, then to the class then show one or two of Matisse’s cut paper art pieces. Point out organic shapes and geometric shapes. Point out wavy lines, zig-zag lines, diagonal edges and curved edges.
Point out how important the contrast of colors is. If you put a blue shape on a blue background, you won’t see the blue shape. When they choose their background paper, have them think about the color choices that they will layer on top. Make sure the colors pop out instead of blend in. Talk about contrasting & complementary colors.
Begin by reading one of the books about Matisse or showing a slide show with examples of his artwork, specifically his cut paper artwork.
Dynamic Art Projects for Children: Includes Step-by-Step Instructions and Photographs, Logan, Denise M., Crystal Productions, 2005.
21st Century Thinking Skills
Problem solving – determining where to place the shapes.
Evaluation – judging using which positive and negative shapes to use and why.
Comparing and contrasting – using variety of colors and shapes in the artwork.
WA State Learning Standards
(VA:Cr1.2.2) Investigate, plan, and make. Make art or design with various materials and tools to explore personal interest, questions, and curiosity.
(VA:Cr3.1.2) Reflect, refine, and continue. Discuss and reflect with peers about choices made in creating artwork.
(VA:Re.9.1.2) Interpret. Use learned vocabulary to express preferences about artwork.
Please note: These lesson plans are intended for non-profit use only. Use of these plans for commercial purposes should give attribution to the Issaquah Schools Foundation and be accompanied by a nominal donation at www.isfdn.org/donate. Thank you.
Fueling Success for Every Student, Every School