Context (History and/or Artists)
Hannah Höch was a German artist. She was one of the originators of photomontage. She distorted proportions of human figures to make a statement about Germany just before WW2, a difficult time for Europe. Out-of-proportion characters suggested things were ‘out of whack’ in the world.
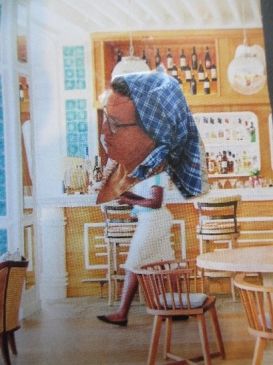
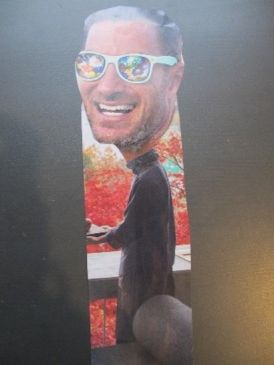
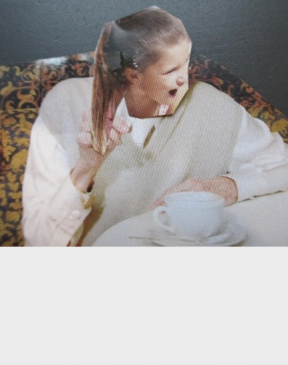
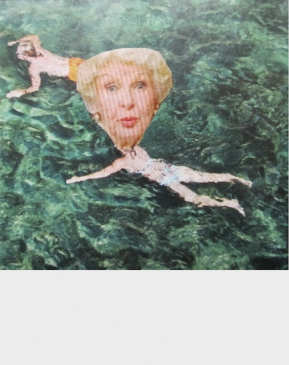
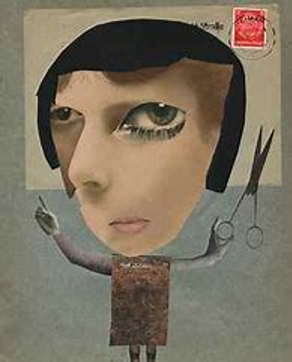 Bad Art
 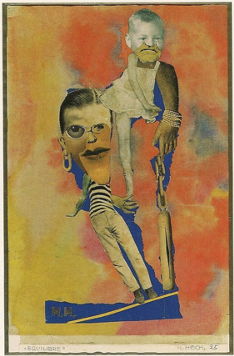 Equilibri, 1925
Tips & Tricks
- Keep background rectangular images to a minimum of 4x6, but can be larger.
- Large flat pans or shallow cardboard trays help spread out and contain magazine pictures.
- Glue sticks work best when applied to the edges of the shapes, not just the middle.
- If any students insist on combining parts of people with other parts of people instead of using a background, that’s ok, as long as they are out of proportion. They can glue these combinations onto the white drawing paper.
- Optional: Paint the final collages with watery liquid glue to leave a smooth surface and all edges slicked down (like decoupage).
- Pictures must be trimmed as close to their edges as possible so they are easy to see in their new combinations (good craftsmanship).
Advanced Preparation
Pre-cut lots of magazine color photos of people and objects. Also cut larger background type pictures, like rooms, the outdoors, city streets, etc. Don’t trim too closely, let students do that. Include vastly different sizes.
Discussion Points
- Post all the vocabulary words listed above and briefly explain each. Spend more time on the concept of proportion: ask them to find an object in the room that is composed of parts. Now imagine one of the parts is the wrong size. What would that look like? Usually a chair’s legs are always the right length so our feet can reach the ground. What if they were very short or very long? The parts would be out of proportion. That would look confusing and amusing, no?
- Artists like Hoch wanted the viewer to see familiar things in a strange new way. Showing reality wasn’t the challenge. Cameras were now taking over that job. Modern artists could shake up the visual world by not showing reality and still challenge the viewer to look closely. Hoch wanted to express the way her society was not working together as a group.
- Ask students if there’s still unity in a picture or sculpture even though the objects aren’t in proportion with each other? (In real life, no, but in art that deliberately wants to create visual excitement, yes).
Reflection Point (Assessment of Learning Objectives)
Students will:
- observe the concept of visual proportion
- observe art by Dada artist Hannah Hoch
- use out-of-proportion images in a collage
- use good craftsmanship
Instructions for Lesson
- Show the Hoch photomontages (or others) while explaining her style. Talk about the subjects in the picture and which parts are out of proportion. Ask students if she accomplished her goal of making the viewer feel disoriented, like something is “wrong with this picture!”
- Using either an overhead projector or gathering students as a group, show them different magazine images, asking them to identify what they see.
- Show them the examples below of out-of-proportion combinations. Or make your own! Point out which parts are ‘wrong’ in the picture. Ask students why they are wrong. (They are the wrong size.)
- Choose a background and look for a separate image of a person. Ask them which part of this person could best be added to the other image. (Usually the head, but other parts could work too.)
- Once you decide on a body part, trim it and talk about the way you hold the paper:
- Show them how you turn the paper for your cutting hand’s ease, rather than the other way around.
- Show them how to cut a tight spot by making cuts on either side of it, snipping it out like a piece of pie.
- Show how scissors work: where the fingers should go to fit the handle and that the wider you open them, the longer the cut can be.
- Remind them that the slower you cut, the more precise it will be.
- Glue down the trimmed piece onto the background to create the most visual interest. As you do this, talk about where you ‘could’ put it, ask students for input. Then show them how to spread the glue along the edges on the back of the shape, not just the middle. Demonstrate spreading the piece from the middle out as you smooth it into place.
- Break them into small groups and have a few go to the table with the backgrounds to select one. Have the other groups go to the table with the images of people, OR make separate piles for groups to choose from at their tables. Let them take time on this. They should only choose 2 images to contrast: the background with a person in it and the out-of-proportion person to cut a body part from.
- As students find what they want to combine, they can return to trim the body part. Monitor how they follow the cutting directions you just demonstrated. Push them to cut as close to the edges as possible before they glue.
- If time, share these interesting, maybe startling combinations with the class so they can enjoy the confusion and amusement themselves!
References and Attributions
Lesson written by Cynthia Moring. Weiner Elementary website Scale and Proportion lesson.
Notes for Educators
21st Century Thinking Skills
Thinking flexibly, persisting, creating, innovating, taking responsible risks, reflecting, goal setting, observing, making connections, visualizing, predicting, comparing/contrasting, finding evidence, determining Point of View, decision making, evaluating.
WA State Learning Standards
(VA:Cr1.2.2) a. Make art or design with various materials and tools to explore personal interests, questions, and curiosity.
(VA:Cr2.1.2) a. Experiment with various materials and tools to explore personal interests in a work of art or design.
(VA:Cr2.2.2) a. Demonstrate safe procedures for using and cleaning art tools, equipment, and studio spaces.
(VA:Cr2.3.2) a. Repurpose objects to make something new.
(VA:Cr3.1.2) a. Discuss and reflect with peers about choices made in creating artwork. This happens if you share out.
(VA:Re7.1.2) a. Perceive and describe aesthetic characteristics of one’s natural world and constructed environments.
(VA:Re8.1.2) a. Interpret art by identifying the mood suggested by a work of art and describing relevant subject matter and characteristics of form.
(VA:Re9.1.2) a. Use learned art vocabulary to express preferences about artwork.
(VA:Cn10.1.2) a. Create works of art about events in home, school, or community life.
(VA:Cn11.1.2) a. Compare and contrast cultural uses of artwork from different times and places.
Please note: These lesson plans are intended for non-profit use only. Use of these plans for commercial purposes should give attribution to the Issaquah Schools Foundation and be accompanied by a nominal donation at www.isfdn.org/donate. Thank you.
Donate Now