Color: the visible range of reflected light. Colors are grouped by certain characteristics.
-Complementary Colors: colors that are opposite on the color wheel and highly contrasting.
-Primary colors: the basic colors from which all other colors are mixed: red, yellow, and blue; no other colors can be mixed to make primary colors.
-Secondary Colors: created by mixing two primary colors: blue & yellow=green, blue & red= violet, and red & yellow= orange.
Shape: a two-dimensional (flat) area enclosed by a line. Shapes can be geometric (straight edges, often symmetrical) or organic (curved edges, asymmetrical).
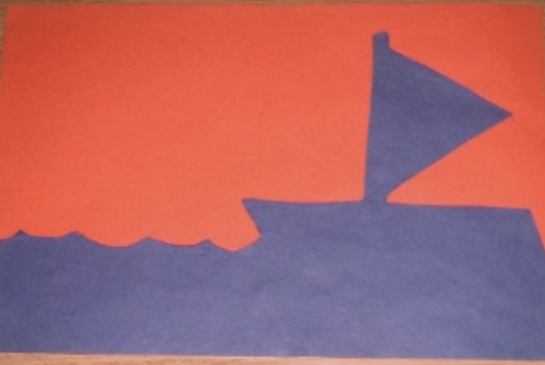
Space: can be positive: the space an object occupies, or negative: the space around the object.
Contrast: refers to the arrangement of opposite elements, or using very different qualities next to each other to create visual interest, excitement and drama.
Positive/Negative Space: positive space is the actual space taken up by a line, shape, or form. Negative Space is the empty space surrounding a shape, figure, or form in a 2- or 3-dimensional artwork.
Color Wheel: a tool in which colors are arranged in a specific order in a circle; used to explain color theory and show how colors relate to one another.
Craftsmanship: following directions and using care and neatness with tools.
Landscape: an outdoor scene depicted.
Classroom set of glue sticks Image of a color wheel
Color can be used by artists to make art more interesting if they know how colors work together. Complementary or opposite colors on the color wheel are the most highly contrasting colors to each other, and artists use this to make the colors stand out. Complementary pairs are green/red; blue/orange; yellow/purple. Traffic lights and school colors are example of these combinations. An interesting way to remember them is to know that 2 primaries, when mixed, are the complement or opposite of the 3rd primary. Eg. green is a mixture of blue and yellow and red is its complement (not “compliment”: which is just a nice thing to say about someone). When 2 complementary colors are mixed (not always equally) they always make brown, just as if you mixed all 3 primary colors.
Space in a picture is also manipulated to make it more interesting. Space is either positive or negative in a composition, and artists must consider both.
1-3 different examples of the lesson, using different landscape ideas. Don’t glue them.
Briefly discuss the vocabulary above. Refer to it during the lesson whenever possible. Using a color wheel, go though the contextual information above. Ask students to think of different complementary color combinations they’ve seen. Look for them around the room.
When you show them a positive/negative space optical illusion like the example below, ask them what it is a picture of, a vase or 2 people? Is there only one answer? (No.)

Students will:
Before students arrive:
Lesson written by Cynthia Moring.
Study.com video resource: Positve and Negative Space in Art.
21st Century Thinking Skills
Thinking flexibly, persisting, creating, innovating, listening with empathy, taking responsible risks, reflecting, observing making connections, visualizing, sequencing, comparing, contrasting, determining main idea, finding evidence, problem solving, cause and effect, decision making.
WA State Learning Standards
(VA:Cr1.1.2) a. Brainstorm collaboratively multiple approaches to an art or design problem.
(VA:Cr1.2.2) a. Make art or design with various materials and tools to explore personal interests, questions, and curiosity.
(VA:Cr2.1.2) a. Experiment with various materials and tools to explore personal interests in a work of art or design.
(VA:Cr2.2.2) a. Demonstrate safe procedures for using and cleaning art tools, equipment, and studio spaces.
(VA:Re7.1.2) a. Perceive and describe aesthetic characteristics of one’s natural world and constructed environments.
(VA:Re9.1.2) a. Use learned art vocabulary to express preferences about artwork.
Arts Integration Opportunities
Writing: procedural, spelling words.
Math: comparing mixing colors to adding numbers.
Please note: These lesson plans are intended for non-profit use only. Use of these plans for commercial purposes should give attribution to the Issaquah Schools Foundation and be accompanied by a nominal donation at www.isfdn.org/donate. Thank you.
Fueling Success for Every Student, Every School