loading Skip to Main Content

Amy Sherald Inspired Portraits

After observing the art of Amy Sherald, students will use watercolor, colored pencil and pen to create a portrait in her style. Recommended for 3rd Graders.

Elements of Art

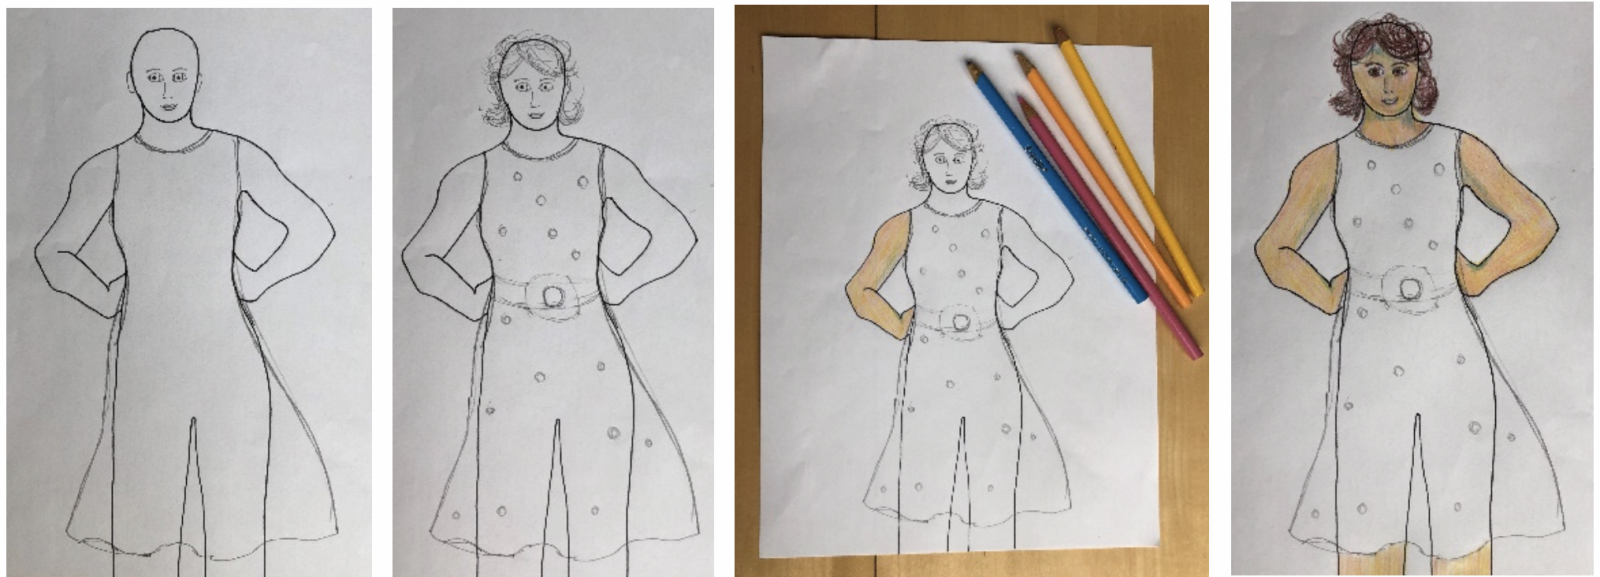
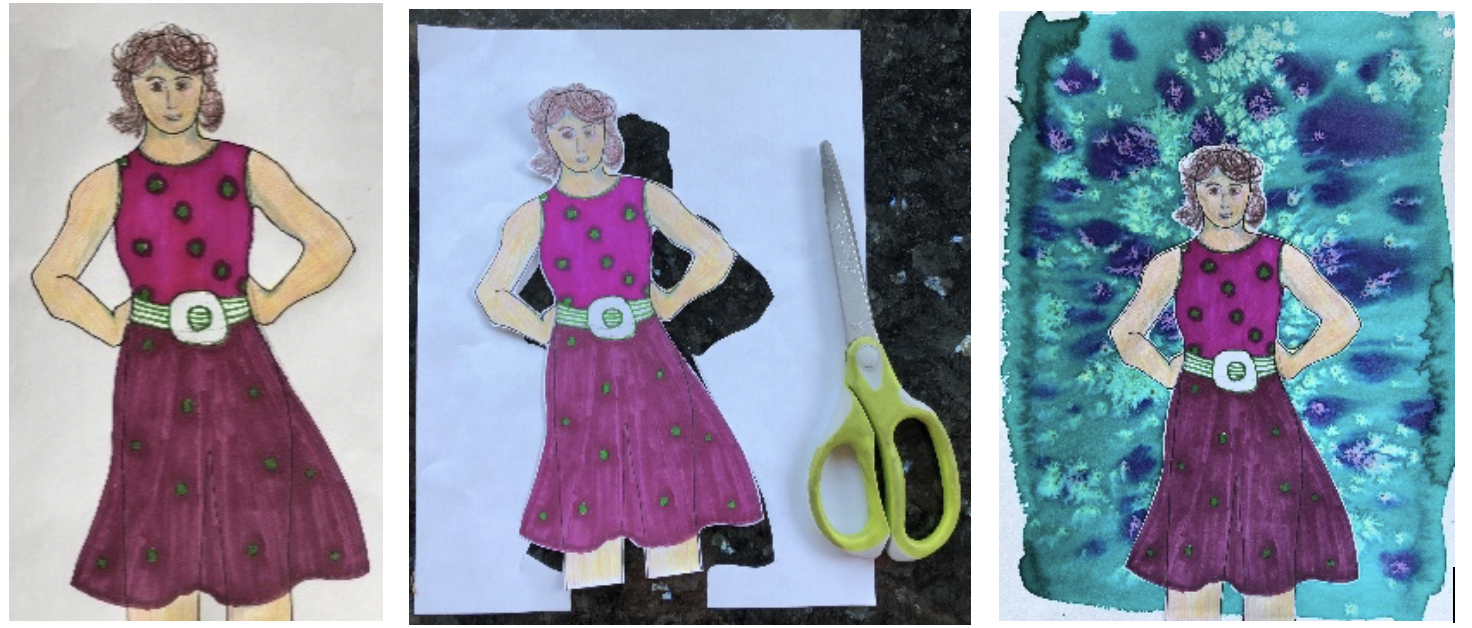
Color: the visible range of reflected light. HUE: its name; VALUE: its tints/shades; INTENSITY: its brightness/dullness.

Principles of Design

Emphasis (focal point): the part of an artwork that is emphasized in some way and attracts the eye and attention of the viewer; also called the center of interest.

Additional Vocabulary

Craftsmanship: A way of working that includes following directions, demonstrates neatness and the proper use of tools.
Monochrome: having or appearing to have only one color, which may include variations on the value of that color.
Portrait: works of art that record the likenesses of humans or animals.
Tint: a value created by adding white to a color 
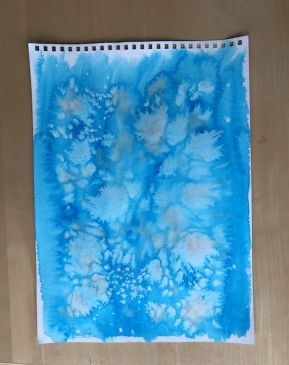
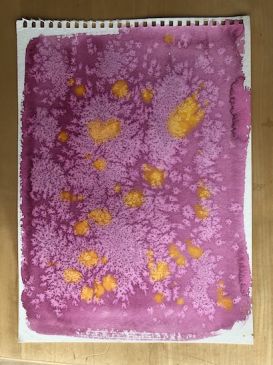
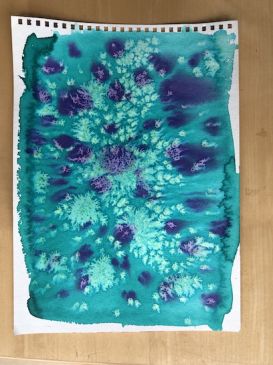
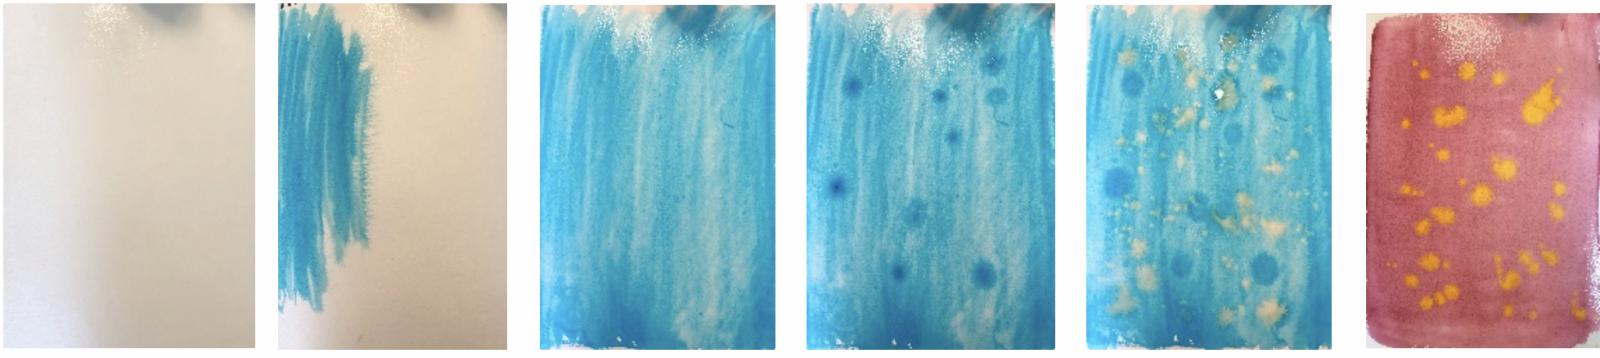
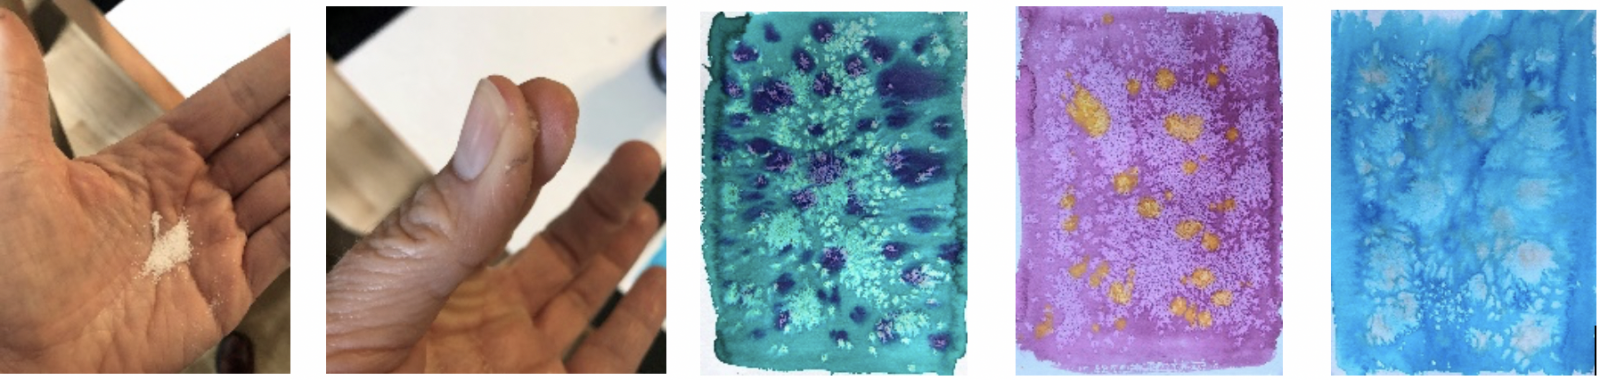
Wash:  a painting technique that leaves a semi-transparent layer of color. A wash of diluted ink or watercolor paint applied in combination with drawing (on dry painting) is called pen and wash, wash drawing, or ink and wash.
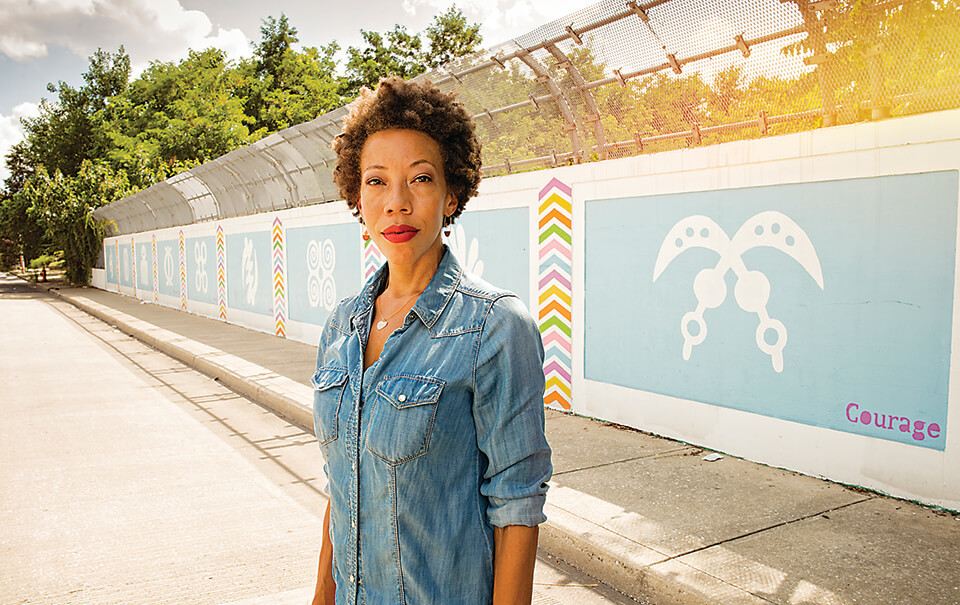
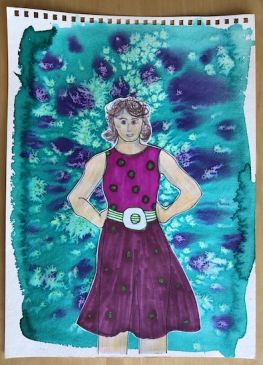
Materials & Supplies

  • 9”x12” watercolor paper
  • Large Watercolor brushes
  • Cardstock – print body worksheet
  • Pencils
  • Drawing pens
  • 3 Skin color sets of colored pencils
  • Pattern sheet
  • Ruler
  • Salt
  • Water Cups
  • Erasers
  • Body templates (Printable PDFs available HERE)
  • Masking tape
  • Colored pencils
  • Paper towels


Context (History and/or Artists)


Amy Sherald
, (American b. Columbus, GA 1973) received degrees in painting from 2 different colleges. She was an International Artist-in-Residence in Panama. Sherald was the first woman to win the Outwin Boochever Portrait Competition grand prize. She painted former First Lady Michelle Obama’s official portrait. It hangs in the National Portrait Gallery in Washington DC.  Her style is simplified realism. She uses neutral colors to portray skin tones as a way of “challenging the concept of color-as-race.” It’s her goal to document the African-American experience in the United States through large-scale portraits, often working from photographs of strangers she encounters on the streets.

Advanced Preparation

  • This is a two-part lesson. 
    • The background is a watercolor wash.  Instead of doing it all at once it can be done as a pullout from the classroom prior to the drawing or as a quick add on to another watercolor lesson.
    • The portrait is done on a template and cut out to glue to the background.
  • Find images of Amy Sherald’s work to show the students. (see above)
  • Find a place to dry the paintings after students have applied a wash.
  • Draw and print simple body templates – we are using pre-drawn generic bodies (printable PDF template available HERE) for our students to save time and cut frustration. 
  • Optional – have students bring in pictures of someone they respect and want to make a portrait of. They will have to simplify the drawings, leaving out some details.

Tips & Tricks

  • The watercolor wash takes about 10-15 minutes.  It could also be done as a pull out a few days before to be sure it’s dry.  A blow dryer can speed up drying time.
  • Put out a small amount of salt.  Otherwise students may put too much on (it won’t hurt anything; it just makes a mess).
  • Tape the students’ paper to their desk.  This stops it from moving while they work with it and creates a nice white border when finished. Remove it slowly to prevent tearing.

Discussion Points

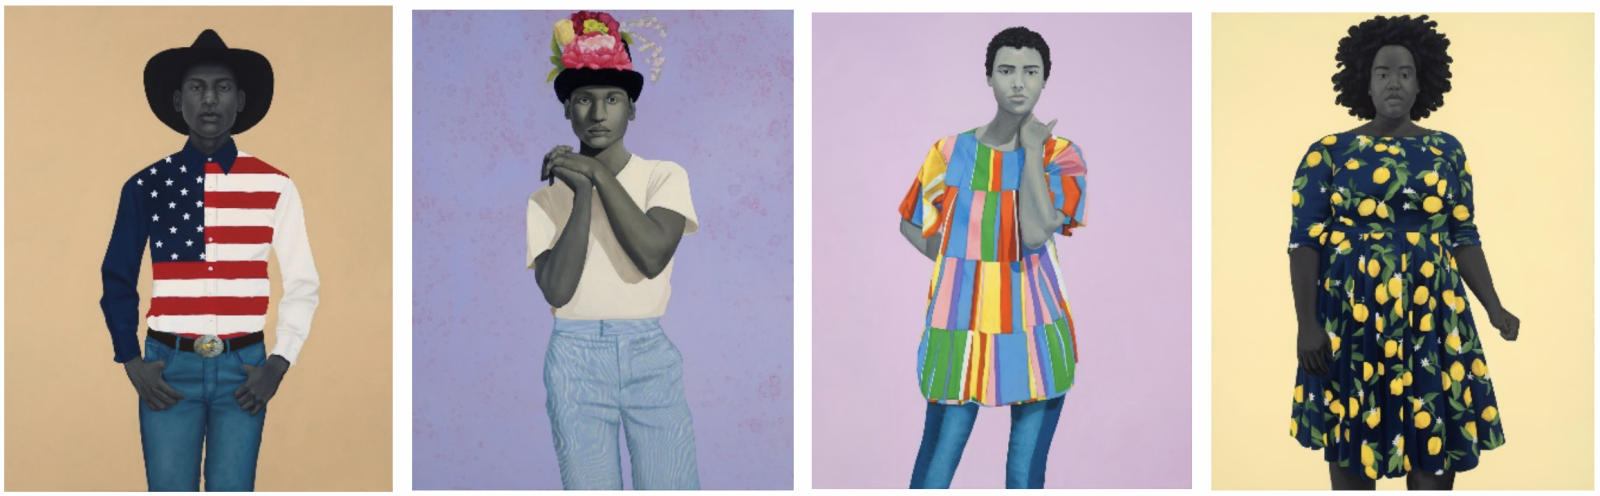
What do you notice about Amy Sherald’s portraits? (Her backgrounds look flat with subtle visual texture; the clothing uses strong hues and often has patterns, the main emphasis is on the person; the person is often looking at the viewer, the skin is often gray.)

How does she use emphasis? (She makes the person the main part of the painting. She has little detail in the background.)

What do you think she is saying with these portraits? (Learn about the person through the expression, details, colors, patterns and textures.)

Why do you think she uses a gray skin tone? (To question the idea of skin tone as important.)

When you create your portrait what colors and patterns do you want to use?  What about the background, smooth or textured? (Give them the options of the colors you have for washes; you don’t have to offer every color).

How will those colors and patterns reflect the person you have chosen? (Mood, personality.)

Reflection Point (Assessment of Learning Objectives)

Students will:

  • Observe the art of Amy Sherald.
  • Create a portrait in her style.
  • Use art vocabulary.
  • Use good craftsmanship.

Instructions for Lesson

Background painting:

Before students arrive:

  • Tape the papers to the tables.
  • Prepare water containers with large brushes.
  • Have the paint pre-poured in containers for table groups; don’t hand this out until after your discussion and demo.
  1. Post art vocabulary and briefly go through it. Refer to vocabulary words often during the lesson.
  2. Go through context and discussion points of Sherald’s work.
  3. Demonstrate painting a wash and adding salt:
    a.) Put your name on the bottom of the page with pencil.
    b.) Fill your water brush with water and cover the whole paper. The paper should be glossy looking, no puddles.

    c.)Fill your brush with a color. If it’s drippy, tap it onto paper towel to absorb the excess. Spread the color into the water until the page is covered. Use slow, even strokes to spread the color evenly. Beware painting too long in one spot. You could make a hole in the paper.
    d.)Fill your brush with a different color and drip drops of paint in various places.  As they are both wet these will ‘bleed’ a bit and create starbursts of color.
    e.)Take a small pinch of salt and sprinkle it over your paper.  You may need two or three pinches to cover the page. Salt absorbs paint.  This will dry as white starbursts.
  4. Have your students paint and salt their paper.
  5. Remove these to dry.

    Portrait time – students can use their imagination or use the images you had them bring. When beginning a drawing, sketch lightly-drawn lines that may need to be redrawn as you go. Don’t be afraid to draw over lines.  Once you have found the best line then erase the rest. Use this technique in the demonstration.
  6. Post vocabulary and briefly review it.
  7. Hand students their body templates (printable PDF template available HERE) and in pencil write their names on the center back of the body (they will later cut them out and you don’t want to lose the name).
  8. Demonstrate drawing a face using proportions and have your students follow along:
    a.) The eyes are halfway down the face, from the top of our head, with an eye width between then for the nose.  Lightly draw two almond shapes.
    b.) Halfway between our eyes and the bottom of the chin is the tip of the nose. Make a light mark there.  Students can use an upside down 7 or a ‘u’ for the nose.

    c.) The remaining space between nose and chin is divided into thirds, make two light marks.  In between these lines is the mouth.
    d.) A mouth can be made with a line, a large sideways ‘C’ underneath and an M on top or just a simple line.
    e.) Ears are shaped like C’s.  They start at the eye line and end at the tip of the nose.
    f.) Add eyelashes, brows, rosy cheeks and any details they choose to describe the subject.
  9. Demonstrate lightly sketching clothing onto their body. Play with different clothing ideas. Because you are sketching you can easily erase lines you don’t want. Circulate the room helping students get the clothing drawings they want.
  10. Demonstrate layering the colored pencils to get the skin tone they are looking for. 
    a.) Color lightly with the side of the tip of a pencil, then go over it in another direction with another pencil in the same way.
    b.) Students are welcome to use unconventional colors for skin and hair.  Amy Sherald often uses gray to eliminate the attention to race.
  11. Let students add patterns to their clothing.
  12. Students can add color with their pens and colored pencils to their portrait.
  13. Demonstrate holding and turning the paper as you carefully cut out the figure.
  14. Students cut out the portrait.
  15. If you have time, show them how to cut out the white space in-between the body and arms.  Pinch that area gently and make a cut on the fold.  Then slide the scissors in and carefully cut out the space.
  16. Check to be sure their name is on the back if you are storing them to be glued later.  

References & Attributions

Lesson written by Juliette Ripley-Dunkelberger. Artist bio from Artist Amy Sherald's website.

Notes for Educators

21st Century Thinking Skills
Thinking flexibly, persisting, questioning, creating, innovating, listening with empathy, taking responsible risks, observing, making connections, visualizing, sequencing, predicting, comparing/contrasting, determining main idea, finding evidence, problem solving, cause and effect, determining point of view, decision making.

WA State Learning Standards
(VA:Cr1.1.3) a. Elaborate on an imaginative idea.
(VA:Cr1.2.3) a. Apply knowledge of available resources, tools, and technologies to investigate personal ideas through the artmaking process.
(VA:Cr2.1.3) a. Create personally satisfying artwork, using a variety of artistic processes and materials, this happens if they choose to portray a real person.
(VA:Cr2.2.3) a. Demonstrate an understanding of the safe and proficient use of materials, tools, and equipment for a variety of artistic processes.
(VA:Cr3.1.3) a. Elaborate visual information by adding details in an artwork to enhance emerging meaning.
(VA:Pr6.1.3) a. Identify and explain how and where different cultures record and illustrate stories and history of life through art.
(VA:Re7.1.3) a. Speculate about processes an artist uses to create a work of art.
(VA:Re7.2.3) a. Determine messages communicated by an image.
(VA:Re8.1.3) a. Interpret art by analyzing use of media to create subject matter, characteristics of form, and mood.
(VA:Cn11.1.3) a. Recognize that responses to art change depending on knowledge of the time and place in which it was made.

Arts Integration Opportunities
Science: Capillary action when watercolors are applied to wet watercolor paper.  What is happening when we add salt to the watercolor?

Please note:  These lesson plans are intended for non-profit use only. Use of these plans for commercial purposes should give attribution to the Issaquah Schools Foundation and be accompanied by a nominal donation at www.isfdn.org/donate. Thank you.

Donate Now

Artistic Support Reference Materials

Loading...
Loading

Fueling Success for Every Student, Every School