loading Skip to Main Content

Art Nouveau Ceramic Tile

Students will observe Art Nouveau style art then create a create a clay tile with a flower motif, inspired by this style. Recommended for 3rd Graders.

Elements of Art

Linea mark on a surface between two points.
Shape: an enclosed line, having height and width, lacking depth. It is either geometric, with angles/corners or organic, as found in nature, without angles/corners. 
Texture: actual texture is how something feels when touched; visual texture (also called simulated texture) is how something appears to feel.

Principles of Design

Emphasis (focal point): the part of an artwork that is emphasized in some way and attracts the eye and attention of the viewer; also called the center of interest or focal point.

Additional Vocabulary

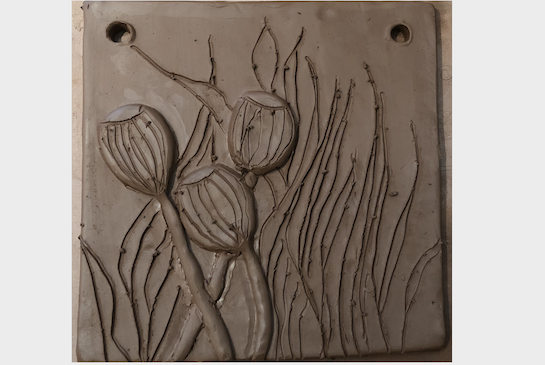
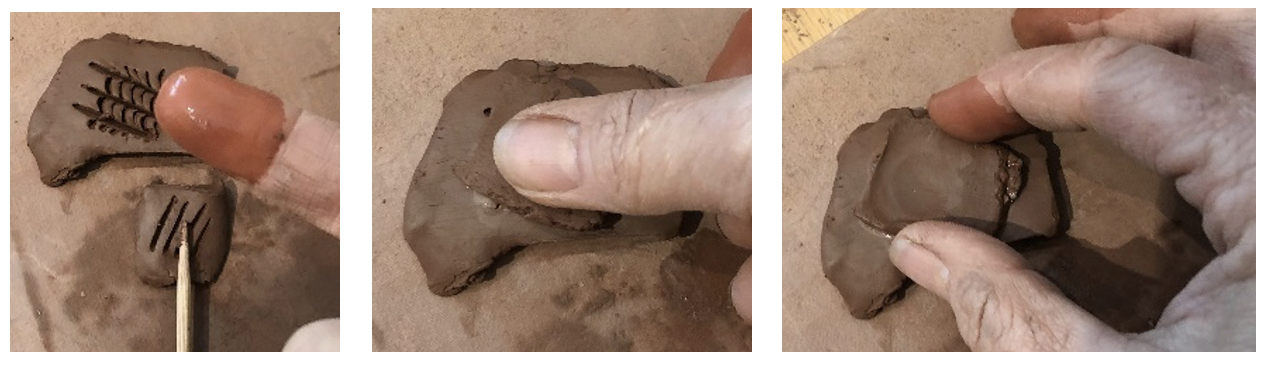
Bas Relief: (pronounced "bah ree·leef") is a sculpture technique in which design elements stick out from the surface, creating a bumpy texture.
Clay: A fine-grained, firm material that is plastic (sculpt-able) when wet and hardens under extreme heat, consisting primarily of water, silica (glass) and finely grained rock.  It is widely used in making bricks, tiles, and pottery.
Curvilinear: made of curved lines.
Firing: the act of heating dried clay to a specific temperature to permanently harden it. 
Glazes: a mixture of clay, water, colorants and silica.  When fired it becomes colorful, hard and glassy.  
Scoring (Scratch & Attach): how we attach two wet clay pieces, by scratching each touching clay surface to ‘interlock them’ before pressing together firmly.Slip: the slurry clay/mixture the consistency of melted ice cream. Used to attach wet clay pieces.

Materials & Supplies

Clay Building:

  • Low fire clay, 1lb/student
  • Class set canvas or vinyl mats
  • Wire clay cutter
  • Clay roller and shims
  • Circles and tear drop cookie cutters (or students can cut their own shapes)
  • Plastic knives, class set
  • Skewers, class set
  • Dull pencils, class set
  • Straws, class set
  • Worksheet with natural images students can easily copy: sun, flower, vine, tree, bird, bug, dandelion etc.
  • Texture tools
  • Small paper cups for water or slip
  • Cardstock 6” x 6” templates, class setLow fire clay
  • Wood skewers for drawing, scoring & cutting clay
  • Plastic knifes for cutting
  • Slip or water in small cups
  • Newsprint or paper towels for wadding to create a mold
  • Glazes in primary & secondary colors
  • Glaze examples
  • Glaze brushes: large and absorbent


    Glazing supplies:
  • Glazes, 4 colors and black
  • Brushes
  • Paper to protect work area
  • Paper cups
  • Dull pencils, class set
  • Glaze examples 

Context (History and/or Artists)

Art Nouveau was an international art style very popular at the turn of the 20th century (1890 – 1910).  It incorporated curvy forms, a decorative approach and was often inspired by the natural forms of plants.  A major tenant of Art Nouveau was to blur the lines between “fine” art and applied art (architecture, furniture design, interior design and graphic design).  Lots of household comforts would have art nouveau touches: pillows, furniture, tile work, wood working, jewelry and fabrics.  This style used many mediums not typically used in “fine” art like: glass, metal, wood, ceramics and textiles.  Louis Tiffany’s lamps, Antoni Gaudi’s architecture and Alphonse Mucha’s graphic arts posters are great examples of the Art Nouveau style.

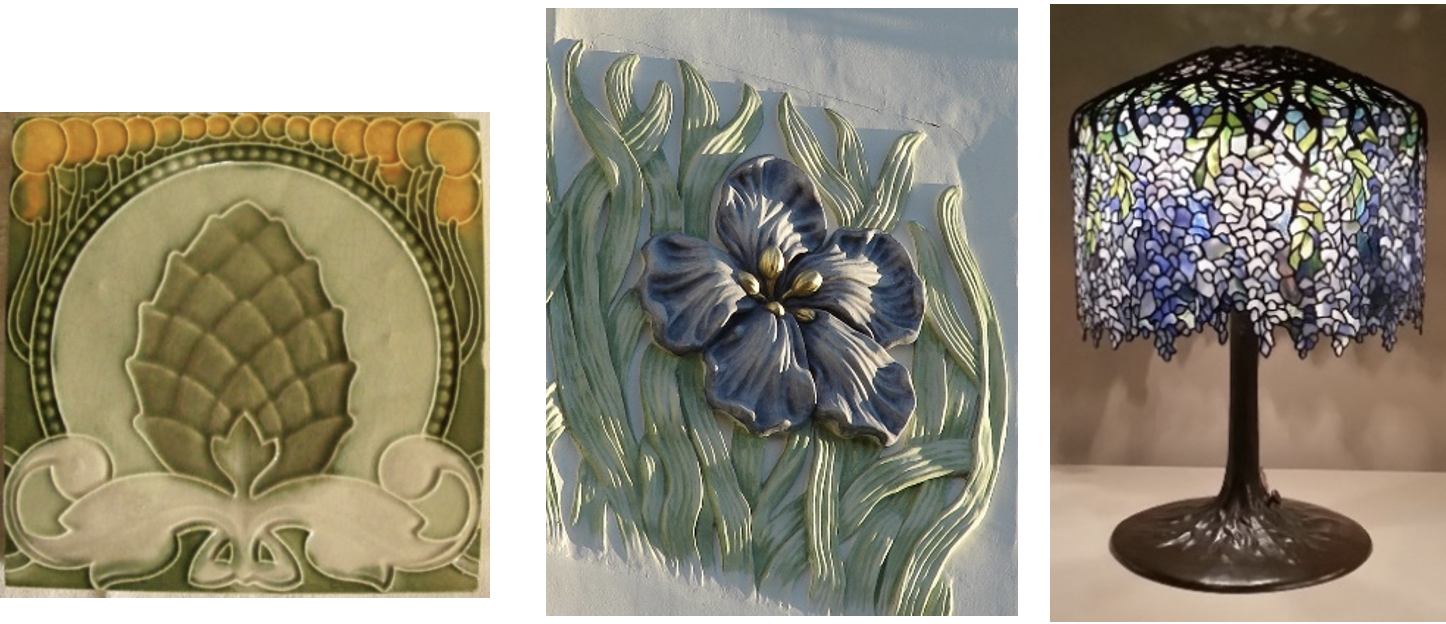
Above left image from Au Fil de l'Eau Antiques website. Above right image Louis Tiffany lamp.

Advanced Preparation

  • This lesson requires two sessions. 

  • Students build the work, it dries, then is fired. 
  • Students glaze the work, then it is fired again. This part requires less time.
  • Volunteers will string yarn through the holes to create a hanger. 
  • Gather 2-3 volunteers to help with this project. 
  • Cut clay out of bag by using a wire tool to cut straight down vertically, horizontally and across to make cubes. If you cut slabs directly across the bagged clay it won’t dry evenly and will crack in the center. From these cubes, roll out approx. 1 lb. rectangle slabs, to about 1/3” (thickness of a slice of bread) for each student (these can be stored in an airtight container separated by plastic for weeks) and wide enough to fit the 6” square templates.
  • Make extra for demonstration and in case students are gone and need one to glaze.  
  • Decide how you want to set up the cookie cutters: work stations or table groups.
  • Put butcher paper or vinyl (cut up tablecloths work well) or unprimed canvas mats at desks.

Tips & Tricks

  • Use scrap clay for students to practice “scoring”. 
  • Students must use slip or water in the scratches to guarantee they stay together. 
  • When attaching scored pieces, push from the center out. Any air pockets trapped between clay pieces could result in cracks during firing. 
  • Check to see if pieces are well attached with the “wiggle test”.  Gently try to wiggle an attached piece to see if it moves.  If it does then they need to better attach it (push more or score more). 

Discussion Points

Post vocabulary and briefly go through it. Use vocabulary throughout lessons.

Show images (2 or 3) of Art Nouveau pieces of other household items, in addition to what’s in the lesson.

  • Ask students to describe the lines. – curvy lines, no sharp angles
  • What sort of shapes do they see? – mostly organic
  • What do they notice about the subjects? – plants, people, no cars or buildings

What kind of things are these?  - decorative, usable household items

Reflection Point (Assessment of Learning Objectives)

Students will:

•          Observe Art Nouveau style art

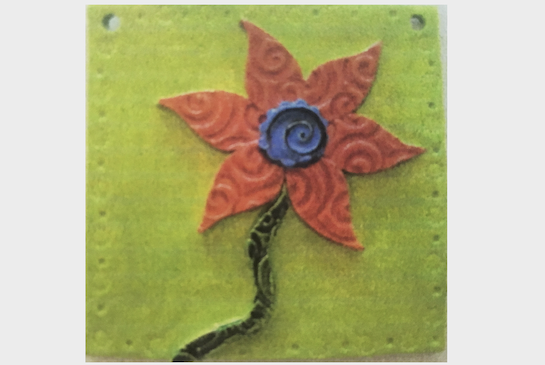
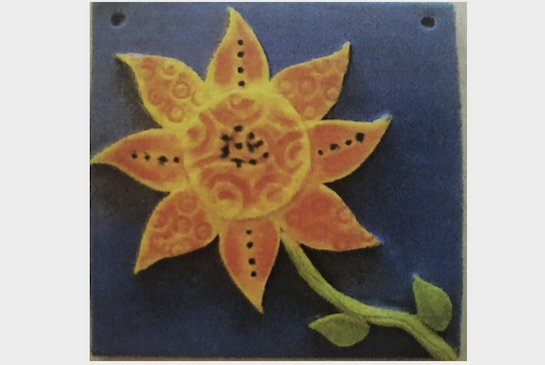
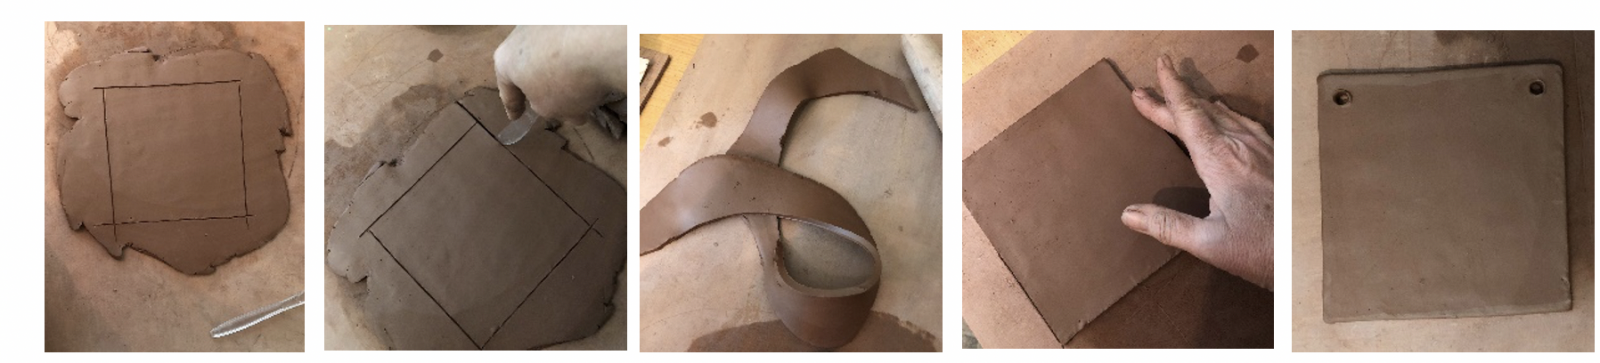
•          Create a clay tile inspired by this style.

•          Use clay tools and techniques.

•          Use art vocabulary.

•          Use good craftsmanship.

Instructions for Lesson

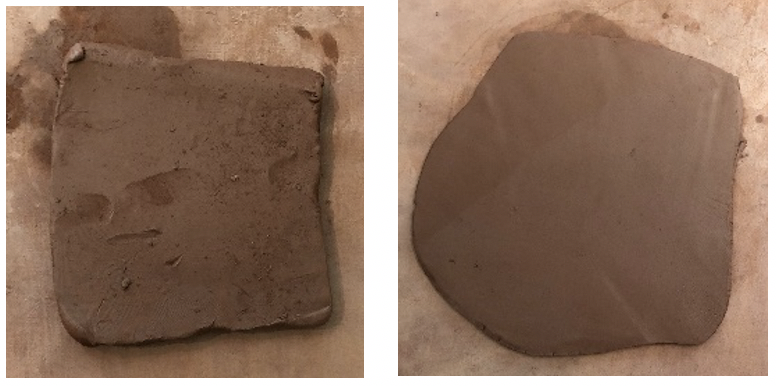
Set up the work space with taped butcher paper or canvas mats on the tables to work on. Put out the slip or water in small plastic tubs or bowls, not much (you can always refill).

Building tools: Every students space should have a slab, scrap clay, a plastic knife, a pencil and a skewer.   

  1. Demonstrate for students: Don’t start until you have all students watching quietly.
    a) Gently smooth the surface of the slab with your finger.
    b) Place their template on the slab and lightly trace around it with the pencil.
    c) Cut with the knife or skewer standing vertically and pressed completely through the slab until you feel the point touches the table. Drag gently along the outline and remove the excess. Talk about your process as you go. 
    d) Keep the excess slab pieces. They will become parts for the built-up nature scene.

    e.) Smooth the rough edges of the tile with your fingers.
    f.) Using the straw, carefully push it through the clay, no closer than ¼” in from both edges, to create a hole for hanging. Be sure it goes clean through, show students how it removes clay completely.
  2. Let the students complete these steps and then set their tile aside.  Have volunteers write students’ names gently on the back with a skewer while you demonstrate the next step.
  3. Demonstrate scoring using some scrap clay.
    a) With the skewer make scratches on surfaces of both pieces of clay that will attach. 
    b) Smear on slip or water.

    c) Press firmly together.
    d) Do the “wiggle test” (gently tug or wiggle both pieces to test adhesion).
  4. Have students practice with their scrap clay.  
  5. Walk around and wiggle test those that look like they are well attached.  Celebrate when they stay attached by announcing who’s done it successfully.
  6. When most students have done this step, stop them so you can demonstrate rolling or drawing textures into their excess clay from their slab. Remind them not to press too lightly or too hard. All pieces need to be roughly the same thickness when attached. Straws and other tools can also create textural patterns. 
  7. Allow students to briefly experiment with textures. Pass out worksheets with nature images.
  8. Have them cut out the attachments for their plant forms.  Let them get creative with organic forms and curvy lines.
    a) Circles for centers or small seed pods
    b) Tear drops for petals or other flower forms
    c) Roll small coils for vines, stalks and trunks.
  9. Students should lay out their design and move things around to find a focal point in their design (this is how artists make decisions: they try it, look at it, and see if it’s the best choice).  Have them ask themselves: where do you want the viewer’s eye to go first?
  10. When they settle on a design, they may attach their parts: score surfaces that will attach, brush slip onto both surfaces, and press pieces gently together from the center out. 
  11. Students should smooth the rough edges of the attachment with their fingers gently to avoid sharp edges and where attachment seams show.
  12. Students can draw gently with a skewer to add detail and background imagery.  Keeping in mind that their raised image should remain the focal point.


    Volunteer
    -  The little bits of clay can be brushed off before you put them in the kiln, when they are dry.  If students do it now it will smear their lines.
    -  Make sure to dry these pieces flat on newsprint so that they can shrink freely.

Instructions for Glazing the Tile

  1. Set up your space:
    a) with paper on the table to make for easy clean up. 
    b) With a single brush for each glaze color.  Students can ask for turns if needed.
    c) Pour a small amount of glaze in little cups and refill as needed.  That way if glaze gets mixed you don’t “lose” a whole bottle.
  2. Demonstrate:
    a) The glaze will dry very fast and almost stick.
    b) It doesn’t move around like paint.  Brushing more only moves it around.
  3. Also demonstrate glazing a section and then starting at the beginning again, to get two full coats of glaze on each section.
  4. Students can glaze their pieces.
  5. Wipe the bottoms of the pieces off with a damp sponge or paper towel before they go into the kiln to be sure no glaze is on the bottom.  It will stick to the kiln shelf.   

References and Attributions

Lesson from Newcastle Elementary. More about Bas Relief can be found here: https://www.thoughtco.com/bas-relief-183192; see also https://commons.wikimedia.org/w/index.php?curid=28011259.

Notes for Educators

21st Century Thinking Skills
Thinking flexibly, persisting, questioning, creating, innovating, listening with empathy, taking responsible risks, observing, making connections, visualizing, sequencing, predicting, comparing/contrasting, determining main idea, finding evidence, problem solving, cause and effect, determining point of view, decision making.

WA State Learning Standards
(VA:Cr1.1.3) a. Elaborate on an imaginative idea.
(VA:Cr1.2.3) a. Apply knowledge of available resources, tools, and technologies to investigate personal ideas through the artmaking process.
(VA:Cr2.1.3) a. Create personally satisfying artwork, using a variety of artistic processes and materials.
(VA:Cr2.2.3) a. Demonstrate an understanding of the safe and proficient use of materials, tools, and equipment for a variety of artistic processes.
(VA:Cr3.1.3) a. Elaborate visual information by adding details in an artwork to enhance emerging meaning.
(VA:Pr6.1.3) a. Identify and explain how and where different cultures record and illustrate stories and history of life through art.
(VA:Re7.1.3) a. Speculate about processes an artist uses to create a work of art.
(VA:Re9.1.3) a. Evaluate an artwork based on given criteria.
(VA:Cn10.1.3) a. Develop a work of art based on observations of surroundings.
(VA:Cn11.1.3) a. Recognize that responses to art change depending on knowledge of the time and place in which it was made.

Please note:  These lesson plans are intended for non-profit use only. Use of these plans for commercial purposes should give attribution to the Issaquah Schools Foundation and be accompanied by a nominal donation at www.isfdn.org/donate. Thank you.

Donate Now

Artistic Support Reference Materials

Loading...
Loading

Fueling Success for Every Student, Every School