Line:the flat path of a dot through space used by artists to control the viewer’s eye movement; a long narrow mark or stroke made on or in a surface.
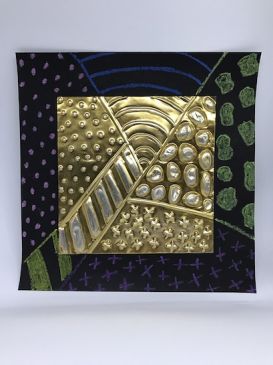
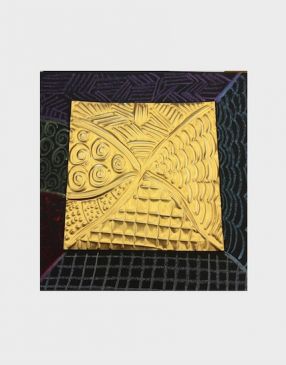
Texture: Actual texture is how something feels when touched; visual texture (also called simulated texture) is how something appears to feel.
Pattern: repetition of elements in an organized way. This creates unity.
Unity: the connection of parts so as to create a sense of completeness.
Cut the metal and construction paper. The metal comes in a 12” width so a 6x6” size works well. Find examples of visual texture in artwork and examples of tactile or textured embossed or hammered metal pieces to show students.An artwork with an amazing array of visual texture is The Arnolfi Portrait by Jan Van Eyck or Olive Trees by Vincent Van Gogh. The Pointillist style of painting uses patterns of dots.
This is a great project to pair with any work of art. Have students examine a great work of art and try to find as many examples of visual texture as they can. Then task them to transfer those textures into their metal project. Ask the students what the artist was trying to convey through the use of texture. What is the texture communicating?
Introduce the elements, principles and vocabulary words used in this lesson by writing them on the whiteboard. Define the meaning of each and ask how they apply to the lesson so far.
Before the lessons begins:
Give the students a 2x2”inch piece of metal to practice on. Ask them to test pressing down so as to create as much depth as possible without pushing through the piece. Then task them to push hard enough to poke through. This helps them learn the amount of pressure needed to emboss. Explain that they should build depth slowly by going over their lines multiple times. Work from both sides of the metal.
Lesson written by Laurelle Graves.
Students will observe and create visual and tactile texture to make an interesting composition. They will learn and use art vocabulary. They will use art tools responsibly. They will use good craftsmanship.
21st Century Thinking Skills
Observing, Making Connections, Visualizing, Sequencing, Comparing/Contrasting, Problem Solving, Decision Making, Evaluating.
WA State Learning Standards
(VA:Cr1.2.3) a. Apply knowledge of available resources, tools, and technologies to investigate personal ideas through the artmaking process.
(VA:Cr2.1.3) a. Create personally satisfying artwork, using a variety of artistic processes and materials.
(VA:Cr2.2.3) a. Demonstrate an understanding of the safe and proficient use of materials, tools, and equipment for a variety of artistic processes.
(VA:Cr3.1.3) a. Elaborate visual information by adding details in an artwork to enhance emerging meaning.
(VA:Re8.1.3) a. Interpret art by analyzing use of media to create subject matter, characteristics of form, and mood.
(VA:Cn10.1.3) a. Develop a work of art based on observations of surroundings.
(VA:Cr1.1.4) a. Brainstorm multiple approaches to a creative art or design problem.
(VA:Cr2.1.4) a. Explore and invent art-making techniques and approaches.
(VA:Re8.1.4) a. Interpret art by referring to contextual information and analyzing relevant subject matter, characteristics of form, and use of media.
(VA:Cr1.2.5) a. Identify and demonstrate diverse methods of artistic investigation to choose an approach for beginning a work of art.
(VA:Cr2.1.5) a. Experiment and develop skills in multiple art-making techniques and approaches through practice.
(VA:Cr2.2.5) a. Demonstrate quality craftsmanship through care for and use of materials, tools, and equipment.
(VA:Re7.1.5) a. Compare one's own interpretation of a work of art with the interpretation of others.
(VA:Cn10.1.5) a. Apply formal and conceptual vocabularies of art and design to view surroundings in new ways through art-making.
Arts Integration Opportunities
Writing: procedural essay, or persuasive essay:“which texture, visual or tactile, is my favorite and why?” Math: devise ways to quickly count the marks within each pattern.
Please note: These lesson plans are intended for non-profit use only. Use of these plans for commercial purposes should give attribution to the Issaquah Schools Foundation and be accompanied by a nominal donation at www.isfdn.org/donate. Thank you.
Fueling Success for Every Student, Every School