Context (History and/or Artists)
Printmaking involves the creation of a master plate from which multiple images are made. The artist chooses a surface to be the plate. The 4 main types of printmaking are woodcuts (carved), lithography (stone), serigraphy (stencil on fabric) and intaglio (etchings into metal). In this case it is a raised-relief surface that accepts ink onto the upper level (similar to a woodcut).
Advanced Preparation
Pre-cut small tagboard pieces into small & large rectangles, squares and triangles. Cut more than you think you’ll need.
Tips & Tricks
- A 2”-3” squirt of ink is good for one or 2 applications and then more must be added. DON’T allow students to squirt the ink. Keep the tube on your person or near you at all times.
- Look at the Plexiglas after it the ink is spread: too much ink has ripples; too little reveals the Plexiglas through the ink layer.
- Have students drop brayers and Plexiglas in a sink or bucket for easy rinsing by an adult.
- Once printer’s ink is dry it can still smear if wetted, so always keep the print dry. It’s not waterproof.
- Remind students that the background shouldn’t be cut.
Discussion Points
- Explain that all prints begin with a ‘master.’ Artists spend most of their time preparing it to produce multiple copies that can be printed quickly and inexpensively. In this way a work of art can be seen by more people and cost less money.
- Explain the basics of printmaking using an art stamp and stamp pad, pointing out that the uppermost parts of the stamp touch the inkpad to transfer the color to the paper, assisted with pressure. Handprints and fingerprints are another example of this process.
- Show students the brayer and Plexiglas (or other non-porous surface) to explain that if the master is too big to fit on a stamp pad, we apply ink with a brayer that has been loaded evenly with ink, taken from an evenly spread layer on the Plexiglas.
- Talk about the two types of shapes: geometric and organic and ask what a handprint shape is. Show them the geometric shapes, name them and ask the same.
- Look at the photos of hot air balloons for individual shapes within the composition.
- Talk about the contrast between the large balloons and the small baskets and between the negative and the positive spaces.
- Only raised or cut away areas will show up as details. Overlapping can show edges, as in a curved line as trim on the balloon shape, or straight line to connect the basket to the balloon. Remind students that drawn details won’t print.
Reflection Point (Assessment of Learning Objectives)
Students will:
- Use printmaking tools
- Observe and cut shapes to make an image
- Create a composition that includes movement as a master and make prints from it.
Instructions for Lesson
- Distribute adult T-shirts to protect clothing. Note: The water-based ink typically doesn’t stain but it's still worth being careful with. Put trays of geometric shapes on students’ desks and pass out the background sheets.
- The instructor should demonstrate first, so gather students around a large table or do it under the overhead projector. Begin by referring to a photo of a hot air balloon and show how to draw curved lines at three corners to curve edges, leaving the last corner as the bottom of the balloon. Cut along the outline, shaping the edges to form the balloon image.
- You can now trace this shape on other squares to cut more balloons. Cut 3 or more balloon shapes. For more detail cut a curved line to overlap the balloon or small circles glued down as dots on the. OR cut 3 different sized balloons to suggest depth in space: the larger ones will appear closer.
- Arrange them on the background sheet to show movement within the composition. Glue them down with liberal amounts of glue, especially at the edges and pressing and holding for a count of 5 seconds or more.
- Have students put their names on the backs of the background sheets and repeat steps 2-4.
- When most of the students are ready, the instructor can demonstrate how to glue the small square or rectangle shape that is the basket under the balloon. Cut 2 narrow ‘lines’ of tagboard that will fit between the balloon and the basket as the ropes. Glue these down.
- Have students repeat step 6 with their additional balloons.
- When a majority of them have finished, have them stop to watch the next demonstration.
- Gather students around a large table or do this under an overhead projector. Begin by squirting a ‘slug’s worth’ (2”-3” line) of printer’s ink onto the Plexiglas and rolling a brayer onto it, moving it in all four directions to spread it evenly without going to the edge. The object isn’t to cover the Plexiglas but to get an even layer onto the brayer.
- Evenly ink all sections of the master. Point out the way the brayer only touches the uppermost surfaces, but if there are large negative spaces the brayer will ink these too. Ink should cover with no tag showing through and no blobs of ink.
- Have the matching size drawing paper ready with your name on the back & lay over the inked master. Press evenly in all corners & the middle using a smooth side to side motion. Banging doesn’t work!
- Making sure students see this step: hold up the master while peeling back the print. Look for the ‘mirror image’ effect and talk about areas that don’t show up well. This may be because not enough ink or pressure was applied. Ask them why some of the negative space has ink (because it was big enough for the brayer to roll into).
- Students will make 2 or more prints. They will signal the adult they’re ready for ink after they write their names on the white paper. They will hold up 1 finger for the first color, and 2 fingers for the 2nd color. The adult should prioritize giving ink to the first printing. Use the darker color first, of the 2 colors you brought.
- For the 2nd color, use the lighter ink and squirt directly onto the prior inked Plexiglas. This will create a mixed color that is fun to roll. It’s not necessary to demonstrate printing with the 2nd color added. You might start with a primary color and add another to get a secondary. Or start with a color and add white or black to see what tints and shades happen.
- Continue helping and doling out ink until everyone made 2 prints. If you have extra time, paper & interest they can make as many prints as they want.
- These shouldn’t be stacked wet or they will stick together. Students usually want both master and prints although they may throw away the unsuccessful ones.
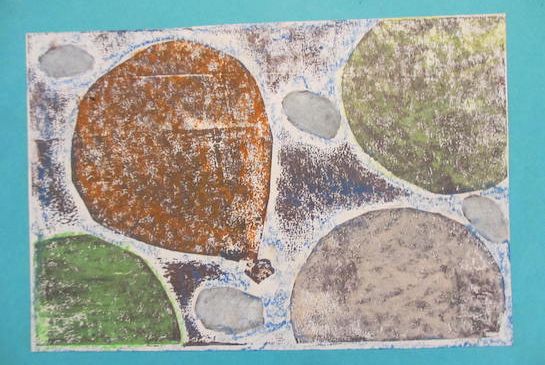
- Once they are dry, details can be added with oil pastels, either drawn with the point, or turned on the side to mimic the ink texture, as shown in the example above.
References & Attributions
Lesson Written by Cynthia Moring
Notes for Educators
21st Century Thinking Skills
Thinking flexibly, creating, taking responsible risks, observing, making connections, visualizing, sequencing, comparing/contrasting, determining main idea, cause and effect, decision making, evaluating.
WA State Learning Standards
(VA:Cr2.1.3) a. Create personally satisfying artwork, using a variety of artistic processes and materials.
(VA:Cr2.2.3) a. Demonstrate an understanding of the safe and proficient use of materials, tools, and equipment for a variety of artistic processes.
(VA:Cr3.1.3) a. Elaborate visual information by adding details in an artwork to enhance emerging meaning.
(VA:Re9.1.3) a. Evaluate an artwork based on given criteria.
Please note: These lesson plans are intended for non-profit use only. Use of these plans for commercial purposes should give attribution to the Issaquah Schools Foundation and be accompanied by a nominal donation at www.isfdn.org/donate. Thank you.
Donate Now