loading Skip to Main Content

Sugar Skull Printmaking

Students will learn about the ancient holiday of Día de los Muertos, use symmetry to make the shape of a sugar skull then create a colorful print. Recommended for 3rd Graders.

Elements of Art

Line: an element of art defined by a point moving in space: line can be descriptive (an actual edge), implied (surrounding elements define it).
Shape: an element of art that is a two-dimensional, flat, and limited to height and width.
Color Value: the relative lightness of darkness of a color.
Color Intensity: the relative brightness of a color. It’s at full intensity if it’s not mixed with black, white or gray.

Principles of Design

Balance: the arrangement of elements that add a feeling of equilibrium or stability to a work of art. Can be either symmetrical (the same on both sides) or asymmetrical (not the same but still feels stable). This lesson teaches symmetry.
Pattern: the repetition of any element to make an interesting design.
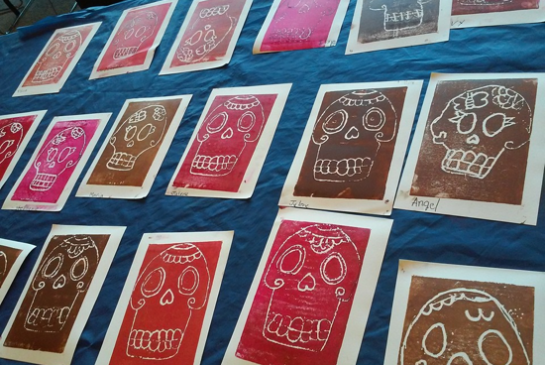
Positive & Negative Space: the positive space is the image and the negative space is what’s around it.  When printmaking, the positive and negative space color and inversion can “switch” to a mirror image.
Unity: all elements fit together in an interesting design. Balance and pattern do this.

Additional Vocabulary

Acrylic sheets: also known as acrylic glass, and by the trade names Plexiglas, Crylux, Acrylite, Lucite, and Perspex among others. It’s often used in sheet form as a lightweight or shatter-resistant alternative to glass.
Brayer: a hand tool used to apply ink to the acrylic sheet in an even layer, much like a stamp pad, only larger. The ink is hand-rolled onto the surface, rather than the stamp pressed into the pad.
Craftsmanship:  A way of working that includes following directions, demonstrates neatness and the proper use of tools.
El Día de los Muertos: (the Day of the Dead), a Mexican holiday, is a 3-day celebration during All Saints’ Day festivities over Oct. 30-Nov. 1, to remember family and friends who have passed on. Special food, art and the traditional cleaning of their graves honors departed loved ones. The living accept death as a part of the circle of life, by treating it as such and not something to be feared.
Matrix: The original surface that is carved or raised by the artist, so that multiple copies or prints can be made with it. An example of a matrix is an art stamp that is carved or raised to receive ink on the highest part of the surface to print.
Sugar Skull (Calaca): a 3-dimensional candy that represents a departed soul with the name written on the forehead. It is placed on the home ofrenda (tabletop shrine) with other meaningful objects, sometimes food and candles and/or flowers, to honor the return of a particular spirit. Sugar skull art reflects the folk-art style featuring big happy smiles, colorful icing and shiny tin and glittery adornments.

Materials & Supplies

  • Plastic tablecloth
  • 5x7 printing foam
  • Ball point pen
  • White printer paper 5x7
  • Water-based printer’s ink in 3 colors: black, white and red. KCDA carries this in large tubes.
  • Brayers (as many as you can get)
  • Plexiglas 5”x7” --8x10” sheets (as many as you can get)
  • Baby Wipes
  • Wax paper
  • Clothesline and pins (optional) 
  • Stamp and stamp pad
  • Scratch paper
  • Paper towels

Context (History and/or Artists)

Printmaking is an artistic process based on the technique of making a permanent image on a reusable surface (the matrix), which is altered by carving or use of chemicals so that the surface accepts ink only on the parts that the artist chooses.  Applying ink to the matrix’ surface enables the transfer of an image onto another surface, usually paper or fabric. Traditional printmaking techniques include woodcut, etching, engraving, and lithography, while modern artists have expanded available techniques to include screen-printing, use computers and explore non-traditional ways to create a matrix. 

Dia de los Muertos is a Mexican tradition during which people place an altar (ofrenda) in their houses to welcome the loved ones that passed away. It is observed on Oct 31, Nov 1 and Nov 2.  Altars have several important items such as the departed’s photo, favorite food, meaningful objects, flowers, candles and Sugar skulls.  Sugar skulls have become a popular ornament in the fashion and clothing industry in the United States. Small skeleton images dressed and engaged in everyday activities are also common. Many people in the Seattle area celebrate this tradition.

Advanced Preparation

  • Cut 5x7 white paper, 3 or more pieces perstudent.
  • Copies of sugar skull illustrations, (links below).
  • Copy templates of a simple skull for students to refer to while also demonstrating it step by step.
  • Find photographs of Mexican families celebrating this holiday, focusing on pictures of skulls and skeletons doing everyday things.
  • Optional: set up an ofrenda, so students can handle the items, or prepare a short slideshow on the holiday, or both.

Tips & Tricks

  • Don’t attempt letters and numbers: they must be drawn in reverse and in reverse order and can easily fail at this age. Remind them to only do the image of a sugar skull.
  • Teachers and docents have control of the ink: they should be the only ones supplying it when students are ready to print.
  • Have a printing station table. Teachers, docents/ volunteers should be behind the table to help students print. Cover the table with layers of newspaper which can be individually removed as they get too messy. Have a trash can near and wipes to clean fingers. If a table isn’t available, have students remain at their desks and raise their hand’ as they become ready, with adults walking to their Plexiglas to squeeze out the ink. Be sure they’ve already written their names on the back of the printer paper.
  • Set up a drying area:  rack, table, counter or hang a line with clothespins.  
  • Water-based printer’s ink washes out easily, even if dry. Simple cleanup: drop plexiglass sheets and brayers into a bucket or sink for quick rinsing later.

Discussion Points 

  • Post all vocabulary words and begin the lesson by explaining them. Use these words as much as possible during the lesson.
  • When explaining the basic principle of printmaking, use a small raised stamp (the matrix) and stamp pad to make multiple images (prints) on a piece of scrap paper. Do this under the overhead projector. Point out the way the surface is raised, which ensures only that part is inked. Remind students that an even layer of ink should be applied, with no blobs. Once they learn the concept, briefly describe the basic printmaking techniques that rely on uneven surface quality like a stamp. This type of printmaking is similar to woodblock carving, in which the surface that is to be untreated with ink is carved away. This is how fingerprints are made too!
  • Spend time describing the Day of the Dead tradition, showing images that feature skulls and skeletons doing everyday things. There are many picture books on this subject and may be in the school library.

Reflection Point (Assessment of Learning Objectives)

Students will:

  • Design an outline of sugar skull, using symmetry 
  • Learn about El Dia de los Muertos
  • Learn basic printmaking techniques
  • Use good craftsmanship

Instructions for Lesson

  1. Give each student several 5x7” white papers for sketching and printing, a 5x7” foam (matrix), a ball point pen, pencil and eraser.
  2. Place examples of black and white sugar skull illustrations on the tables and your simple version of a skull (you can find it on the internet) as well as under the overhead projector. This helps students draw the skull.
  3. Demonstrate drawing the outline of a skull to fit the whole space. It can be a circle for the top of the head, with a square overlapping to make the jawline, erasing the part of the circle and square where they overlap. Add oval shapes (eyes), rectangles (teeth), heart (nose). Have students do this with you one step at a time. This should be a simple drawing. Remind them that erase marks won’t show up on the matrix so no need to erase completely.
  4. Display and discuss the details traditionally used showing simple doodles of flowers, hearts, vines, dots, tear drops, triangles, scallops, stars, spider webs, spirals and lines. Put these on a sheet under the overhead projector. Have students choose 1 or 2 details.
  5. Demonstrate making the matrix: Place your sketch over the foam and trace the sugar skull one more time, pressing a little hard: it’s ok if the paper tears. With a ballpoint pen, go over your design into the foam one more time, the deeper you go, the better! But don’t go through it.
  6. Point out the positive /negative space and use other vocabulary words often.
  7. Have students write their names on the 2 pieces of white stock paper, this is the paper you are going to use for printing. 
  8. Demonstrate printing: Gather all the students: squeeze a 2” line (a slug) of black or red ink onto the Plexiglas. Roll the brayer up and down and side to side to make an even layer on the Plexiglas and mainly to cover the brayer. Roll the brayer to cover the foam: roll up and down, side to side, covering the whole design.  Have your white paper ready with your name on the back, center it and place over the inked foam, rub all over with your fingers (rubbing, not pounding!) or a clean brayer. Gently peel off the print from one corner.  Your print is completed. 
    (Note: if there are bare spots it may be that the brayer isn’t pressing flush or that the fingers didn’t rub all the spots.). Have each student make at least 1 good print.
  9. Move prints to the drying area. The drying process is very quick, 10-30 minutes. Be careful not to stack prints until they are dry. Warning! Even dry ink can smear if it gets wet again.
  10. Have 2 adults supplying 2” slugs of ink for each print. Students can either line up with their Plexiglas to get ink or share a Plexiglas and brayer with a partner so they alternate inking and printing. At least 2 or 3 adults are ideally to help for this class. 
  11. Optional, if time allows do a second print. For the 2nd squirt of ink, add another color to the dirty Plexiglas to change it up. Add white or red to black, black to red. 
  12. When finished, wrap wet foam with a piece of wax paper if students want to take it home, or just dispose of it.  Additional Option: keep both foam and print and mount them onto a large piece of construction paper to highlight the mirror image of matrix with print.

References and Attributions

Lesson created and written by Amaranta Sandys.
Books: Printmaking for Beginners, by Jane Stobar. Funny Bones, by Tonatiuh Duncan. Celebremos el Dia de los Muertos, by Marisa Orgullo. Examples of Sugar Skulls with designs can be found at https://clipground.com/sugar-skull-clipart-print.html and http://www.clipartbest.com/sugar-skull-clipart.

Notes for Educators

21st Century Thinking Skills
Thinking flexibly, persisting, creating, innovating, listening with empathy, taking responsible risks, observing, making connections, visualizing, sequencing, comparing/contrasting, determining main idea, problem solving, determining point of view, cause and effect, evaluating.

WA State Learning Standards
(VA:Cr1.2.3) a. Apply knowledge of available resources, tools, and technologies to investigate personal ideas through the artmaking process.
(VA:Cr2.1.3) a. Create personally satisfying artwork, using a variety of artistic processes and materials.
(VA:Cr2.2.3) a. Demonstrate an understanding of the safe and proficient use of materials, tools, and equipment for a variety of artistic processes.
(VA:Cr3.1.3) a. Elaborate visual information by adding details in an artwork to enhance emerging meaning.
(VA:Pr5.1.3) a. Identify exhibit space and prepare works of art including artists’ statements, for presentation. This happens if both matrix and print are mounted together to showcase the printmaking process.
(VA:Pr6.1.3) a. Identify and explain how and where different cultures record and illustrate stories and history of life through art.
(VA:Re7.1.3) a. Speculate about processes an artist uses to create a work of art. This happens when describing other printmaking techniques.
(VA:Re7.2.3) a. Determine messages communicated by an image.  This happens if the symbolism of the Day of the Dead images is learned.
(VA:Re9.1.3) a. Evaluate an artwork based on given criteria. This happens when meeting learning objectives.
(VA:Cn11.1.3) a. Recognize that responses to art change depending on knowledge of the time and place in which it was made.

Arts Integration Opportunities
Writing: Procedural to explain printmaking steps. Describe the Day of the Dead. Compare/contrast Halloween with The Day of the Dead.
Social Studies: when used to enhance a cultural experience of Mexico, or traditional holidays.

Please note:  These lesson plans are intended for non-profit use only. Use of these plans for commercial purposes should give attribution to the Issaquah Schools Foundation and be accompanied by a nominal donation at www.isfdn.org/donate. Thank you.

Donate Now

Artistic Support Reference Materials

Loading...
Loading

Fueling Success for Every Student, Every School