Form: a three-dimensional object that has height, length, width, and depth. It occupies space.
Line: a mark with greater length than width. Lines are either geometric (straight or arced) or organic (natural, erratic, flowing curves).
Balance: the arrangement of elements that makes individual parts of a composition appear equally important; an arrangement of the elements to create an equal distribution of visual weight throughout the format or composition. If a composition appears top- or bottom-heavy and/or anchored by weight to one side, it is not visually balanced. The physical or visual weight of the composition, so that the image feels stable and ‘right’. In this lesson we are looking at physical balance in a 3-dimensional form.
Rhythm: created when the repetition of an element creates visual movement in an artwork.
Battery: a storage unit for energy.
Circuit: a complete and closed path around which a circulating electric current can flow.
Craftsmanship: accuracy and neatness of construction. In this lesson, it’s making the sculpture balance sturdily and for multiple uses without breaking.
Kinetic art: art from any medium that contains movement perceivable by the viewer or depends on motion for its effect.
Motor: a machine that supplies motive power for some other device with moving parts.
Sculpture/Sculptor: A 3-dimensional work of art created by an artist is ‘sculpture made by a sculptor’.
This lesson is about letting the students experiment, tinker and collaborate; make decisions based on their experience with the materials. The goal is to successfully draw lines with their sculptures. The visual details are just for fun.
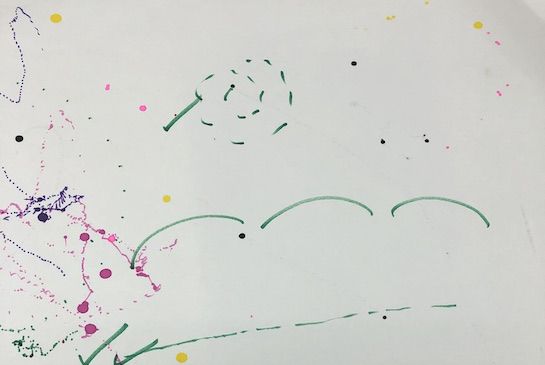
The air-dry clay attached to the fly wheel of the motor will cause it to be unbalanced and resulting vibrations will cause the bot to bounce, stutter and scoot across the paper. This will leave lines in its wake that are characteristic of its movement. Students can create different lines by changing the air-dry clay position and/or the placement of their pen feet.
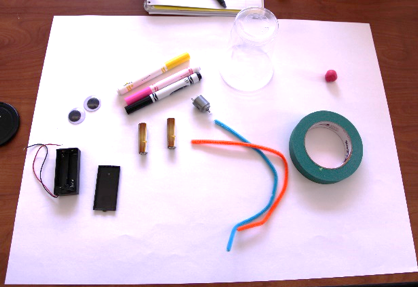
Create ‘kits’ – put needed materials for a single bot in a quart sized plastic bag for ease of distribution in the classroom.
Check the wires on the battery packs, if they are mangled or too short for students to wrap around the motor flange. Use scissor blades to scrape the plastic off the ends a bit.
Hang the mobile in a prominent place.
Immediately before the lesson, pair off students & pass out the kits.
Students will:
Students keep the drawings they create. The bot components will be re-used with another class.
1. Demonstrate assembling the Art Bot: do this under an overhead projector. Verbalize each step, using vocabulary words as often as possible.
a.) Put the batteries in the battery holder
b.) Attach the wires to the flanges on the motor
c.) Test to see if the motor works It’s best to demonstrate it not working, so you demonstrate trouble shooting, (getting curious) by checking the batteries’ placement, wire attachment.
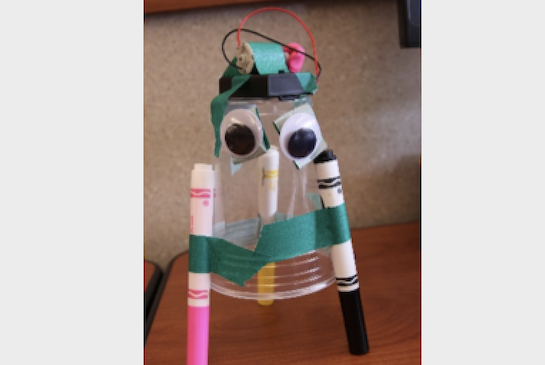
d.) Tape the battery holder & motor onto the cup allowing the motor fly wheel to hang off the edge. Tape can be trimmed to size with scissors.
e.) Tape 3 or 4 markers to the cup so that the cup is supported by them.
f.) Decorate the cup – eyes, antennae, stickers, pom poms.
g.) Attach air dry clay around the motor fly wheel.
h.) Take off the pen lids and let it move.
2. Now Students Make One: Handout 1 piece of white paper and 1 bot kit to each team (set of 2 students).
a.) Build the power source (batteries and motor) and attach to the cup. Turn on the motors and notice how they run.
b.) Attach the pens, adjusting for height before they tape them on.
c.) Decorate as desired
d.) Add the clay around the fly wheel
3. Start their engines!
a.) Let them problem solve/ get curious when things don’t work
b.) As they draw with the bots, ask open-ended questions to lead them to the answers:
--What kinds of lines are you getting? How many types of lines are you getting?
--Do you feel actual movement as well as see visual movement?
--Can you change the patterns?
--How does changing the air-dry clay change your lines?
--If your ‘legs’ aren’t all the same length does that change what your Art Bot does?
--What happens if you add more legs?
c.) Challenge them to create specific line patterns with their bot:
straight dashed line, spiral dashed lines and “hopping” dashed lines.
d.) Once students have experimented with their team bot (20 minutes left or so) let them join another team and create more options using what they learned from their previous experience.
e.) The last 5 minutes, have them share out what worked, what failed!
Lesson written and developed by Angela Bizzarri: docent Coordinator, Grand Ridge Elementary, 2017. Wikipedia defined Kinetic art.
21st Century Thinking Skills
Thinking flexibly, persisting, questioning, creating, taking responsible risks, reflecting, goal setting, observing, making connections, sequencing, predicting, comparing/contrasting, summarizing, finding evidence, problem solving, cause and effect, decision making, analyzing.
WA State Learning Standards
(VA:Cr1.1.4) a. Brainstorm multiple approaches to a creative art or design problem.
(VA:Cr1.2.4) a. Collaboratively set goals and create artwork that is meaningful and has purpose to the makers.
(VA:Cr2.1.4) a. Explore and invent art-making techniques and approaches. This happens when students explore the concept of ‘movement’ and ways to create it.
(VA:Cr2.2.4) a. When making works of art, utilize and care for materials, tools, and equipment in a manner that prevents danger to oneself and others
(VA:Cr3.1.4) a. Revise artwork in progress on the basis of insights gained through peer discussion.
Arts Integration Opportunities
Science – circuits, electricity and balance.
Please note: These lesson plans are intended for non-profit use only. Use of these plans for commercial purposes should give attribution to the Issaquah Schools Foundation and be accompanied by a nominal donation at www.isfdn.org/donate. Thank you.
Fueling Success for Every Student, Every School