loading Skip to Main Content

City in Perspective

Students will learn how to draw objects in 1-point perspective using rulers to draw vertical, horizontal & diagonal lines.  Recommended for 4th Graders

Elements of Art

Form3-dimensional object that has height, length and width.
Line: Mark between two points
Shape: a 2-dimensional (flat) area enclosed by a line (geometric or organic).
SpaceThe area between and around objects. In visual art it is the illusion of depth.

Principles of Design

Balancethe distribution of the visual weight of objects
Contrast: the difference between elements in a composition such that areas of contrast attract the viewer’s eye.
Patternthe repetition of an element throughout the work of art
Rhythmcreated by movement implied through repetition of elements in a non-uniform but organized way. Unlike pattern, which demands consistency, rhythm relies on variety.

Additional Vocabulary

Background:  the area around the objects.
Cityscape: a picture of a city.
Depth: the 3rd dimension that is missing from a shape but present in a form, and it’s the apparent distance from front to back or near-to-far in a 2-dimensional flat artwork.
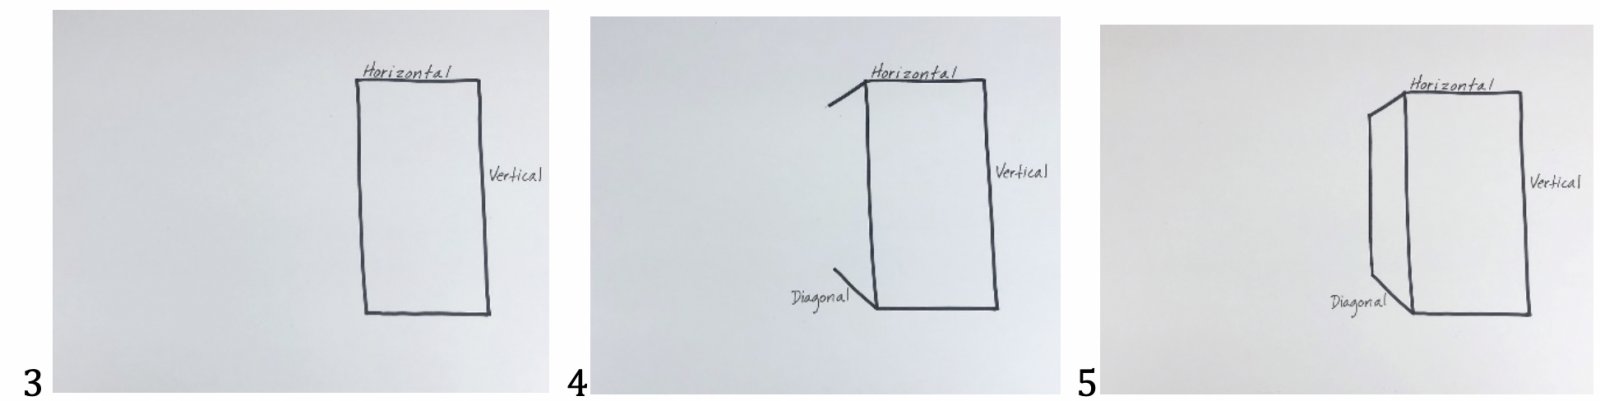
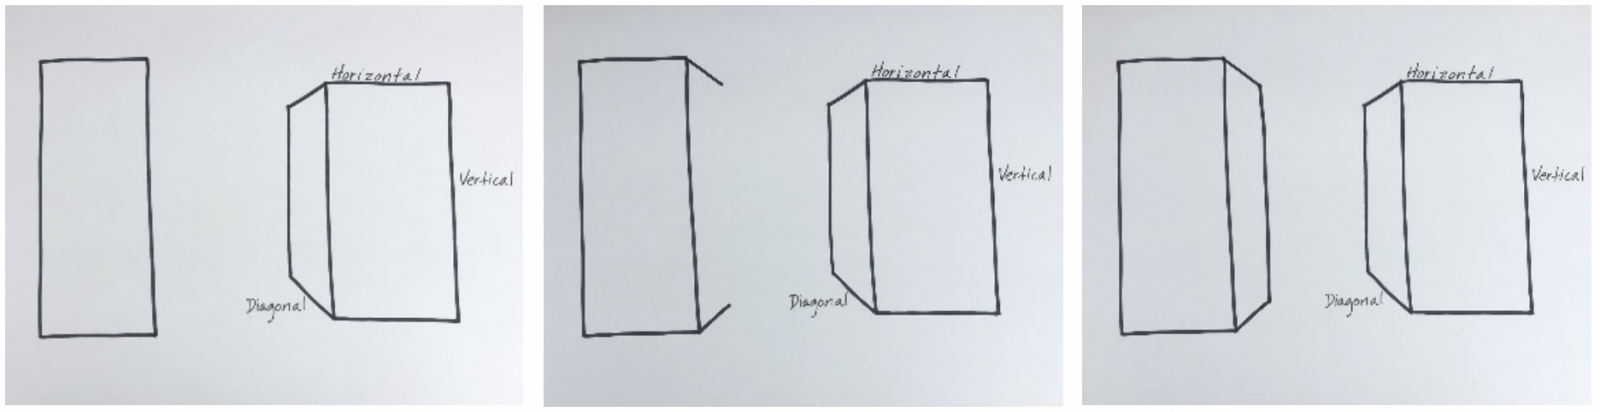
Diagonal: moving in an angled direction.
Horizontal: moving in a side-to-side direction, in alignment with the horizon.
Perspective: a technique (way of doing something) used to create the illusion of depth.
Vertical: moving in an up-&-down direction.

Materials & Supplies

  • Class set or more of white drawing paper, 9”x12” or 12”x18”         
  • Class set or more of black construction paper, 9”x12” or 12”x18”
  • Images of city skylines & skies                      
  • Class set or less of glue sticks
  • Class set of oil pastels including white. (students may share if necessary
  • Class set of rulers

  • Class set of pencils and erasers
  • Images of city skylines & skies                      
  • Class set or less of glue sticks 
  • Class set of scissors

Context (History and/or Artists)

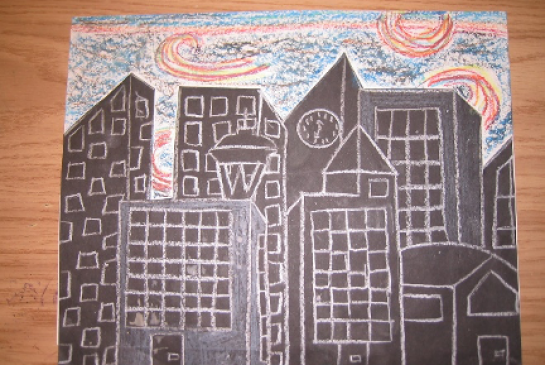
Vincent Van Gogh’s “The Starry Night” painting may offer inspiration for a background sky.

Advance Preparation

  • Gather photos of city sky lines and examples of one-point perspective.
  • Gather photos of different types of sky: cloudy, sunny, evening, fireworks, “The Starry Night”-the more, the better. 
  • Have the definitions of elements, principles & vocabulary word on an overhead, white board or handout for students to refer to.

Tips & Tricks 

  • Distribute black paper, rulers, pencils and erasers before you start.
  • When drawing, draw lightly so erasing is easier. If they can’t completely erase, remind them they will go over it with white oil pastels later, which will hide the drawing.
  • Because they’re tracing over their lines with oil pastel, don’t put the lines closer together than 1”.
  • Remind them when drawing, ‘if you can’t see it you don’t have to draw it’, implying that overlapping will hide what’s ‘behind’ it.
  • No free hand straight lines in this project! Use the ruler every time! It may seem like it’s slower, but it’s actually much faster and more effective.
  • If you can, find a good picture of the Seattle Space Needle. Students love to include that.
  • If a curved building is drawn, the windows must follow a matching curve. This is harder.

Discussion Points

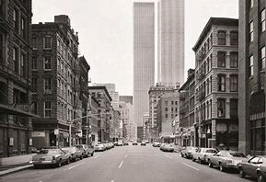
View images and discuss the way objects appear to shrink as they are farther away from the viewer. 

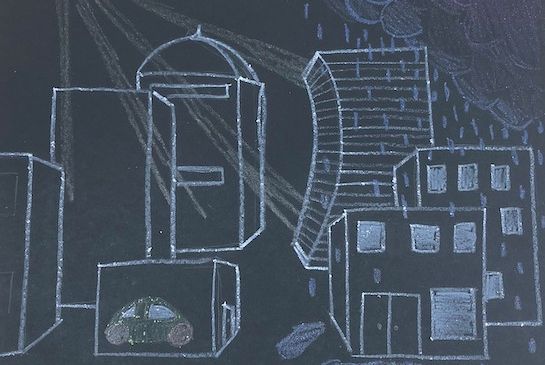
Point out the way geometric buildings are bound by horizontal and vertical edges on the walls facing us, but the tops (& bottoms) of the buildings are diagonal on the walls ‘going away’ from us, because they are ‘shrinking’ as they travel back.

Point out the way windows on a receding wall also have diagonal edges on the tops & bottoms, but not on the sides—these remain vertical, like the walls. 

Remind them that forms are just 3-d shapes, and when we draw them using perspective (point of view) we create the illusion of form & depth.

Reflection Point (Assessment of Learning Objectives)

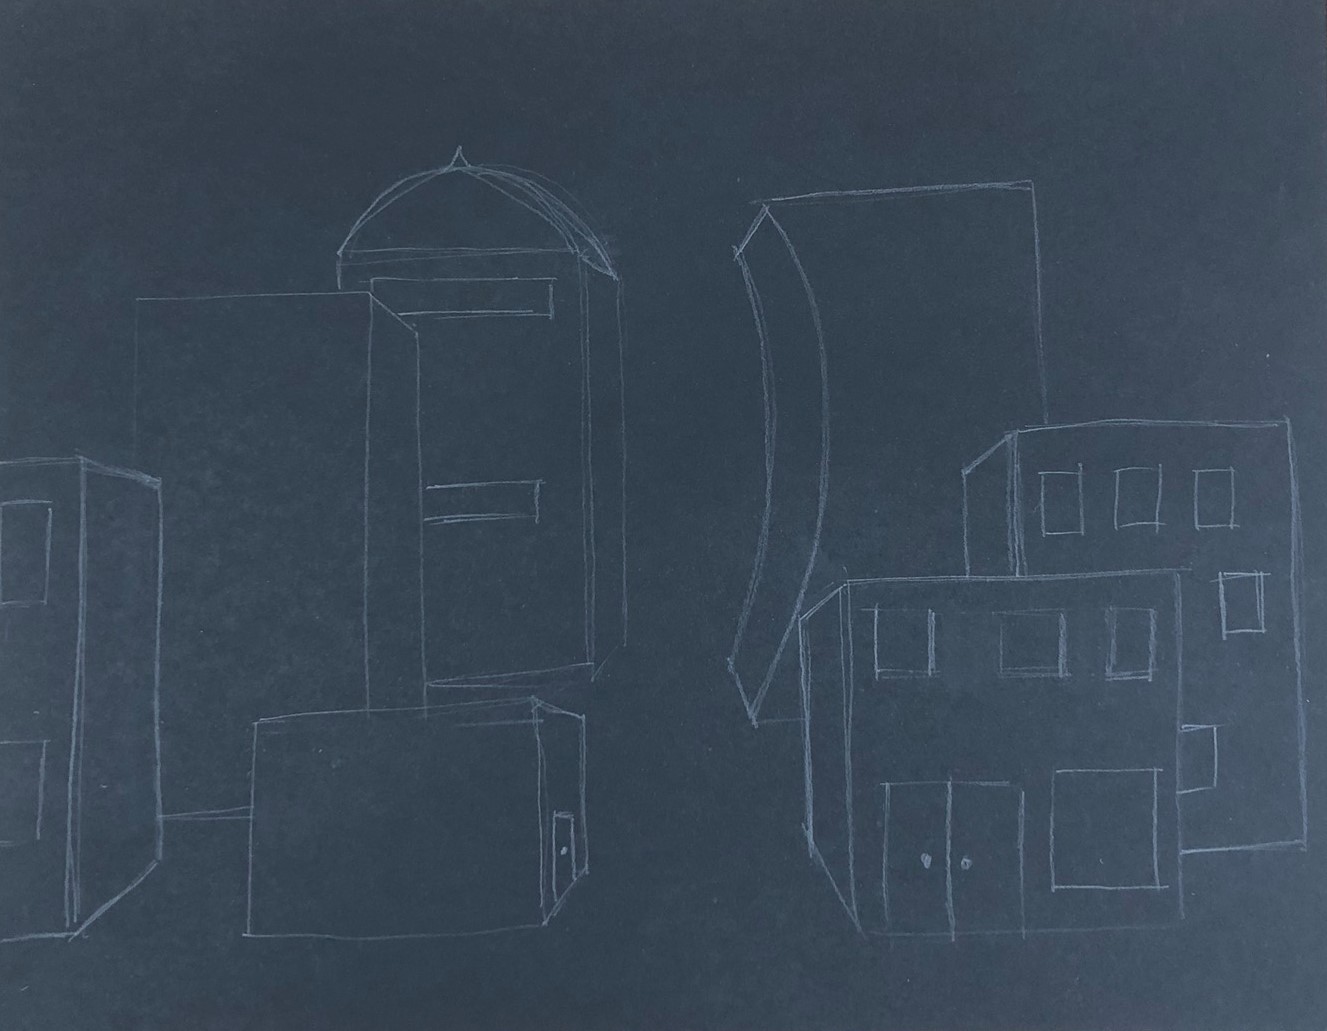
Students will use 1-point perspective (using vertical, horizontal & diagonal lines to depict receding or facing surfaces). They will use rulers to create straight lines & patterns of windows. They will make individual choices about what kind of sky to draw in their backgrounds.

Instructions for Lesson

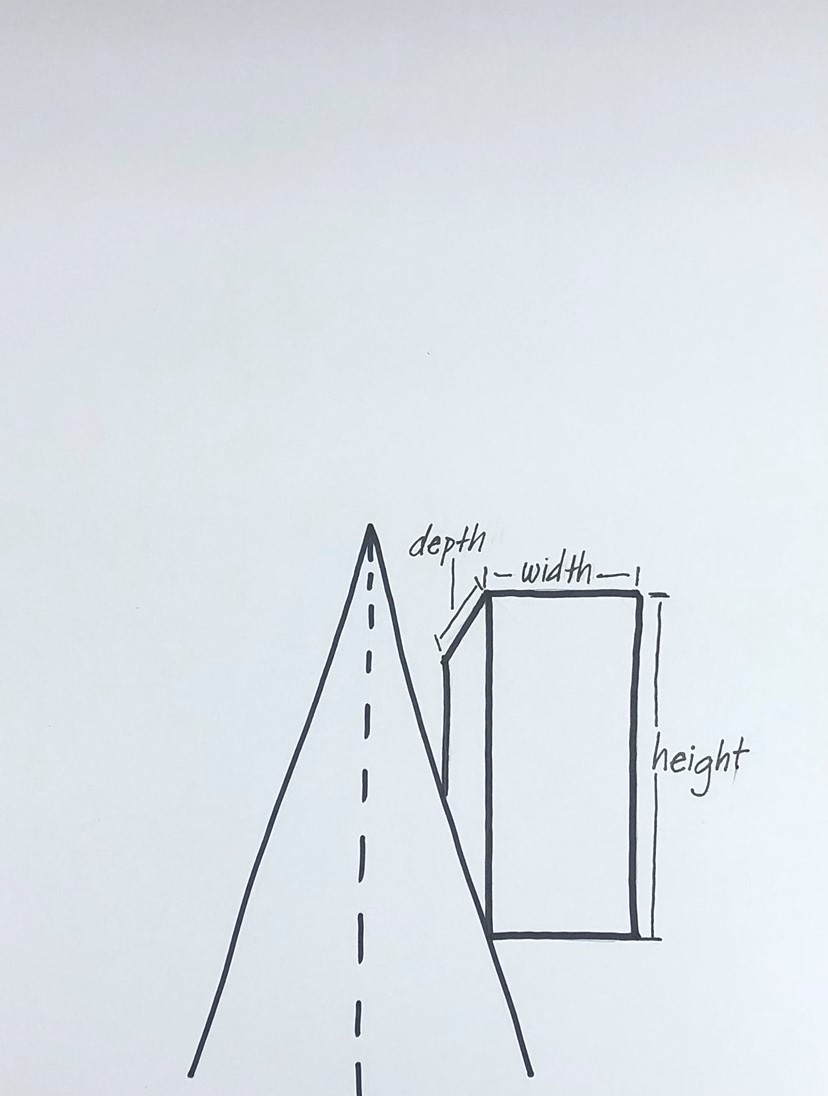
Set-up: Draw an upside -down V on the white board.
Add a vertical dotted line from the base to where the lines of the V meet.

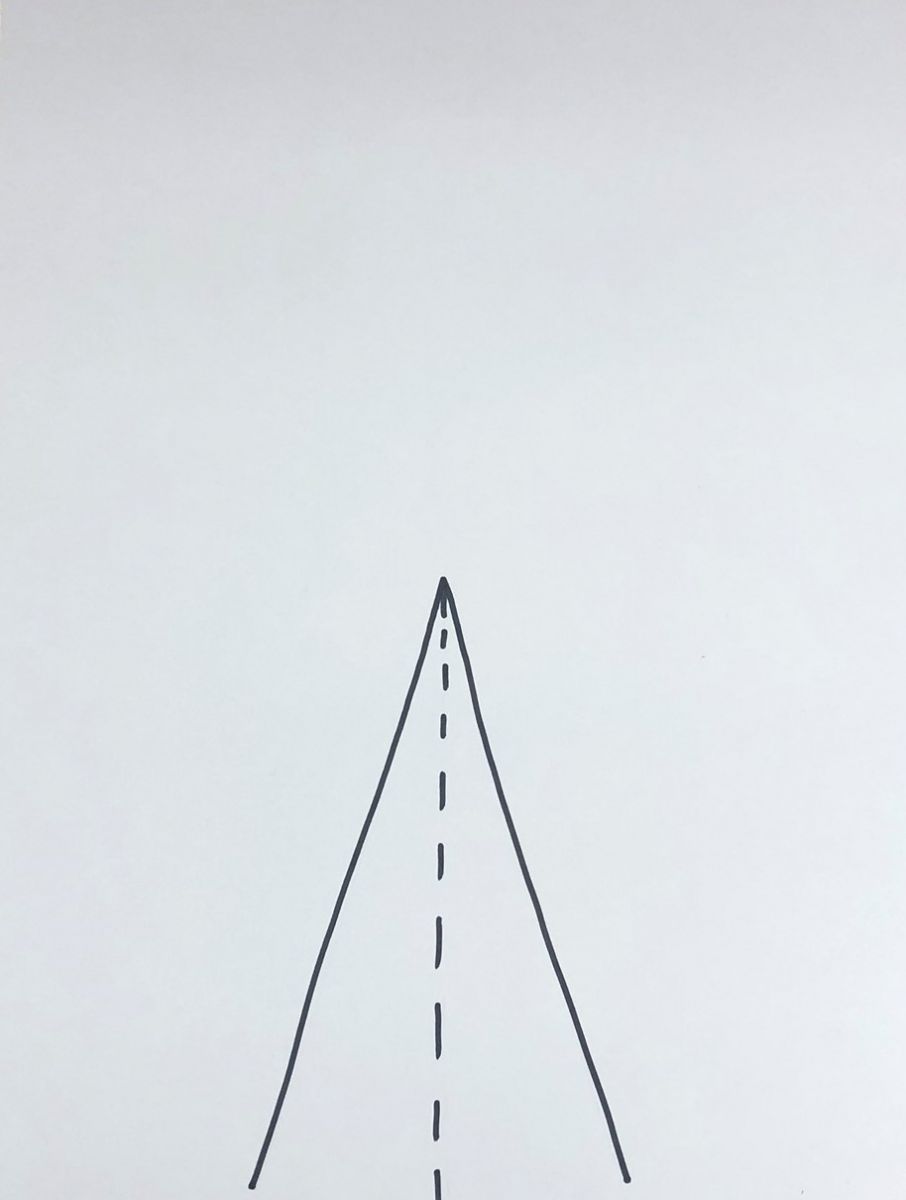
Ask them what this looks like to them. They usually see it 2-dimensionally. When you explain this is a road, & it’s an illusion of depth, you can remind them that things appear to shrink as they recede into the background. 
Write the 3 dimensions on the board: height, width & depth. Point out these 3 dimensions on a nearby object, such as a chair or a student.

Next, draw a line free hand, then draw one with a ruler: ask them which one looks straighter.

  1. Demonstrate on scratch paper how to correctly hold the ruler: right side up, the non-drawing hand holding the ruler down with at least 2 fingers, drawing on the drawing hand side of the ruler (right side for righties, left side for lefties). 
  2. Draw your road again, from the above exercise, on the paper.
  3. Draw a tall rectangle, labeling the horizontal and vertical lines. On the right side of the paper.
  4. On the left side draw a short diagonal line angling slightly down from the top & angling slightly upward from the base. 
  5. Connect these with a vertical line. Label diagonal & vertical. Point out that the ‘receding’ wall is doing what a road does if it’s moving back in space: it’s shrinking even if only very slightly. 
  6. Repeat this drawing on the left side, having the diagonals moving downward toward the center of the paper.
  7. Students will turn their black papers to the landscape orientation (hamburger) and you will walk them through the same drawing of 2 buildings on either side lightly with a pencil.
  8.  When all are ready to move on, have them ‘underlap’ another rectangle partially behind the one drawn on the right. Ask them to predict how to draw the receding wall. Remind them that the diagonals only replace the tops & bottoms (if visible) of buildings and should point to the center of the paper.
  9. Let them fill their skyline with buildings. Encourage a variety of height, width, & roof shape (rounded, triangular) & placement. 
  10. Bring them back to your original sketch to watch you draw windows. Use your ruler to draw a pattern of short horizontal lines crossing the facing wall, to make the bottom edge of a row of windows. Match this with a row of horizontal lines an inch or so above, to form the tops of windows. Then use the ruler to draw the vertical edges of the windows. Have them copy you. Since oil pastels will trace over these lines, don’t get too tiny with details.
  11. Have them watch you draw a row of windows on the receding wall of the same building. Instead of horizontal lines you’ll draw them with a slight angle that matches the roof line. Do both top & bottom window lines, so that they line up with the row on the facing wall. Then draw the connecting vertical lines, reminding them that verticals never change. (Some students won’t understand or want to draw windows on the receding walls, which is ok.) 
  12. When finished they should overlap with a white oil pastel. Because of its thickness, lay the ruler slightly farther to the side to accommodate its size. They still use a ruler on this step!
  13. Demonstrate how they will cut along the roofline of the cityscape and glue onto similar size white paper, allowing room for a sky. Pass out white paper & glue while they are cutting.
  14. Demonstrate making a sky with oil pastels (no pencils). Remember to do one differently from the example so they have options. Walk around & announce the different kinds of sky you see being drawn.

References and Attributions

Lesson written by Cynthia Moring. How To Teach Art To Children. Even Moor, 2001.

Notes for Educators

21st Century Thinking Skills
Observing, sequencing, problem solving, persisting.

WA State Learning Standards
(VA:Cr1.1.4) a. Brainstorm multiple approaches to a creative art or design problem. When deciding on what to include in the sky, what shape roof for buildings.
(VA:Cr2.1.4) a. Explore and invent art-making techniques and approaches.   When studying one-point perspective.
(VA:Cr2.3.4) a. Document, describe, and represent regional constructed environments. 
(VA:Cr3.1.4) a. Revise artwork in progress on the basis of insights gained through peer discussion. This is achieved as you make comments on what students have chosen to depict in their skies and building details.
(VA:Re9.1.4) a. Apply one set of criteria to evaluate more than one work of art. This happens when you reflect if students learned the objectives of the lesson.
(VA:Cn10.1.4) a. Create works of art that reflect community cultural traditions. This happens if community and culture is revealed in detail.
(VA:Cn11.1.4) a. Through observation, infer information about time, place, and culture in which a work of art was created. This happens if certain known landmarks are included, such as the Seattle Space Needle.

Arts Integration Opportunities
Vocabulary words can be included in spelling lists.
Social studies lessons can incorporate 1-point perspective illustrations of towns, dwellings, landmarks being studied. Eg. Log cabins, pyramids.

Please note:  These lesson plans are intended for non-profit use only. Use of these plans for commercial purposes should give attribution to the Issaquah Schools Foundation and be accompanied by a nominal donation at www.isfdn.org/donate. Thank you.

Donate Now

Artistic Support Reference Materials

Loading...
Loading

Fueling Success for Every Student, Every School