loading Skip to Main Content

Hatching and Crosshatching

Students will draw a building using hatching techniques to create shadow and imply depth. Recommended for 4th Graders. 

Elements of Art

Line: a long narrow mark or stroke made on or in a surface.
Form: a 3-dimensional figure that exists in space instead of flat on paper.
Shape: a two-dimensional (flat), limited to height and width.
Value: (Hue/Shade/Tint): 
Color (Hue) and variations of the color. Shades are color+black, tints are color+white. Muted colors have gray added.

Principles of Design

Contrast: refers to the arrangement of opposite elements, or using very different qualities next to each other to create visual interest, excitement and drama.  E.g. smooth/rough textures, light/dark colors, or thick/thin lines.
Pattern: uniform repetition of any element of art: in this case: color, shape & line.
Rhythmcreated by movement, implied through the repetition of line in a non-uniform but organized way to show 2 & 3-dimensions.

Additional Vocabulary

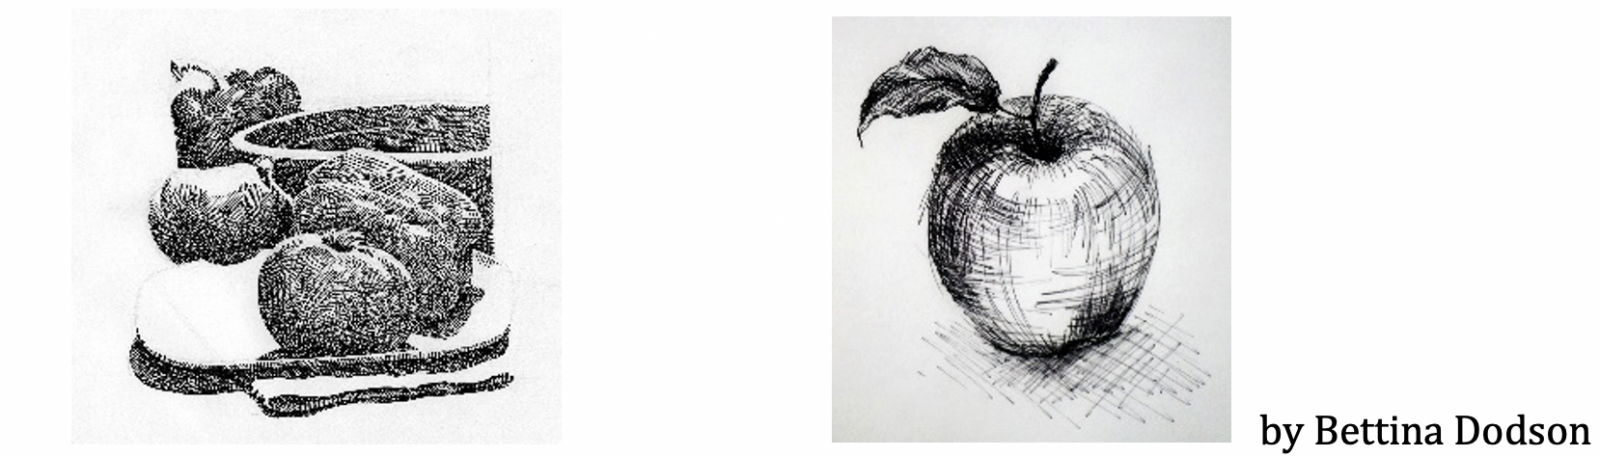
Crosshatching: the use of multiple parallel marks, laid over another set of parallel marks going in a different direction, to darken color.
Craftsmanship: A way of working that includes following directions, demonstrates neatness and the proper use of tools.
Gradation: a gradual change in value and/or color.
Hatching:  the use of multiple small parallel marks which create a color value.
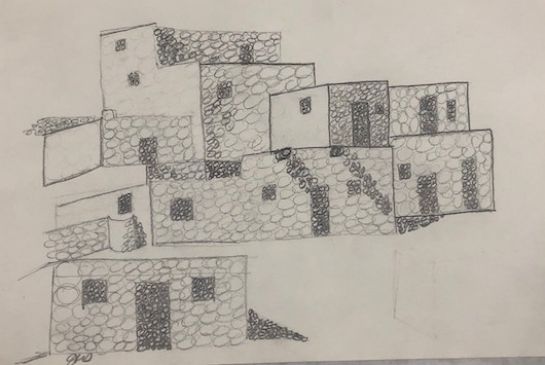
Linear perspective: a technique to simulate depth in a 2-dimensional picture plane. Objects that appear to recede get smaller, nearer the horizon, and are overlapped.

Materials & Supplies

  • Pencils,
  • Class set rulers (optional but help low confidence drawers)
  • Fine tipped permanent markers
  • Kneaded erasers

Advanced Preparation

Context (History and/or Artists)

Cross-hatching is a method of line drawing that shows shadows. Light is shown by the white of the paper, while shadow is created by crossed lines. The closer together the lines, the darker value you will create.

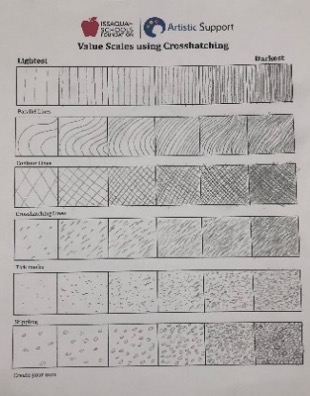
Using the value scale below, see how the light end at left uses a simple pattern of parallel lines spaced widely and evenly apart to represent light. The dark end (right) layers crisscrossing lines to represent shadow. The use of densely packed lines creates deep shadow and is how we show depth on a flat page.
 

Discussion Points

  • Write the definitions on the board, read them aloud and use those terms during the lesson.
  • If you have one color to draw with, how do you make it look darker? (press harder, go over it a few more times, etc.)
  • When you are drawing on a flat surface (height and width), how can you make something look three dimensional (depth)?
  • Light moves in a straight line, so it hits an object in different ways, depending on the object’s surface. Parts of the surface that receive less light look darker with shadow. Look around the room for proof of that theory. Look for the ‘cast shadow’ that is left on the ground or wall when light is blocked by an object.

Reflection Point (Assessment of Learning Objectives)

  • Students will create implied form using charcoal blending techniques.
  • They will differentiate between 2D shape and 3D form.
  • They will use good craftsmanship.

Instructions for Lesson

  1. View images of hatching and crosshatching used to create depth using the vocabulary words as you talk about them. Black and white comic strips are fun to use too.
    Bettina Dodson artwork examples using crosshatching technique
  2. Demonstrate hatching.  Ask if anyone can think of other marks that would do this.  (Hopefully you will get some ideas like stippling, crosshatching and contoured hatching.)
  3. Demonstrate each of the marks that they need to fill in their worksheet.
  4. Hand out crosshatching value worksheets and have students fill them in (5 – 8 minutes).
  5. Hand out drawing paper as they are working. Wait to hand out rulers.
  6. Direct students’ attention to the image you have for them to draw from. Talk about the basic lines and shapes found in buildings.
  7. Point out areas with light, medium and dark values.  Compare it to the shading they made with cross-hatching.
  8. Demonstrate: find a building wall shape and draw it, then move on to the shape next to it.  Be observant using angles and perspective as a guide for your lines.
  9. Remind everyone that the goal isn’t to re-create the photos perfectly, it is to use hatching / crosshatching to create shadow and imply depth. The photos show us where shadows are.
  10. Demonstrate: in the photo find a shadow, maybe door, window or cast shadow and outline its shape with your finger. Now return to your drawing and hatch that same shadow in the same place. Talk about the process as you work, making sure everyone is watching.
  11. Students can choose which type of mark to use to create their values.  They need to remain consistent throughout unless they want to call attention to a specific item.
  12. Students can choose an area of the photo, instead of the whole photo, to draw lightly with their pencil.  
  13. Hand out rulers to those who want them. When they finish pencil drawing, they can go over the marks with their fine tipped marker. 
  14. As they draw, keep track of the time. About 15 minutes before the end of class, announce that everyone needs to finish what they are working on and switch to marker. 
  15. As you circulate, you can talk about what you see being drawn by who. Keep it positive and share successes. Talk about their craftsmanship, difficult details they’ve added, use art vocabulary again and again.

References and Attributions

Lesson written by Juliette Ripley-Dunkelberger. 
Alexander, K. (2003). Drawing & painting activities: using masterworks as inspiration. Glenview, IL: Crystal Productions.

Notes for Educators

21st Century Thinking Skills
Thinking flexibly, persisting, questioning, creating, innovating, listening with empathy, taking responsible risks, observing, making connections, visualizing, sequencing, predicting, comparing/contrasting, determining main idea, finding evidence, problem solving, cause and effect, determining point of view, decision making.

WA State Learning Standards
(VA:Cr2.1.4) a. Explore and invent art-making techniques and approaches.
(VA:Cr2.2.4) a. When making works of art, utilize and care for materials, tools, and equipment in a manner that prevents danger to oneself and others.
(VA:Cr2.3.4) a. Document, describe, and represent regional constructed environments.
(VA:Cr3.1.4) a. Revise artwork in progress on the basis of insights gained through peer discussion. This happens if you share out about students’ choices of craftsmanship during the lesson.
(VA:Re7.2.4) a. Analyze components in visual imagery that convey messages. This happens when you explain how to create the illusion of depth in a 2-dimensional picture plane.
(VA:Re8.1.4) a. Interpret art by referring to contextual information and analyzing relevant subject matter, characteristics of form, and use of media.
(VA:Re9.1.4) a. Apply one set of criteria to evaluate more than one work of art. 
(VA:Cn11.1.4) a. Through observation, infer information about time, place, and culture in which a work of art was created.

Please note:  These lesson plans are intended for non-profit use only. Use of these plans for commercial purposes should give attribution to the Issaquah Schools Foundation and be accompanied by a nominal donation at www.isfdn.org/donate. Thank you.

Donate Now

Artistic Support Reference Materials

Loading...
Loading

Fueling Success for Every Student, Every School