Elements of Art
Form: 3-dimensional structures expressing length, width and depth.
Shape: A closed line to make a 2-dimensional shape (flat).
Texture: The perceived or actual feel of the surface.
Value (light &/or shadow): Altering the hue with tints & shades to create light & shadow, artists create the illusion of depth (the 3rd dimension) in a 2-dimensional space.
Principles of Design
Movement: using curved line & tints & shades to move the viewer’s eye around the image to create the illusion of depth.
Additional Vocabulary
Contour lines: Lines drawn to suggest the form (depth) of an object.
Depth: the 3rd dimension that’s missing from shape but present in form.
Overlap: Shapes that appear to be ‘in front of’, and cover shapes that are ‘behind’, suggesting depth.
3-dimensional form: takes up space using height, width & depth.
Materials & Supplies
- Class set or more of light gray construction paper, 9”x12”
- Class set of pencils, erasers
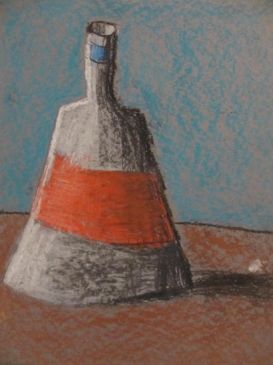
- Photos or paintings of bottles, lit from either side, with a cast shadow.
- Class set or less of oil pastels (students may share if necessary)
- Wet wipes (1-2 per student)
Context (History and/or Artists)
Shiny bottles are often used in still-lifes. Matisse, Van Gogh & others used them in their paintings.
Advanced Preparation
Put the definitions of elements, principles & vocabulary words under a document camera or on a white board for students to read.
Tips & Tricks
- Distribute gray paper, pencils and erasers before you start.
- Draw lightly so erasing is easier. If they can’t completely erase, remind them they’ll go over it with oil pastels later.
- Because they’re going over them with oil pastel, don’t put the lines too close together.
- Draw the top & base of the bottle first to establish the size within the composition.
Discussion Points
Discuss the way 3-d objects reflect light:
- There is a place where the light hits directly (the highlight) & reflects. It’s especially bright on shiny surfaces like metal, glass, ceramic, & water.
- Shadow happens where the light is blocked. All 3-d objects will cast a shadow on a nearby surface. Have them look around the room for evidence of this.
- There are also areas of mixed light-shadow where some light is present, but it’s not fully lit.
- Point out how artists adjust tints/shades to make light 'reflect’ off a bottle to create the illusion of depth.
- Have them look for a highlight & a cast shadow.
- Have them identify where there’s mixed light-shadow as the bottle appears to curve away from the light.
*Point out how curved (contour) lines within the shape can make it look round. The bottom of the bottle, or rim, or label curves as it gets ‘closer’ to us. When we draw ‘closer’ objects, we draw them lower on the paper, while ‘farther’ objects are drawn higher. The sides of the bottle, however, stay parallel.
Reflection Point (Assessment of Learning Objectives)
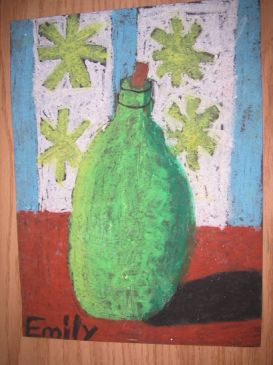
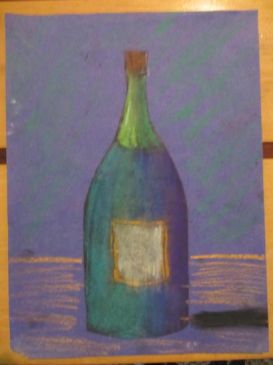
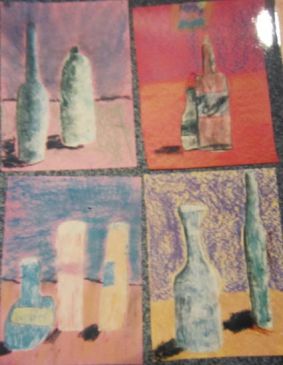
Students will draw a bottle using contour lines and hues/tints/shades. They will put it in a 3-d space using overlapping & a cast shadow. They will use their fingers to blend their oil pastels into a gradation vs. stripes. They will create two distinct textures by blending their pastels on the bottle and not blending the colors and patterns they may create for their background.
Instructions for Lesson
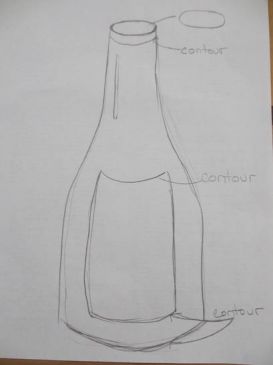
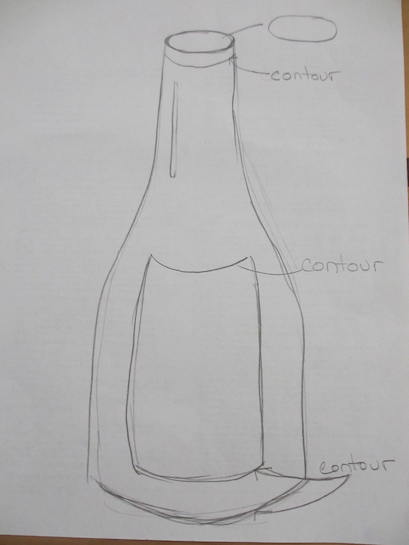
- Place a sheet of gray paper under the document camera, in the ‘portrait’ orientation. In the center, a couple of inches down, draw an oval about 2” wide & 1” deep. (see diagram below). Have students copy you. Remind them to draw lightly. You may need to walk around & help.
- About 1 inch from the bottom of the paper, draw a slightly curved line so that there are about 3 inches on either side. Have students copy you.
- On each side of the oval, draw a vertical line that flares out & becomes vertical again until it meets the bottom line. Have students copy you.
- Draw a curved contour line under the oval (see diagram) & make a ‘label’ (optional) that mimics the curves on top & bottom, vertical lines on sides. Draw a vertical ‘highlight’ to show reflection on 1 side. Have students copy you. If you aren’t comfortable drawing, you can point out each step as it appears on figure 1:
 (figure 1)
- Show them figure 2:
 (figure 2)
You demonstate drawing the lines from this step first, then have them draw very light contour lines as shown to divide the bottle into 4 sections. There is no need to number each section.
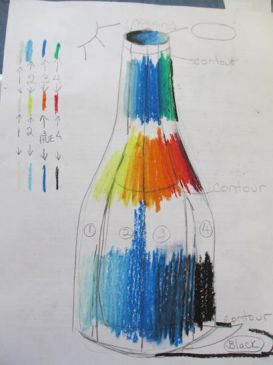
- Explain using figure 3:
 (figure 3)
how each color scheme shown on the left margin is chosen so that as it’s applied & blends with its neighbor, it simulates a hue going from tint-hue-shade with a gradual gradation with no ‘stripes’. This requires each section to blend seamlessly. Oil pastel is perfect since it softens & blends with gentle rubbing.
- Model this by applying 1 of the color schemes shown. Figure 3 shows all 3 color schemes as they move from light to dark. Then using your finger blend each two colors into each other, so that there is a distinct color, a blend of the two and a distinct color again. Have them use their wet wipes to clean their finger between color combinations.
- Students can decide on 1 of 3 color schemes given & can pull those pastels. They may start on their own. Monitor their progress.
- Stop them to remind them to be sure to include a strong white edge where the light hits, & a strong dark edge along the bottle’s other side.
- If students are making stripes, they aren’t blending gradually enough & can add more tint/hue/shades where needed to even it out.
- Draw a cast shadow, being sure it touches the bottom curve of the bottle. This is filled in completely black.
- Draw a horizontal line ‘behind’ the bottle to suggest a table with a wall.
- Turn the pastel on its side (label should be removed) to fill in each surface, choose 2 contrasting colors (e.g., if bottle is warm, choose cool colors). Any colors but the bottle color is fine. Students may create patterns or other decoration for their wall if time permits.
Notes for Educators
21st Century Thinking Skills
Observing, Making Connections, Visualizing, Sequencing, Contrasting, Finding Evidence, Determining Point of View, Cause and Effect, Evaluating.
WA State Learning Standards
(VA:Cr1.1.4) a. Brainstorm multiple approaches to a creative art or design problem. When drawing the sides of the bottle & choosing the color scheme.
(VA:Cr2.1.4) a. Explore and invent art-making techniques and approaches. When using contour drawing and the tint/shade techniques to show depth.
(VA:Cr3.1.4) a. Revise artwork in progress on the basis of insights gained through peer discussion. This is achieved as you make comments on what students have chosen to depict in their skies, and building details.
(VA:Re9.1.4) a. Apply one set of criteria to evaluate more than one work of art. This happens when all students fulfill the learning objectives.
(VA:Cn11.1.4) a. Through observation, infer information about time, place, and culture in which a work of art was created. This happens if artists’ still-lifes are shown. eg. Wine bottles were commonly used in French culture, so appeared in French artists’ work.
(VA:Re7.1.5) a. Compare one's own interpretation of a work of art with the interpretation of others. This happens when all students’ work is displayed.
Arts Integration Opportunities
Vocabulary words can be included in spelling lists.
Science: the characteristics and behavior of light can be elaborated upon.
Please note: These lesson plans are intended for non-profit use only. Use of these plans for commercial purposes should give attribution to the Issaquah Schools Foundation and be accompanied by a nominal donation at www.isfdn.org/donate. Thank you.
Donate Now