loading Skip to Main Content

Sculptured Mountains

Using plaster gauze strips, students will make an armature to create a 3-dimensional mountain sculpture. Recommended for 5th Graders.

Elements of Art

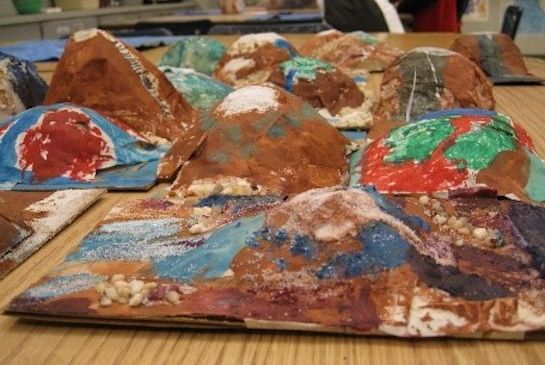
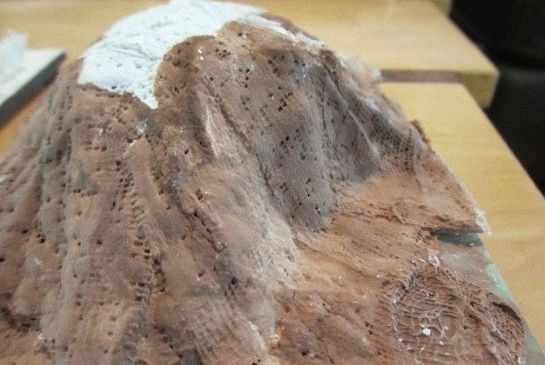
Form: a 3-dimensional figure that exists in space. This project features organic form, in which the form is irregular and asymmetrical.
Space:  can be positive: the space an object occupies or negative: the space around the object. It also refers to an illusion of depth on a 2-dimensional (height and width) surface, so that the scene appears to go back into space and real depth as used in sculpture.
Texture: actual texture is how something feels when touched; visual texture (also called simulated texture) is how something appears to feel.

Principles of Design

Asymmetrical Balance: a form in which neither side is the same as the other but they still make a whole, with equally important sides.

Additional Vocabulary

3-dimensional: dimensions are a way of taking up space. All forms have height, width and depth.
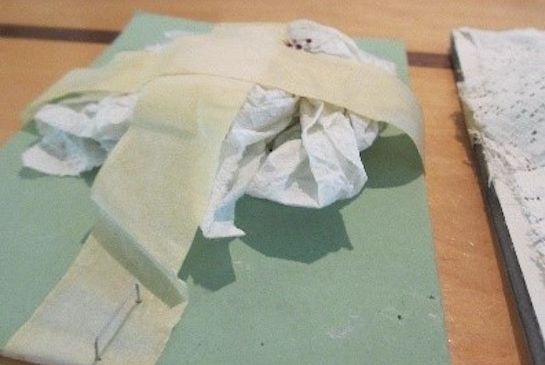
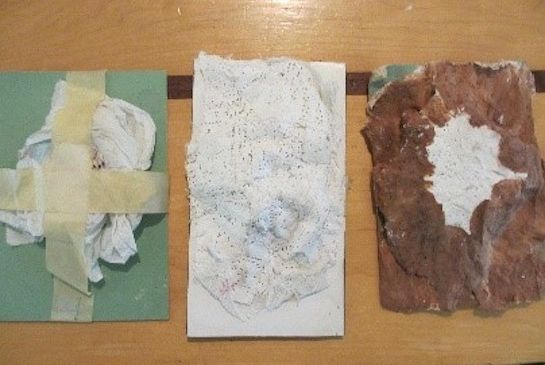
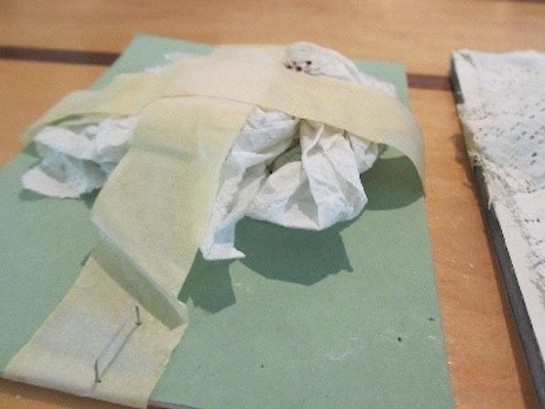
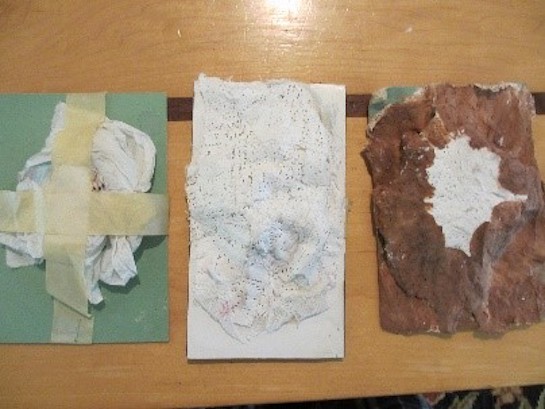
Armature: a framework on which the sculpture is molded.
Base: the bottom of the sculpture which anchors it in space.
Craftsmanship: following directions and using care and neatness with tools.
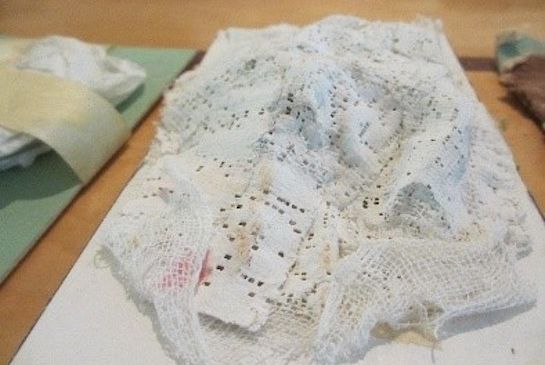
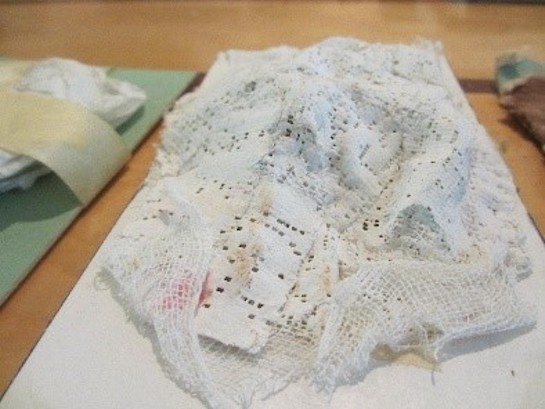
Plaster gauze: open weave fabric infused with dry plaster. Useful for making molds.
Sculptor: someone who make sculpture.
Sculpture: a three-dimensional work of art.

Materials & Supplies

  • CREATING MOUNTAIN
    • 6” x 6” Carboard pieces/ 1 per student
    • Paper towels or newsprint/ 1 per student    
    • Masking tape
    • Dry plaster gauze cut into 3x4” strips (2 180” rolls yield 10 strips/student, 4  rolls yield 20 strips/student)
    • Side and aerial images of mountains (with and without vegetation)
    • Tempera paint in “natural” colors: white, brown, green, blue, yellow (red is optional)
  • PAINTING MOUNTAIN
    • Med-large paint brushes
    • Tiny pebbles, moss, blue yarn, sand
    • Paper bowls for water
    • Side and aerial images of mountains (with and without vegetation)


Advanced Preparation

  • Cut the plaster gauze into strips, at least 10 per student, but more strips (if time/budget allows) make the mountain sturdier.
  • Tear paper towels.
  • Find images of mountains.
  • Prepare an unpainted mountain that will be dry enough to paint during instructions.

Tips & Tricks

  • This is a 2-part lesson: the sculpting and the painting of the dried form. You will explain both parts but return later to pull students out of the class to do the painting.
  • The plaster gauze must be kept dry until ready to use. Don’t let the strips get too close to water cups in case of splashing or spillage.
  • Once the gauze is wet it must be used immediately as it’s already starting to harden. Be sure it’s completely soaked and laid flat, with no air pockets. Practice this at home first if needed.

Discussion Points

  • Post all art vocabulary on the board and quickly review it. Have students repeat the words aloud. Use the words throughout the lesson.
  • Briefly explain the 3-dimensions by looking at a 3-dimensional object in the room and note how it takes up space in dimensions of width, height and depth (length).
  • When looking at the mountain images ask for evidence of asymmetry, organic form, and where/why the colors change.

Reflection Point (Assessment of Learning Objectives)

Students will:

  • make an armature to create a 3-dimensional sculpture
  • Use art vocabulary
  • Work with sculptural materials
  • Use good craftsmanship

Instructions for Lesson

SCULPTING:

  1. Students write their name on the underneath of the cardboard base.
  2. Demonstrate making the armature: using masking tape, crisscross it over a loosely balled up piece of paper towel.
  3. Have students do the same.
  4. Demonstrate dipping a strip of gauze into the paper bowl and gently pulling it through their fingers to get rid of the excess water. Remind them not to let the gauze fold once it’s wet: it will stick together.
    a.) Quickly press it flat along the tape with no air pockets.
    b.) Repeat this, overlapping each strip slightly over the last so it adheres.
    c.) Continue until no gaps show, but don’t waste strips by piling them too thickly.
  5. Have students do the same. Remind students not to ‘over-water’. Place finished ones to dry. They will be painted later.
        

    PAINTING:
  6. Once the sculptures are dry, show students the images of mountains again to refresh their memory of colors and textures.
  7. Gather students around a station equipped with tempera paint and brushes. Demonstrate painting your pre-made model.
    a) remind them of the colors they noticed on the images of mountains. 
    b) Students can make choices about colors used, as long as they reflect nature. (no tie-dye disasters!) 
    c) Mountains can have snow on top, can be all brown or with green vegetation. 
    d) The base can be part of the earth, or painted blue, which makes the mountain into an island. 
    e) Mix yellow with brown to make a sandy shore, or finish by painting glue around the base and sprinkling sand. 
    f) Blue yarn can create rivers, waterfall. 
    g) Red paint can simulate lava, but use this only if needed. Students tend to go overboard with this detail.
  8. Once they are all painted and dry, they can be set up side by side or stapled to the wall as a mountain range.

References and Attributions

Lesson written by Cynthia Moring.

Notes for Educators

21st Century Thinking Skills
Observing, Making Connections, Visualizing, Sequencing, Determining Main Idea, Problem Solving, Determining Point of view, Decision Making, Evaluating

WA State Learning Standards
(VA:Cr2.1.5) a. Experiment and develop skills in multiple art-making techniques and approaches through practice.
(VA:Cr2.2.5) a. Demonstrate quality craftsmanship through care for and use of materials, tools, and equipment. 
(VA:Cr3.1.5) a. Create artist statements using art vocabulary to describe personal choices in art-making. This happens when students use the vocabulary of the lesson.
(VA:Re7.1.5) a. Compare one's own interpretation of a work of art with the interpretation of others. 
(VA:Re8.1.5) a. Interpret art by analyzing characteristics of form and structure, contextual information, subject matter, visual elements, and use of media to identify ideas and mood conveyed. This happens if students reflect on their work and the work of their peers.
(VA:Cn10.1.5) a. Apply formal and conceptual vocabularies of art and design to view surroundings in new ways through art-making.

Arts Integration Opportunities
Science: this lesson can be part of a geology lesson. If the armature includes a small plastic pill container centered at the ‘mountain peak’, it can hold baking soda and vinegar, to simulate volcanic eruptions.
Procedural Writing: Students describe how to build this sculpture, step-by-step.
Creative Writing: Students use the mountain range as a backdrop for a story.
Spelling: art vocabulary words can be included in spelling lists.
Music: plaster gauze over light bulbs will make maracas. Simply smack the finished sculpture hard enough to shatter the bulbs inside.
Group project: much larger mountains, or other objects can be made for stage sets. 

Please note:  These lesson plans are intended for non-profit use only. Use of these plans for commercial purposes should give attribution to the Issaquah Schools Foundation and be accompanied by a nominal donation at www.isfdn.org/donate. Thank you.

Donate Now

Artistic Support Reference Materials

Loading...
Loading

Fueling Success for Every Student, Every School