loading Skip to Main Content

Clay Pinch Pot Monsters

Students will start with a clay pinch pot technique to make a big monster's mouth then add on shapes to create their own 3D monster sculpture. Recommended for 5th Graders.

Elements of Art

Forma three-dimensional object that has height, length, width, and depth.
Shape: A flat area, such as a circle or a square, that has clear boundaries.
Texture: Formed by pattern or repetition. The way a surface looks and feels, such as smooth, rough, or bumpy. 

Vocabulary Words

3-Dimensional: Having height, width, and thickness. Forms are three-dimensional.
Bisqueware: Clay that has been fired once and is unglazed.
Ceramics: The art of making objects from clay and hardening them with fire.
Clay: A fine-grained, firm material that is plastic (sculpt-able) when wet and hardens under extreme heat, consisting primarily of water, silica (sand) and finely grained rock. It is widely used in making bricks, tiles, and pottery.
Coil: A rope-like shape that has been rolled from clay or other such material.
Firing: Heating clay to the required temperature to harden.
Glaze: A thin, transparent, glassy coating on ceramics.
Greenware: Unfired clay.
Kiln: The furnace in which clay is fired to harden it.
Pinch pot: A way of shaping a ball of clay by pinching, pulling, and pressing it with the hands.
Slab: A method of making pottery in which a flat piece of clay is cut into shapes which are joined together to form an object.
Slump: The act of placing a clay slab into a form then dropping form containing the slab from a few inches above a flat surface using gravity to make the slab take on the shape of the form.

Materials & Supplies

  • Low-fire white clay (cone 04-06)
  • Clay tools: basic texture tools, scratching tools (metal pick or toothpick), fishing line cutters
  • Clay slip (optional)
  • Bin or bucket for cleanup (clay should not go down the drain)
  • Vinegar
  • Sponges – dampened with water
  • Clay/glaze mats
  • Various low fire glazes (cone 04-06) 
  • Glaze brushes

Advanced Preparation

Precut chunks of clay about 3 x 3 x 1 inch. One block per student. The correct size gives you a ball that fits in the palm of the students’ hand. Cut lots of smaller chunks to be formed into eyes, arms, legs, and other appendages. Precut pieces can be stored for up to 2 weeks in plastic bags or boxes with damp paper towels. 
Day of Lesson: Pour out small dishes of vinegar for slip & scoring of pieces to the main pinch pot figure. 
Use trays or containers to divide up 2-3 basic texture tools like shells, sticks, scoring (scratching) tools, and fishing line cutters.

Tips & Tricks

The largest issue with this build is making sure students understand slip & score and attach pieces appropriately. 

  1. SLIP & SCORE (also known as scratch & attach). Demonstrate how to SLIP & SCORE. Show students how to slip using vinegar and score using sharp tools like a tooth pick to make a crosshatch pattern. Smoosh the two pieces to be joined and turn them gently back and forth 2-3 cm to adhere appendages to the main body. If appendages are not securely attached they will fall off during firing and they may not make it back onto the clay piece. 
  2. PINKY RULE. Instruct students that appendages: Horns, arms, legs, tails, winges must be larger than the pinky finger in diameter or they will be shrink too much during firing, become brittle and possibly break off.
  3. HEIGHT GUIDELINES. In order to avoid breakage (and to make loading the kiln easier), appendages should not be taller or longer than three inches from the clay body. 
  4. STABILTY. Instruct students to be sure that the monster can stand up. Are the feet flat? Are the feet and tails balanced so that the clay body can stand on its own? 
  5. SAY YES! Yes, they can BE CREATIVE. Yes, they can make animals instead of monsters. Yes, they can make them cute. Just include pinch pot, coil, formed pieces, slip & core, demonstrate balance of a free-standing build. Yes, the mouth can be mostly closed (allowing for air to escape) or turned upside down if they can still combine other complex aspects of the build. Use your judgment to ensure they can meet the learning objectives. 

Discussion Points

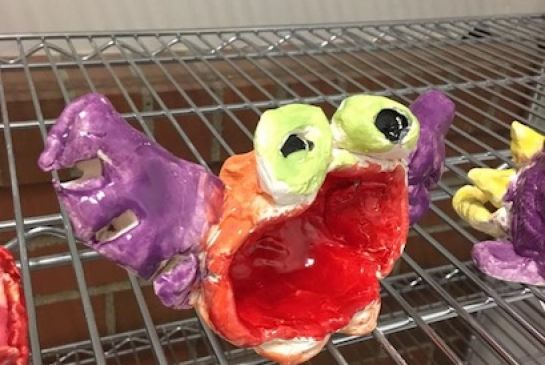
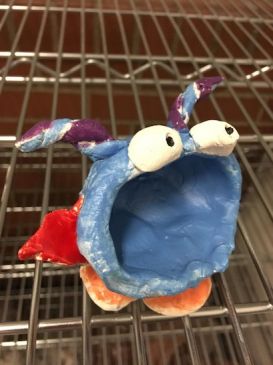
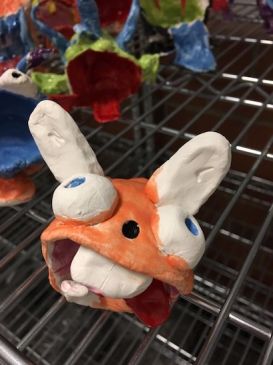
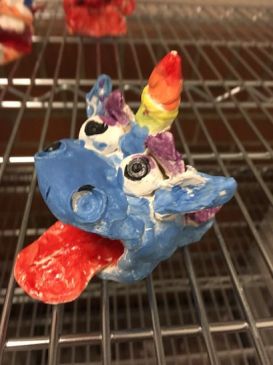
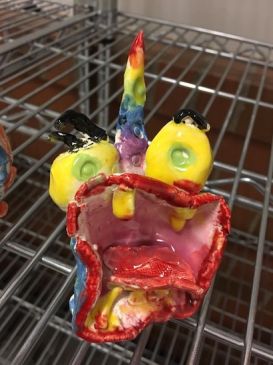
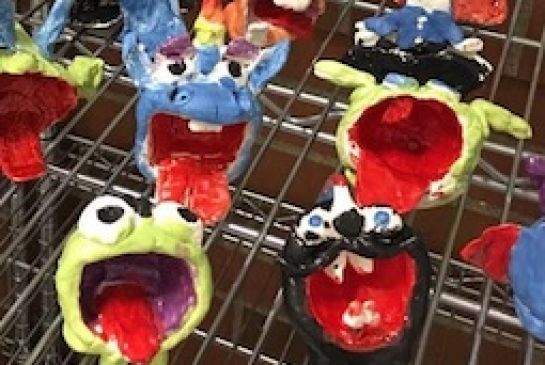
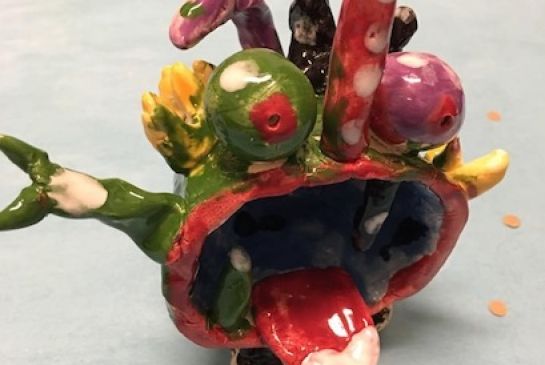
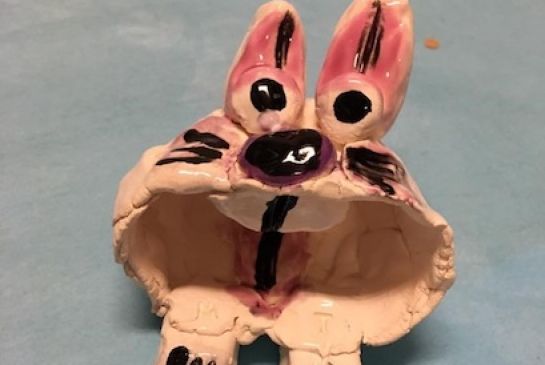
Provide examples of clay sculpture which demonstrates a variety of facial expressions, texture, realism, details in clay sculpture, and step by step pictures of creating a pinch pot. Or present students with some examples of how clay sculpture can express ideas, thoughts, or feelings in the way that it is formed and presented. 

Reflection Point (Assessment of Learning Objectives)

  1. Can students verbally recall the various hand building techniques they have learned? (pinch pot, slab, coil, slip & score, slump/drape) 
  2. Can students verbally recall basic terms for clay bodies during the process? (greenware, bisqueware, ceramic) 
  3. Can students build a clay body monster that it balanced and built well enough to stand on its own without pieces falling off in the process?

Instructions for Lesson

Part One: FIRST CLASS. Slip and Score Demonstration (using two pieces of scrap clay) 

  1. Score the surface of each piece to be joined at the point of connection. Students can try it with scrap as well. 
  2. Apply vinegar to the roughened surfaces (or a liquid clay slip).
  3. Push two pieces together gently and twist back and forth about 2-3 cm to create a bond between the two pieces.
  4. Review size guidelines of the pieces to be stuck onto the main clay pinch pot body. 

Part Two: Making a Pinch Pot. A place to begin.

  1. Wake the clay by throwing onto the tabletop or other clean surface.
  2. Roll into a firm, compact ball. Clay ball should be about the size of your fist.
  3. Open the pot: Hold the ball of clay firmly in one hand. Use your thumb of your other hand to push down, creating an opening in the center of the ball. The opening should end about a half to a quarter of an inch from the other side of the ball; be careful not to push your thumb all the way through. If the hole does end up going all the way through, simply compress the ball back together and begin again.
  4. Pinching the pot: Using thumb, push against your fingers in a pinching motion. This will thin the clay out to create the pot’s floor and walls. Use a series of small pinches to work the clay upwards more than outwards as it thins. Thumb stays in the center of the pot. Fingers are used on the outside of the pot. Work to make the walls and bottom as uniform in thickness as possible. This will help keep the pot from cracking as it dries or during the firing.

Part Three: Students Can Get Creative!!

  • Demonstrate how to use the fishing line (or wire clay cutter) to slice a sphere in half for eyeballs. 
  • Demonstrate rolling a fat coil for a leg or tail or horns. 
  • Thin coils can be eyelids, eyebrows, mustaches, hair, teeth, etc. 
  • Slabs can be cut in the shapes of wings, spines, etc.
  • Students have the best imaginations if left to their own minds to create. 

Part Four: Drying for 14 days and Firing

  • Move all greenware to a space to allow for 14 days of drying. 
  • Bisque fire at appropriate temperature – cone 06.
  • Schedule time for students to glaze the bisqueware at least 48 hours after your bisque fire date.

Part Five: SECOND CLASS. Applying Glaze 

  1. Arrive 20-30 mins before your class to shake and decant all glazes to be used. 
  2. Give students lesser amounts of several colors of glaze in paint pots specifically used for glaze. 
  3. Decant more glaze as needed. Pour back unused glazes.
  4. Instruct students to apply 2-3 coats of glaze for good coverage.
  5. Instruct students to keep surfaces that will touch the kiln shelves free of glaze. DO NOT GLAZE the bottoms of feet or tails. If pieces have popped off, instruct students to refrain from glazing surfaces that will need to be glued back together. 
  6. Instruct student to not mix glazes and expect that they will make a desired color. For example: red glaze + blue glaze will not make purple glaze when fired due to the chemical make-up glazes. 
  7. Docent should wipe away excess glaze from the feet and tails of clay bodies before they go back into the kiln room for firing.
  8. Move glazed clay bodies back to the kiln room to await firing.

Clean-up Tips: Clay and glaze will clog drains. Use buckets to rinse and capture most of the particulate in order to avoid this. Dump the buckets with collected material into a grassy area outdoors.

References and Attributions

Lesson written by Angie Warren.

Notes for Educators

21st Century Thinking Skills
Persisting, creating, innovation, Taking responsible risks, reflecting, observing, making connections, visualizing, cause & effect, decision making, evaluating.

WA State Learning Standards
(VA:Cr1.1.1) a. Engage collaboratively in exploration and imaginative play with materials. This happens when students use tools to make textures in clay.
(VA:Cr1.2.1) a. Use observation and investigation in preparation for making a work of art. This happens when watching demonstrations and viewing examples.
(VA:Cr2.1.1) a. Explore uses of materials and tools to create works of art or design. This happens when using clay tools.
(VA:Cr2.2.1) a. Demonstrate safe and proper procedures for using materials, tools, and equipment while making art. 
(VA:Cr3.1.1) a. Use art vocabulary to describe choices while creating art. This happens when using vocabulary as defined in this lesson.
(VA:Re.7.2.1) a. Compare images that represent the same subject. this happens when finished work is displayed.

Art Integration Opportunities 
Writing: procedural writing, vocabulary words can be added to spelling lists.
Natural Science: if studying certain topics, the templates can reflect this.

Please note:  These lesson plans are intended for non-profit use only. Use of these plans for commercial purposes should give attribution to the Issaquah Schools Foundation and be accompanied by a nominal donation at www.isfdn.org/donate. Thank you.

Donate Now

Artistic Support Reference Materials

Loading...
Loading

Fueling Success for Every Student, Every School